

Network Service
VPC
Basic Concepts
VPC: A private network space in a region. It isolates and carries cloud hosts, network interfaces, routers, and related resources.
Subnet: An IP address range inside a VPC. Cloud hosts and network interfaces connect to subnets to obtain private IP addresses.
CIDR: The address range format used for a subnet, for example
192.168.2.0/24.Gateway IP: The default gateway address of a subnet, usually assigned by the platform based on the subnet range.
A VPC is a private network in a region. It carries cloud hosts, network interfaces, routers, and related resources. Go to Network Service > VPC, select a region, and view the VPC list. The table displays ID / Name, Description, Status, CIDR, Created At, and Action.
Create a Network
Creating a VPC can also create the initial subnet. The parameters are described below:
| Configuration Area | Parameter | Description |
|---|---|---|
| Network Information | Name | The VPC name. It must start with a letter, can be up to 128 characters, and can contain letters, digits, and supported symbols. |
| Description | The VPC description. The maximum length is 200 characters. | |
| Subnet Information | Subnet Name | The initial subnet name. It follows the same naming rules as the VPC name. |
| IP Version | The subnet IP protocol version. The current page defaults to IPv4. | |
| CIDR | The subnet address range, for example 192.168.2.0/24. |
To create a network:
- On the VPC page, click Create VPC.
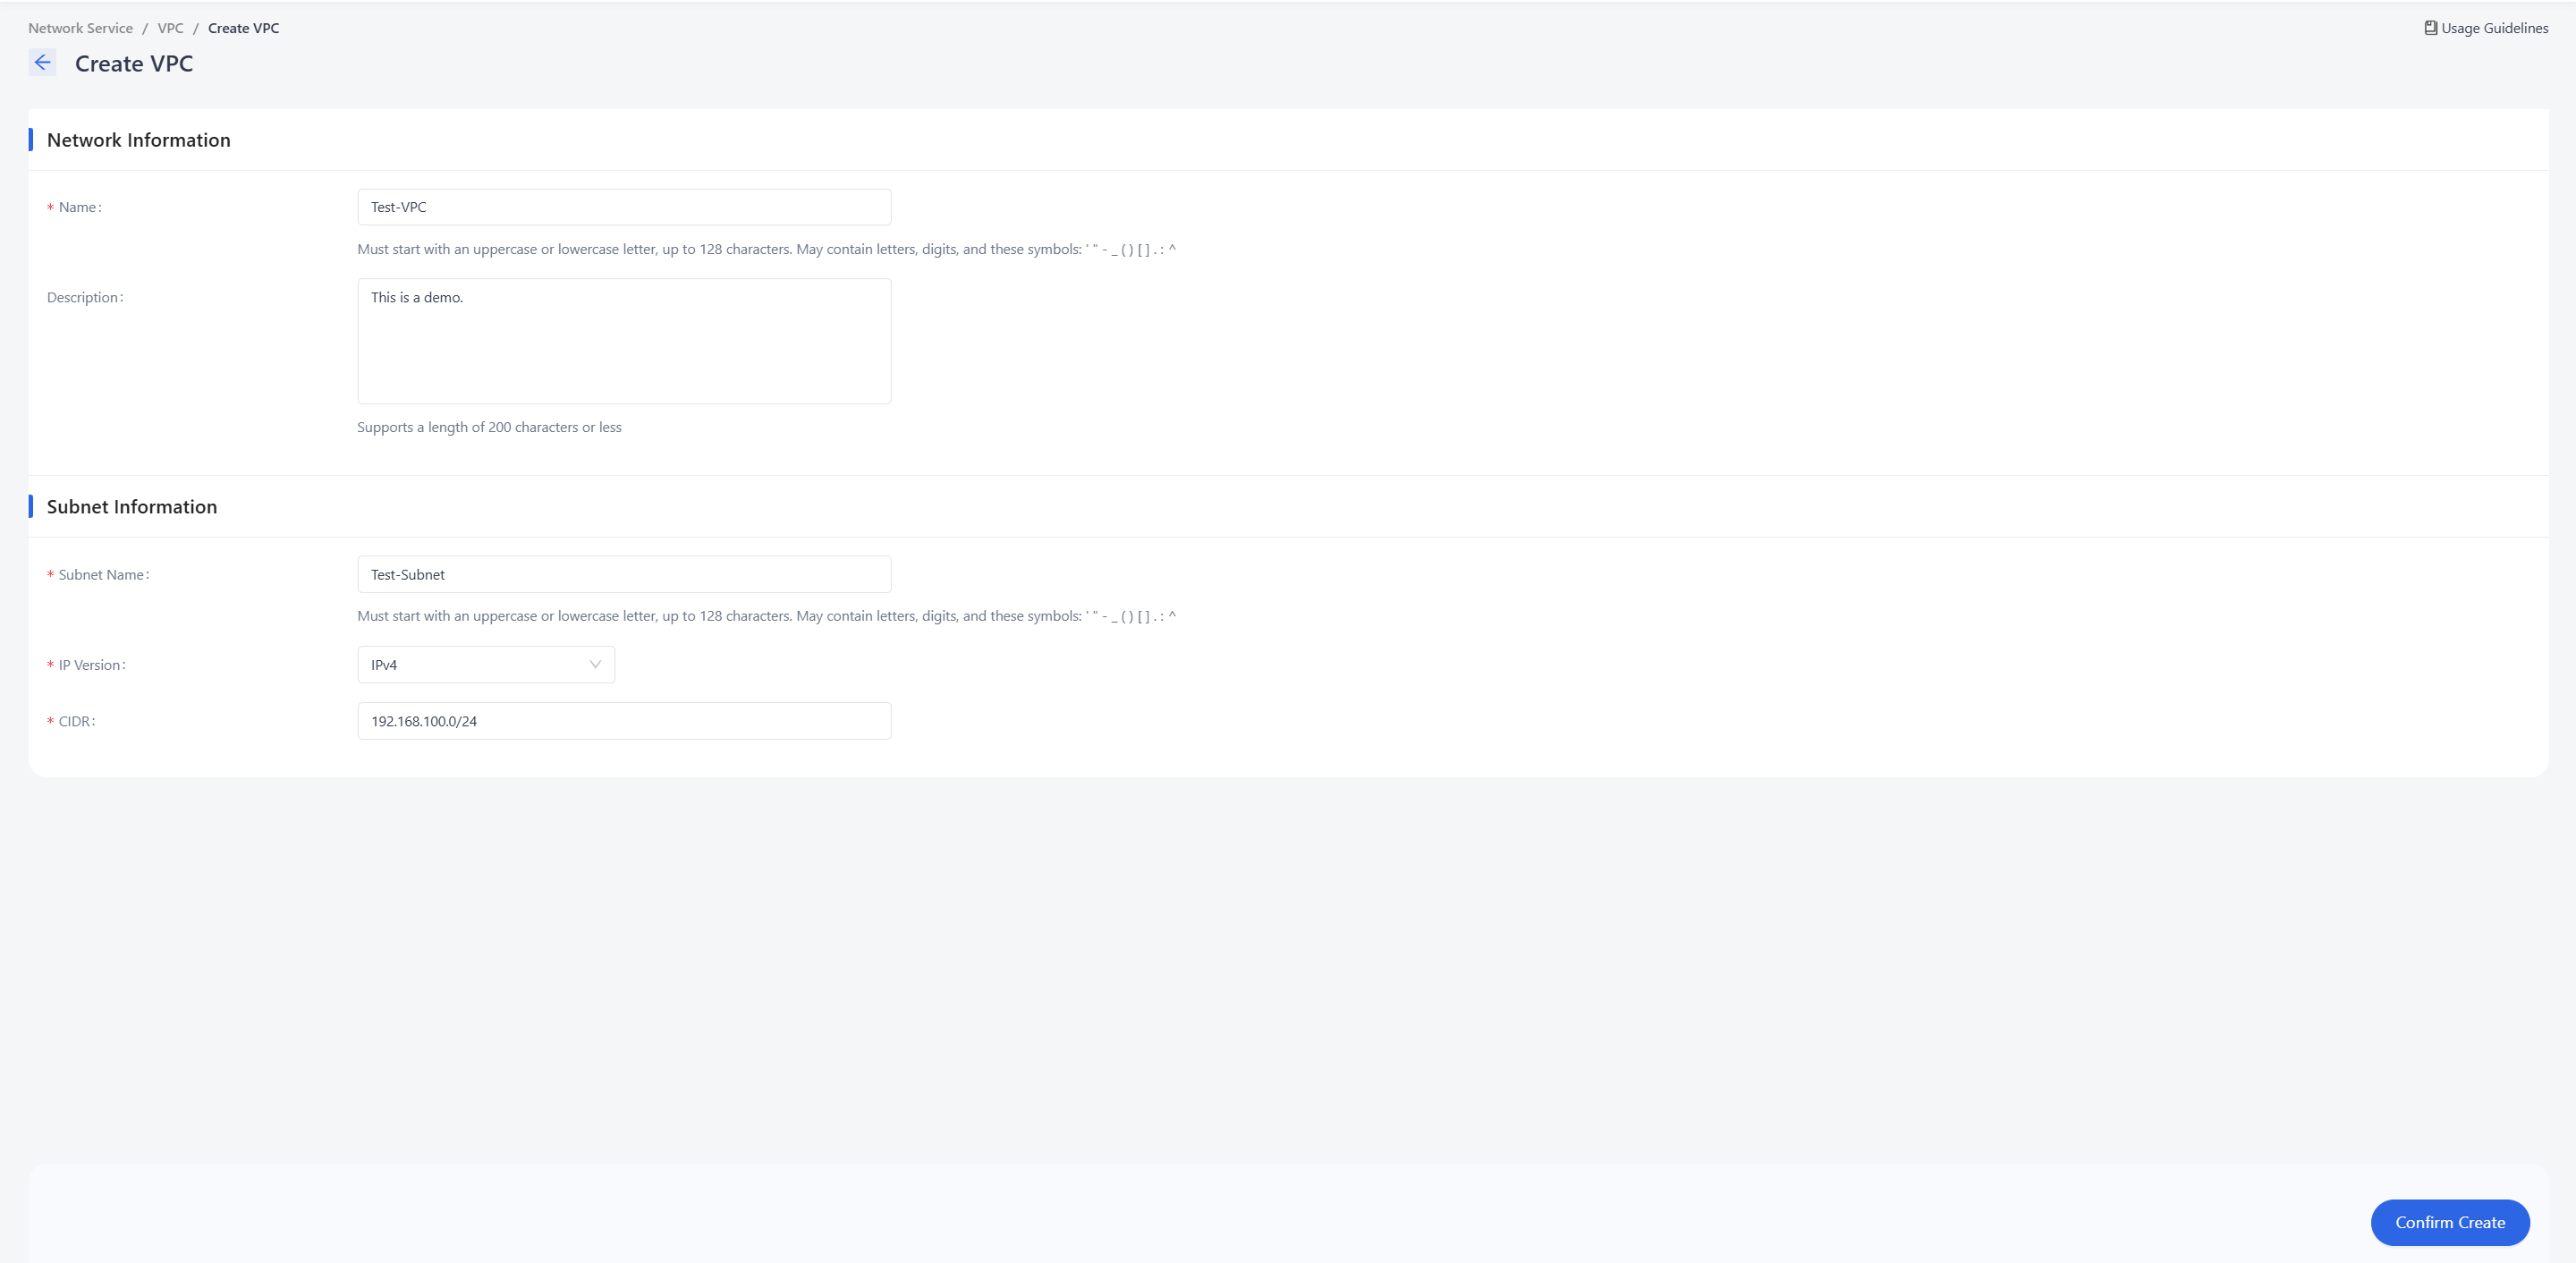
In Network Information, enter Name and Description.
In Subnet Information, enter Subnet Name.
Select IP Version.
Enter CIDR.
Click Confirm Create.
Return to the VPC list and confirm that the status is Active.
Create a Subnet
A subnet is the address range that actually allocates private IP addresses inside a VPC. The parameters are described below:
| Configuration Area | Parameter | Description |
|---|---|---|
| Subnet Information | Subnet Name | The subnet name, used to identify the subnet in instance, network interface, and router configuration. |
| IP Version | The subnet IP protocol version. The current page defaults to IPv4. | |
| CIDR | The subnet address range. It should fit the VPC plan and avoid conflicts with other subnets in the same VPC. |
To create a subnet:
In the VPC list, locate the target VPC.
In the row Action, click More > Create Subnet.
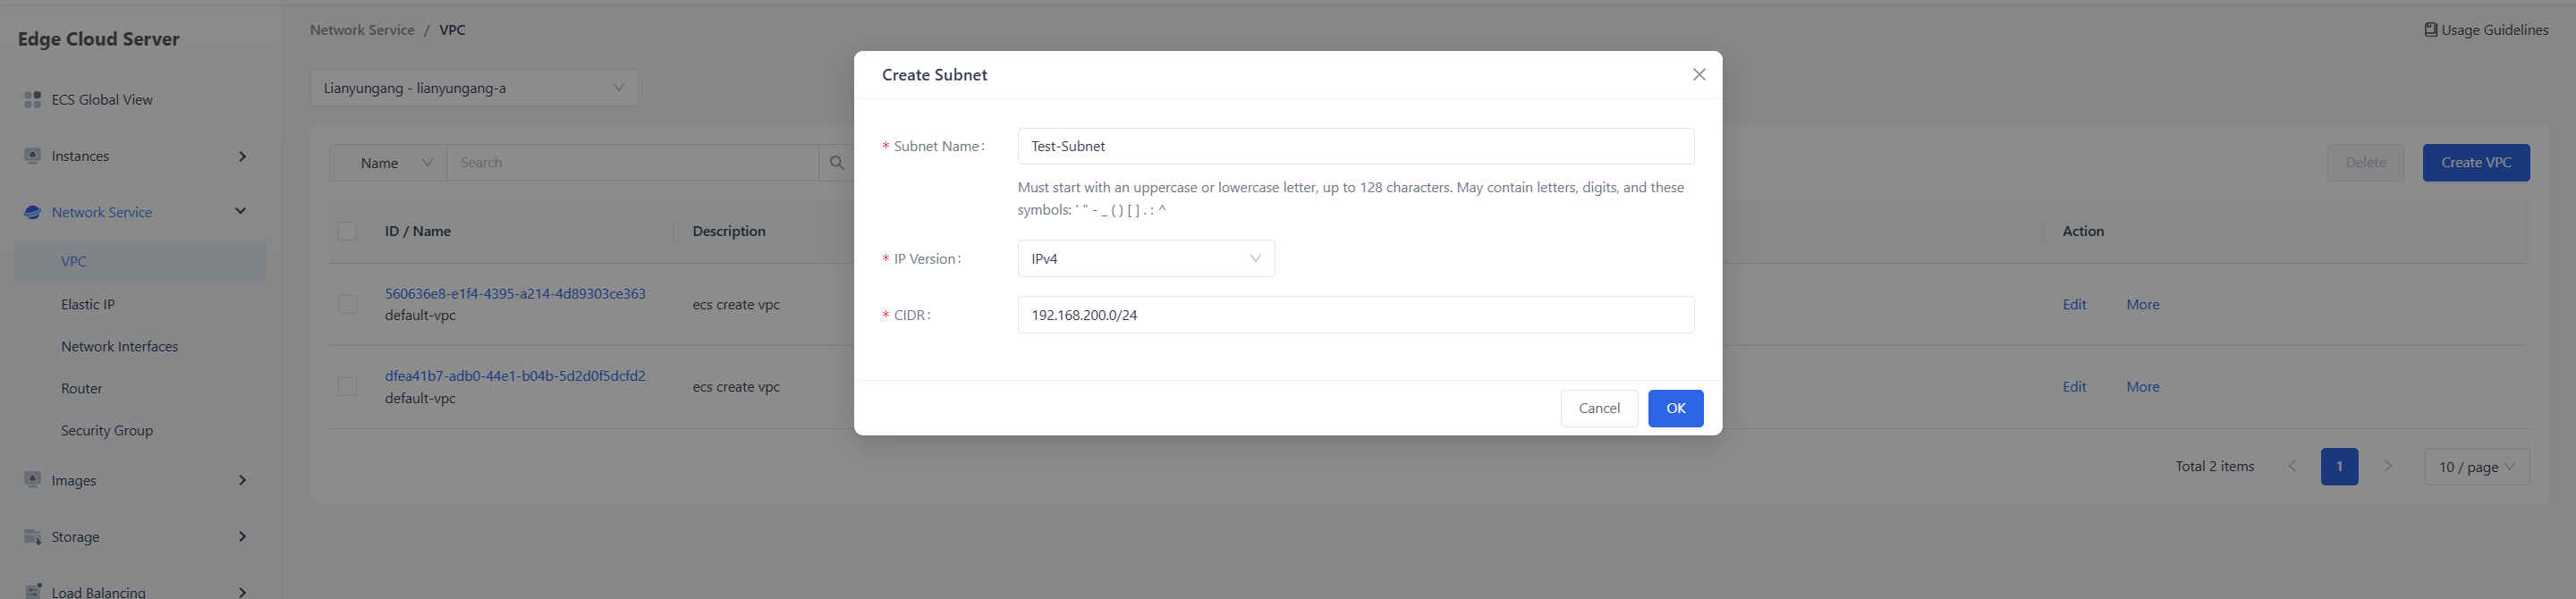
Enter Subnet Name.
Select IP Version.
Enter CIDR.
Click OK.
Open the VPC details page and confirm the subnet in the Subnet tab.
Delete a Subnet
In the VPC list, click the VPC ID to open details.
In the Subnet tab, locate the subnet.
Click Delete in the subnet row.
Review the confirmation dialog and click Confirm.
Delete a Network
In the VPC list, locate the target VPC.
Click More > Delete in the row, or select the VPC and click Delete in the toolbar.
Review the VPC information in the confirmation dialog.
Click Confirm.
Elastic IP
Basic Concepts
Elastic IP: A public IP address that can be allocated and released independently, and associated with a cloud host or network interface.
Bandwidth Billing: Billing based on the configured bandwidth limit. Higher bandwidth supports a higher public traffic peak.
Associated Resource: The cloud host or network interface currently bound to the EIP.
Renewal and Expiration Date: Subscription EIPs have an expiration date and should be renewed before expiration if still needed.
Elastic IPs provide public network access for instances or network interfaces. Go to Network Service > Elastic IP, select a region, and view the EIP list. The table displays ID / EIP, Description, Associated Instance, Associated Network Interface, Charge Mode, Status, Created At, Expire Date, and Action.
Allocate an Elastic IP
Allocating an EIP creates a new public address resource. The parameters are described below:
| Configuration Area | Parameter | Description |
|---|---|---|
| Allocate IP | Charge Mode | The EIP billing mode. The current page shows By Bandwidth. |
| Bandwidth | The public bandwidth limit in Mbps. Set it through the slider, stepper, or input field. | |
| Description | The EIP description. The maximum length is 200 characters. | |
| Renewal | Enable Auto-renewal | Enables automatic renewal, suitable for public addresses that need to be retained long term. |
| Purchase | Quantity | The number of EIPs to allocate. |
| Duration | The purchase duration. The page displays the discount, total price, and discount amount. |
To allocate an Elastic IP:
On the Elastic IP page, click Allocate IP.
In Charge Mode, select the billing mode.
In Bandwidth, set the bandwidth in Mbps.
Enter Description.
Select Enable Auto-renewal if needed.
Set Quantity and Duration.
Review the price and click Confirm Order.
Edit an Elastic IP
Editing an EIP updates editable attributes such as description or bandwidth settings allowed by the page.
In the Elastic IP list, locate the target EIP.
Click Edit in the row Action.
Modify the description, bandwidth, or other editable settings.
Click OK.
Return to the list and confirm that the configuration is updated.
Associate an Elastic IP
Associating an EIP binds the public address to a cloud host or network interface so that the target resource can be reached from the public network.
In the Elastic IP list, locate an available EIP.
In the row Action, select Associate.
Select the target cloud host or network interface.
Confirm the fixed IP, network, and MAC address information.
Click OK.
Disassociate an Elastic IP
Disassociating an EIP removes the binding between the public address and the resource, but does not release the EIP itself.
In the Elastic IP list, locate an associated EIP.
In the row Action, select Disassociate or Unbind.
Confirm the target object.
Click OK.
Return to the list and confirm that Associated Instance and Associated Network Interface are empty.
Delete an Elastic IP
Deleting an EIP releases the public address. Before deletion, make sure it is not associated with any instance or network interface.
In the Elastic IP list, select the target EIP.
Click Delete in the toolbar, or use the delete action in the row.
Review the EIP information in the confirmation dialog.
Click OK.
Renew an Elastic IP
Renewal extends the validity period of a subscription EIP and helps avoid service interruption caused by expiration.
In the Elastic IP list, locate the EIP to renew.
In the row Action, select Renew.
Select the renewal duration and auto-renewal option.
Click Confirm Order.
Network Interfaces
Basic Concepts
Network Interface: A virtual NIC in a VPC. It carries private IP, MAC address, security group, and binding information.
Primary and Secondary Interface: The default interface provides basic connectivity, while additional interfaces support multi-NIC and network isolation scenarios.
Attach Instance: Attaches the interface to a cloud host so that the host can use the private IP and security policies on the interface.
Associate EIP: Associates a public IP with the interface so that it can access or be accessed from the public network.
Network interfaces connect cloud hosts to a VPC and can be associated with Elastic IPs and security groups. Go to Network Service > Network Interfaces, select a region, and view the interface list. The table displays ID / Name, Bind Instance, Bind EIP, Status, Owned Network, IPv4 Address, IPv6 Address, Mac Address, Description, and Action.
Create a Network Interface
Creating a network interface requires a name, optional description, and owning VPC. The parameters are described below:
| Configuration Area | Parameter | Description |
|---|---|---|
| Basic Information | Name | The network interface name. It must start with a letter and can be up to 128 characters. |
| Description | The network interface description. The maximum length is 200 characters. | |
| Owned Network | VPC | The VPC that owns the interface. |
| Select Subnet | Subnet | The Subnet that owns the interface. The interface obtains a private IP address from the selected subnet |
To create a network interface:
- On the Network Interfaces page, click Create Network Interface.
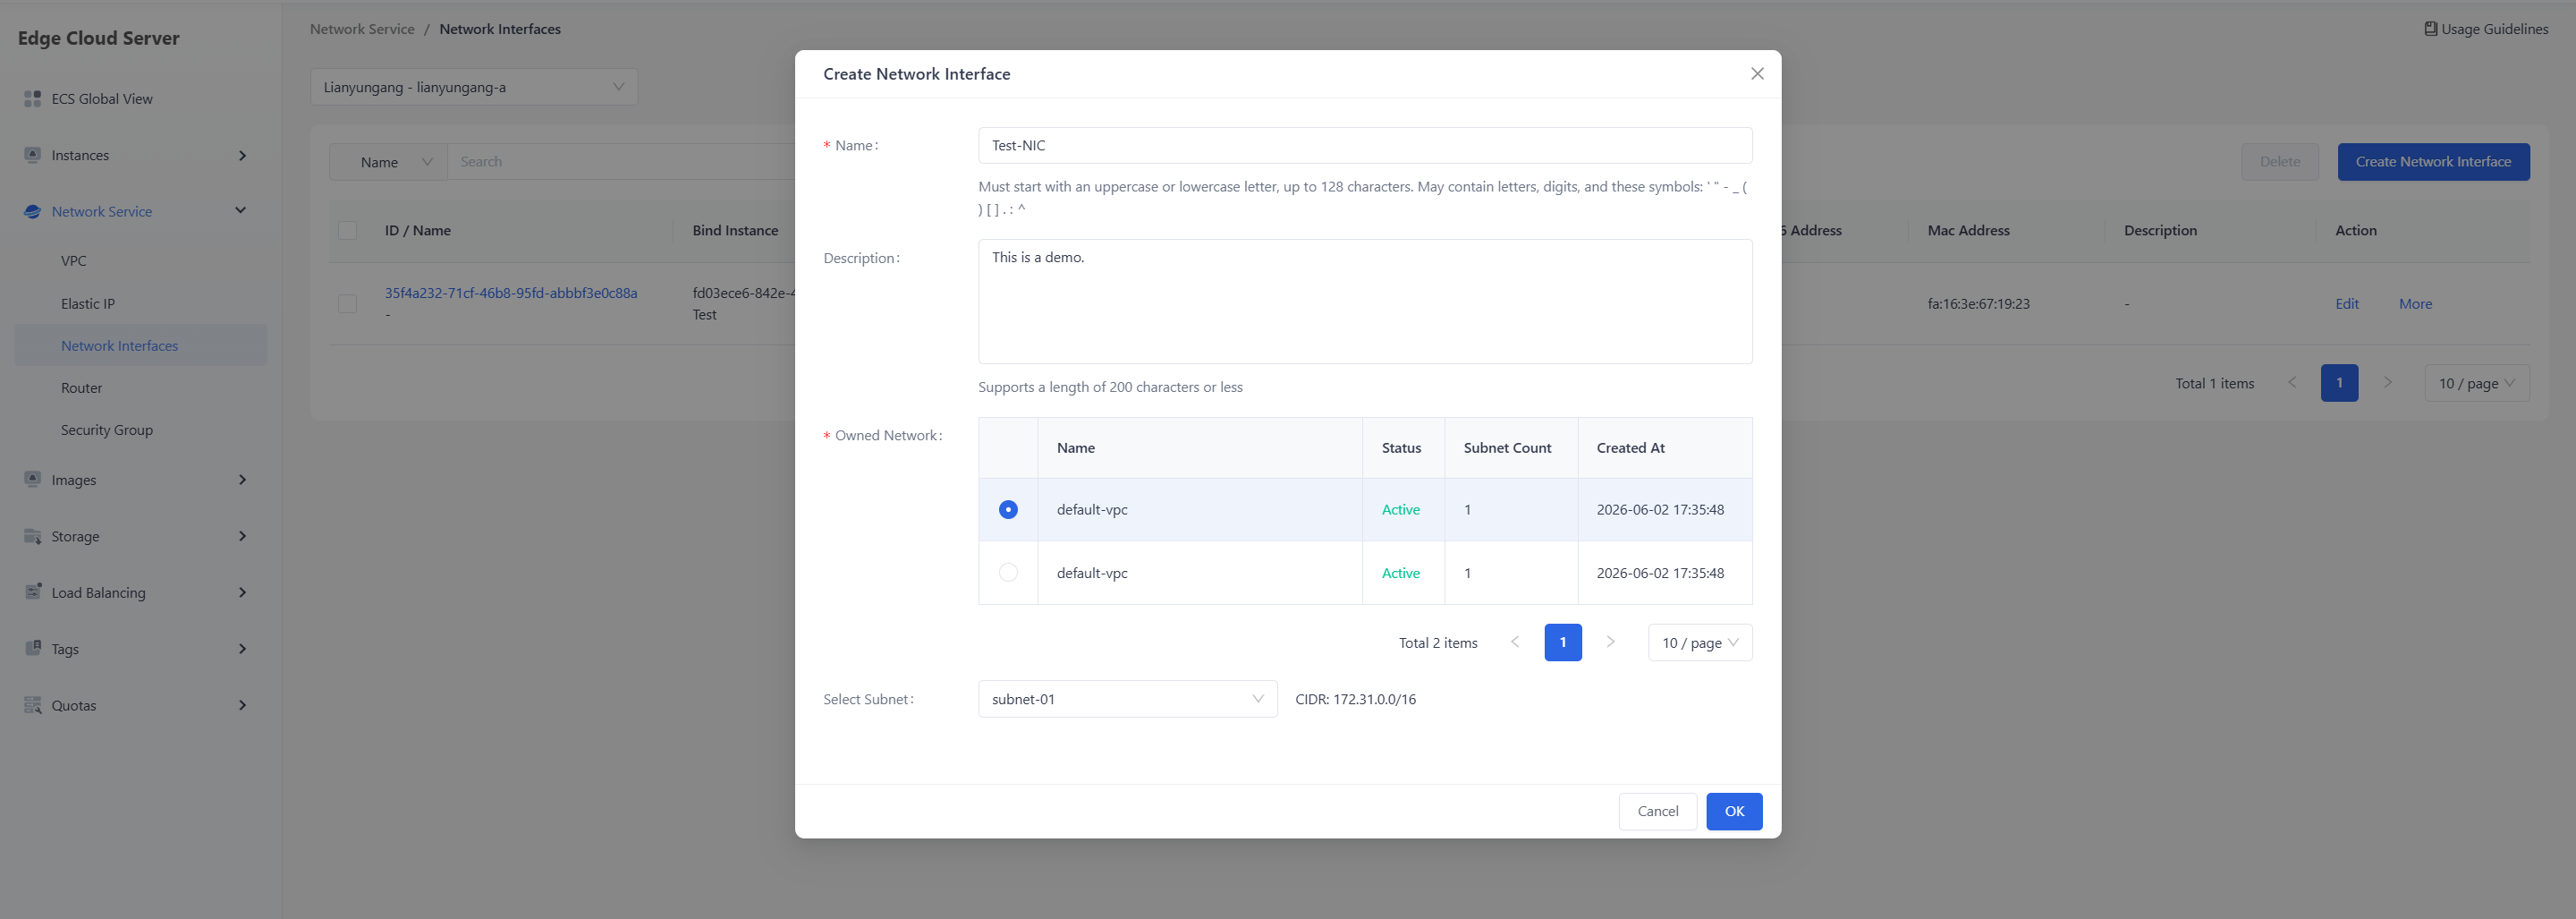
Enter Name.
Enter Description if needed.
In Owned Network, select the target VPC.
In Select Subnet drop-down list, select the target subnet.
Click OK.
Edit a Network Interface
Editing a network interface updates non-binding attributes such as name or description.
In the interface list, locate the target interface.
Click Edit in the row Action.
Modify the name, description, or other editable fields.
Click OK.
Attach an Instance
Attaching an instance mounts the network interface to a cloud host. After attachment, the host can use the private IP address and security group rules on the interface.
In the interface list, locate an interface that is not attached to an instance.
In the row Action, select Attach Instance.
Select the target cloud host.
Click OK.
Associate an Elastic IP
Associating an EIP provides public network access for the network interface.
In the interface list, locate the target interface.
In the row Action, select Associate EIP.
Select an available Elastic IP.
Confirm the association and click OK.
To remove the association, select Disassociate EIP in the same row and confirm the operation.
Manage Interface Security Groups
Interface security groups determine the inbound and outbound traffic allowed for the interface.
In the interface list, locate the target interface.
In the row Action, select Manage Security Group.
Review the associated security groups.
Add or remove security groups, then click OK.
Return to the list or the security group details page to confirm that rules apply as expected.
Delete a Network Interface
Deleting a network interface releases the interface and its private IP address. Before deletion, detach the cloud host and disassociate any Elastic IP.
In the interface list, select the target interface.
Click Delete in the toolbar, or use the delete action in the row.
Review the confirmation dialog.
Click OK.
Router
Basic Concepts
Router: A virtual routing resource used to connect VPC subnets and manage network forwarding.
Associate Subnet: Connects a VPC subnet to the router so that the subnet can forward traffic through it.
External Gateway: The router capability used to connect to an external network. When enabled, connected subnets can access the public network through the gateway.
External Fixed IP: The external network address used by the router gateway.
Routers connect VPC subnets and can enable or disable an external gateway. Go to Network Service > Router, select a region, and view the router list. The table displays ID / Name, Status, Open External Gateway, External Network, External Fixed IP, Created At, and Action.
Create a Router
Creating a router provides Layer 3 forwarding capability for VPC subnets. The parameters are described below:
| Configuration Area | Parameter | Description |
|---|---|---|
| Basic Information | Name | The router name, used to identify the resource in the router list and subnet association workflow. |
| Gateway | Open External Gateway | Determines whether to enable the public gateway. If enabled, select an external network and generate an external fixed IP. |
| Gateway | External Network | The external network connected by the public gateway. Required only when the external gateway is enabled. |
To create a router:
- On the Router page, click Create Router.
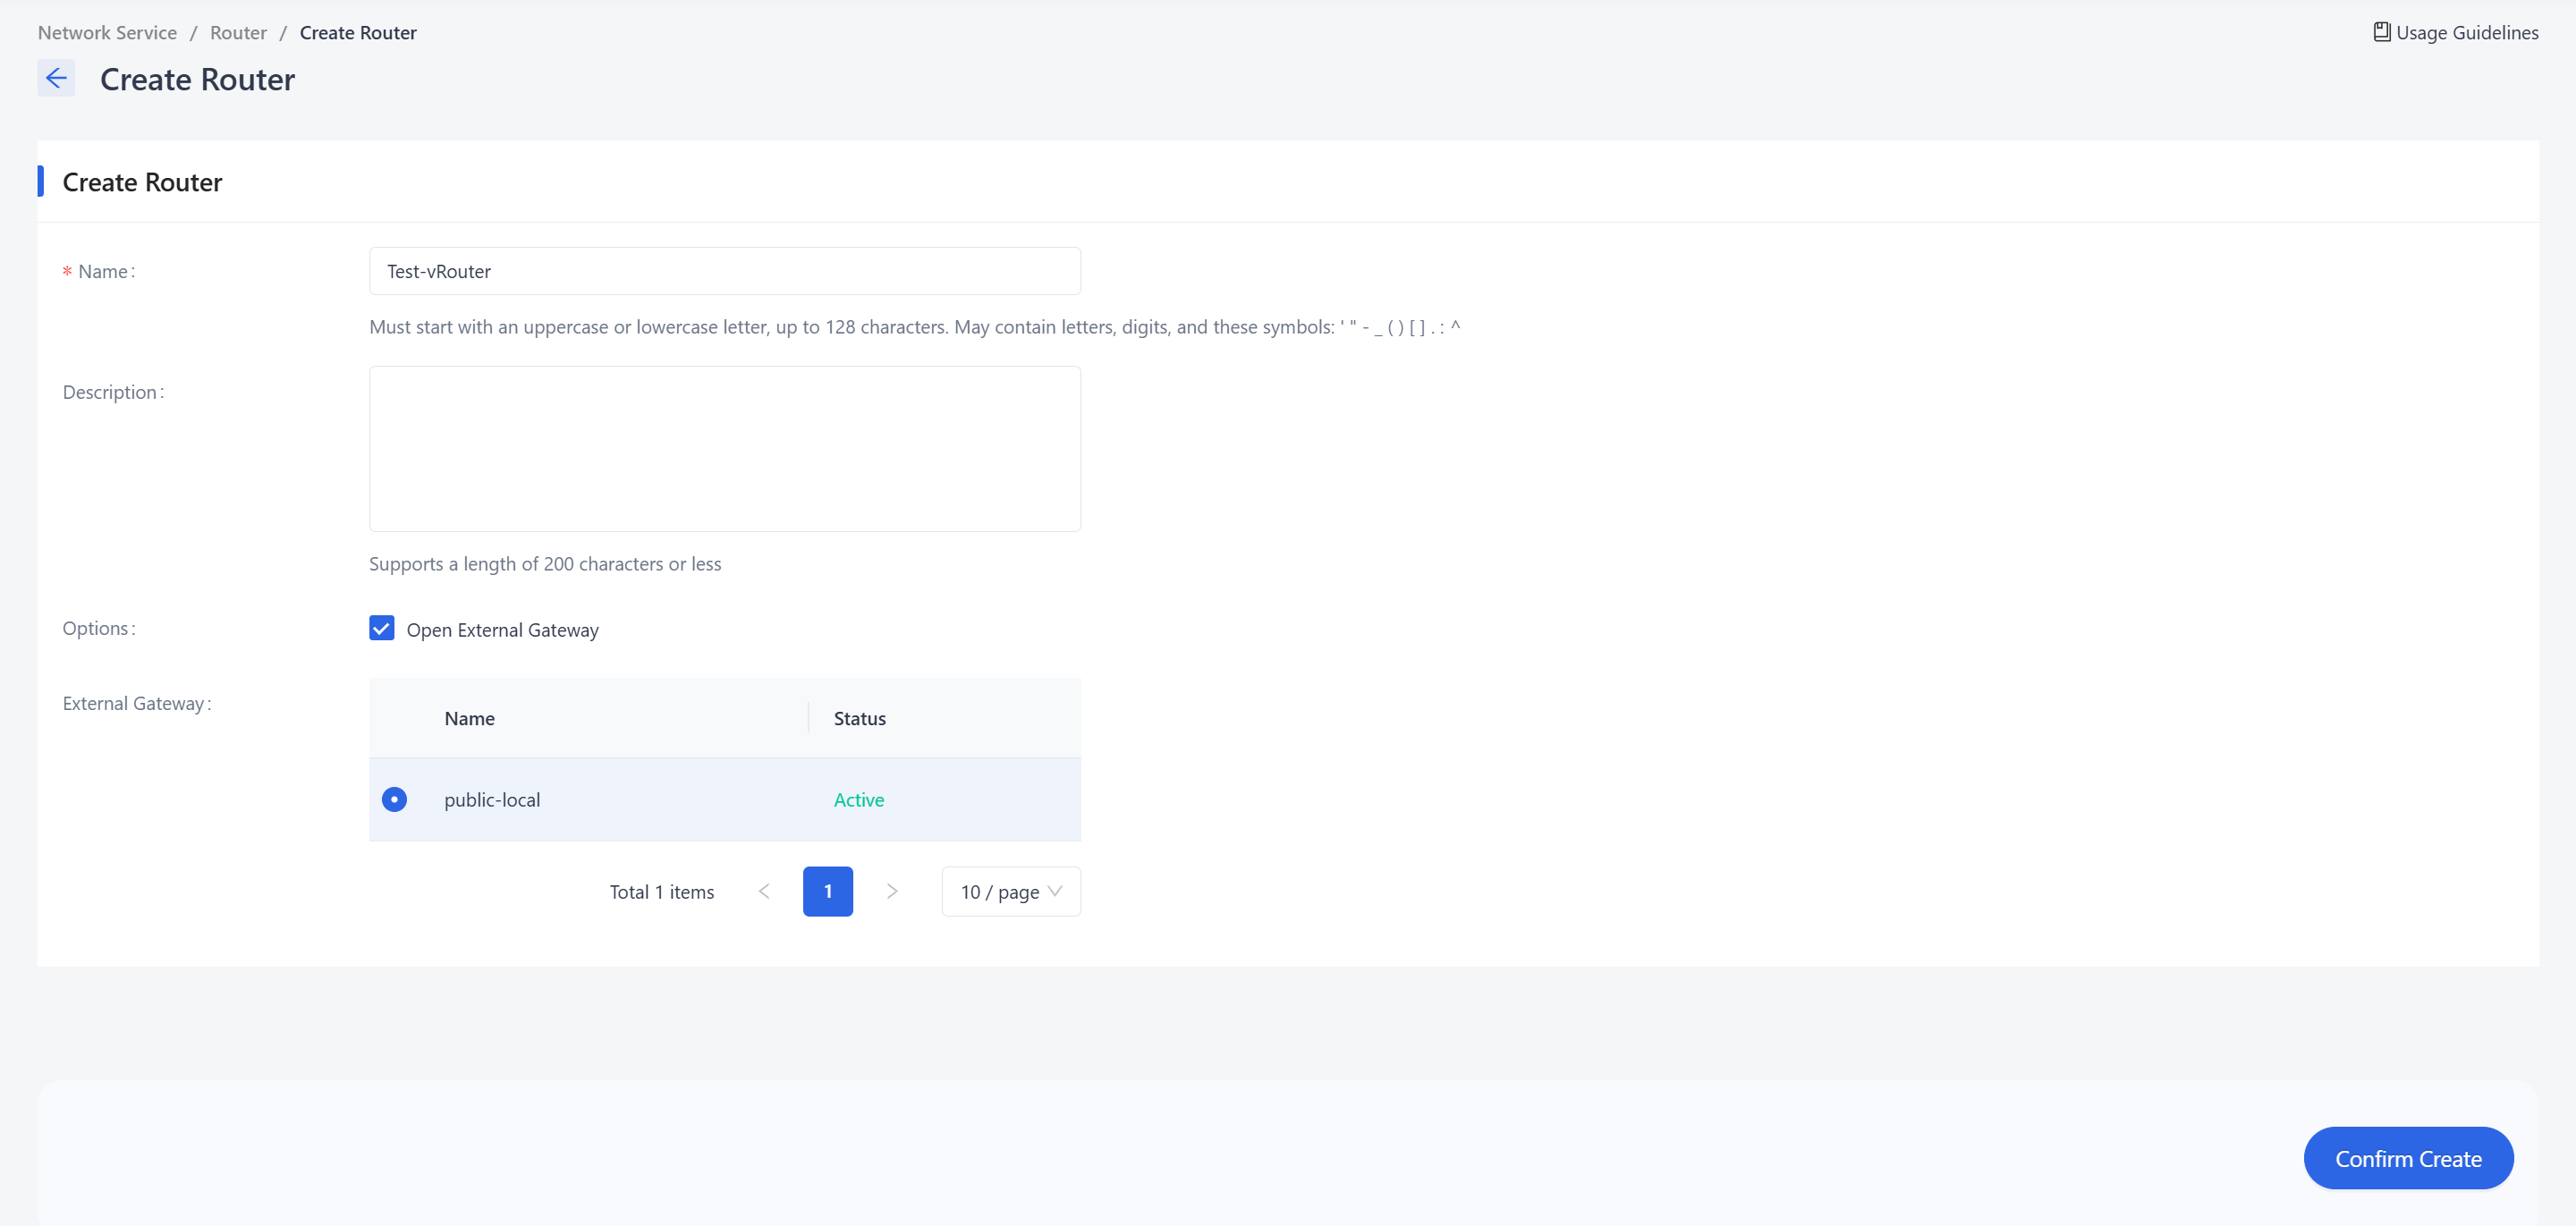
Enter the router name.
Enable the external gateway if needed and choose the target external network.
Click Confirm Create.
Associate a Subnet
Associating a subnet connects a VPC subnet to the router.
In the router list, locate the target router.
In the row Action, click More > Associate Subnet.
In the dialog, select VPC.
Select the subnet in the Subnet table.
Click OK.
Open the router details page and confirm the VPC port or subnet connection information.
Dissociate a Subnet
In the router list, locate the target router.
In the row Action, click More > Dissociate Subnet.
Select the subnet to disconnect.
Click OK.
Close the External Gateway
In the router list, locate a router whose Open External Gateway value is Yes.
In the row Action, click More > Close External Gateway.
Review the external network and fixed public IP in the confirmation dialog.
Click OK.
After closing the external gateway, subnets connected to the router cannot access the public network through that gateway. Services running under this router will also lose public network access and will no longer be accessible from the internet.
Open the External Gateway
Opening the external gateway connects the router to an external network.
In the router list, locate a router whose external gateway is closed.
In the row Action, click More > Open External Gateway.
Select the external network.
Click OK.
Return to the list and confirm that Open External Gateway is Yes.
Delete a Router
Deleting a router removes the router resource. Before deletion, dissociate connected subnets and make sure the external gateway is closed or no longer needed.
In the router list, select the target router.
Click Delete in the toolbar, or select More > Delete in the row.
Review the router information in the confirmation dialog.
Click OK.
Security Group
Basic Concepts
Security Group: A virtual firewall that controls inbound and outbound traffic for instances or network interfaces.
Security Group Rule: A specific access control entry defined by direction, protocol, port, and remote range.
Ingress Rule: Controls traffic entering an instance or network interface.
Egress Rule: Controls traffic leaving an instance or network interface.
Remote Mode: The source or destination match mode of a rule, such as CIDR or Security Group.
Security groups control inbound and outbound traffic for instances or network interfaces. Go to Network Service > Security Group, select a region, and view the security group list. The table displays ID / Name, Description, Create Time, and Action.
Create a Security Group
When a security group is created, the platform also creates default IPv4 and IPv6 rules. The parameters are described below:
| Configuration Area | Parameter | Description |
|---|---|---|
| Basic Information | Name | The security group name. It must start with a letter and can be up to 128 characters. |
| Description | The security group description. The maximum length is 200 characters. |
To create a security group:
On the Security Group page, click Create Security Group.
Read the notice. The platform creates default IPv4 and IPv6 security group rules.
Enter Name.
Enter Description if needed.
Click OK.
Create a Security Group Rule
Creating a rule defines inbound or outbound traffic allowed by the security group. The parameters are described below:
| Configuration Area | Parameter | Description |
|---|---|---|
| Rule Information | Protocol | The rule protocol, such as Custom TCP Rule. |
| Direction | The traffic direction, such as Ingress or Egress. | |
| Ethernet Type | The IP protocol type, such as IPv4 or IPv6. | |
| Port Type | The port type. If Custom is selected, enter a port or port range. | |
| Destination Port / Port Range | The destination port or port range, for example 80 or 80:160. | |
| Remote Mode | The remote match mode, such as CIDR or Security Group. | |
| Remote IP Prefix | Required when Remote Mode is CIDR, for example 192.168.0.0/24 or 2001:DB8::/48. |
To create a security group rule:
In the security group list, locate the target security group.
Click Create Rule in the row, or open the details page and click Create Rule.
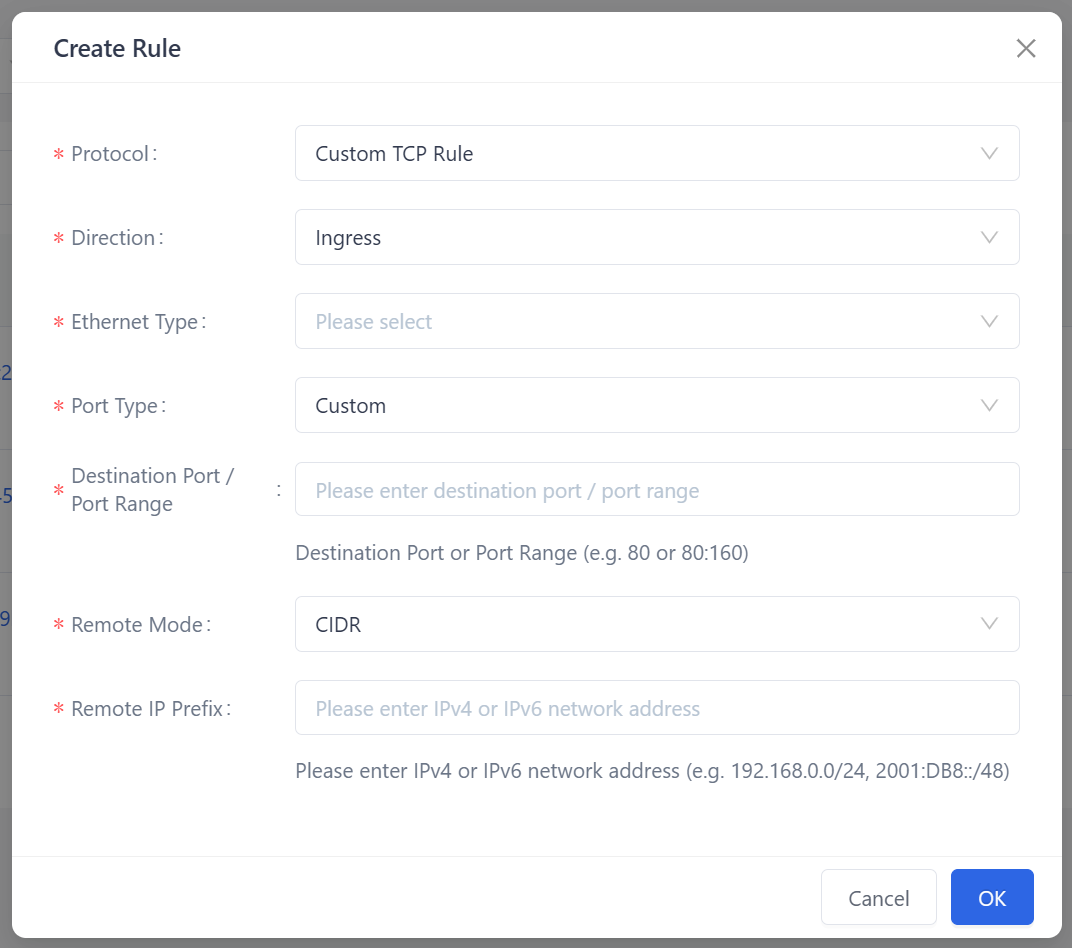
Select Protocol.
Select Direction.
Select Ethernet Type.
Select Port Type.
Enter Destination Port / Port Range.
Select Remote Mode.
When Remote Mode is CIDR, enter Remote IP Prefix.
Click OK.
Delete a Security Group Rule
In the security group list, click the security group ID to open details.
In the Rule Information table, locate the rule.
Click Delete in the rule row.
Click OK to delete the security group rule in the confirmation dialog.
Delete a Security Group
Before deleting a security group, make sure no cloud host or network interface is using it.
In the security group list, select the target security group.
Click Delete in the toolbar.
Review the security group name in the confirmation dialog.
Click OK.
Need help? Contact our support team at support@edgenext.com.
Back to documentation home