

Instances
ECS Instances
Basic Concepts
ECS Instance: A virtual compute node running in an edge cloud resource pool. It is the basic resource used to deploy applications, services, and runtime environments.
Instance Specification: A predefined combination of vCPU, memory, architecture, and internal bandwidth. It determines the computing capability and workload fit of the instance.
Image: The operating system template used to boot the instance. You can select a public image or a custom image.
System Disk and Data Disk: The system disk stores the operating system. Data disks store business data and can be added during instance creation.
Login Credentials: The authentication method used to sign in to the instance, such as an SSH key pair or password.
The ECS Instances page is used to view, create, and manage cloud hosts. Go to Instances > ECS Instances, select a region, and use the search controls to find instances. The instance table displays ID / Name, Status, Area, Instance Type, Instance Configuration, Image, IP Address, Instance Billing Model, Network Billing Model, Create Time, Tags, and Action.
The toolbar provides bulk Power On, Power Off, and Restart actions. Select one or more instances to enable these buttons. Before running power actions, make sure the workloads on the instances can tolerate shutdown or restart.
Create an ECS Instance
When creating an ECS instance, configure basic information, instance specification, image, storage, network, security group, and login method according to the workload requirements. The main parameters are described below:
| Configuration Area | Parameter | Description |
|---|---|---|
| Basic Configuration | Billing Method | The billing method of the resource. The current creation page shows Subscription, which is used for prepaid instances purchased by duration. |
| Basic Configuration | Region & City | The region and city where the instance is created. Instances, VPCs, and cloud disks usually need to be in the same region to be attached or accessed. |
| Instance Configuration | Select | Filters specifications by vCPU and memory so that you can quickly find a suitable configuration. |
| Instance Configuration | Architecture | The CPU architecture of the instance. The current page shows X86 Computing. |
| Instance Configuration | Instance Specification | The specification name and corresponding vCPU, memory, internal bandwidth, and price. |
| Image | Public Image | Standard operating system images provided by the platform. |
| Image | Custom Image | User-created images used to reuse an existing system or business environment. |
| Storage | System Disk | The boot disk of the instance. Select disk type and capacity. The capacity must meet the image minimum disk requirement. |
| Storage | Data Disk | Additional data disks for business data. Add them when needed. |
| Network & Bandwidth | Select Network | The VPC that the instance connects to. If no private network is available, create one first. |
| Network & Bandwidth | Elastic Public IP | Determines whether an independent public IP is automatically assigned to the primary network interface. |
| Security Group | Security Group | Security groups controlling inbound and outbound traffic. Each instance can be associated with up to five security groups. |
| Other Settings | Instance Name | The instance name. If empty, the system uses a default name. |
| Other Settings | Login Method | The instance sign-in method. Options include Associated Key Pair and Set Password. |
| Configuration Summary | Count | The number of instances to purchase. |
| Configuration Summary | Duration | The purchase duration. The page displays the corresponding discount and total price. |
| Configuration Summary | Auto-renewal | Whether to enable automatic renewal according to platform rules. |
To create an ECS instance:
On the ECS Instances page, click Create Instance.
In Basic Configuration, select Billing Method and Region & City.
In Instance Configuration, select an instance specification.
In Image, select Public Image or Custom Image, and then select the image.
In Storage, configure the system disk type and capacity. To add data disks, click Add Data Disk and configure disk type and capacity.
In Network & Bandwidth, select the VPC. To enable public access, select Assign independent public IP.
In Security Group, select an existing security group or create a new one.
In Other Settings, enter the instance name and select the login method.
Review Configuration Summary for region, specification, image, disks, VPC, Elastic IP, security group, and login credentials.
Set the quantity, duration, and auto-renewal option.
Click Confirm Order to enter order confirmation.
Log In to an ECS Instance
Logging in to an ECS instance lets you enter the operating system to deploy applications, check configuration, or troubleshoot issues. Before logging in, make sure the instance is in the Active state, valid credentials are available, and the security group allows the required login port. Linux instances usually use SSH, while Windows instances usually use Remote Desktop.
To log in to an ECS instance:
Go to Instances > ECS Instances and select the region where the instance is located.
Locate the target instance by instance name, ID, or IP address.
Check the public or private IP address of the instance. Public access requires an associated Elastic IP. Private access requires network route reachability from the login source.
Use the password or SSH private key configured during instance creation to log in.
After login, check the host name, operating system version, disk mounts, service processes, and network connectivity.
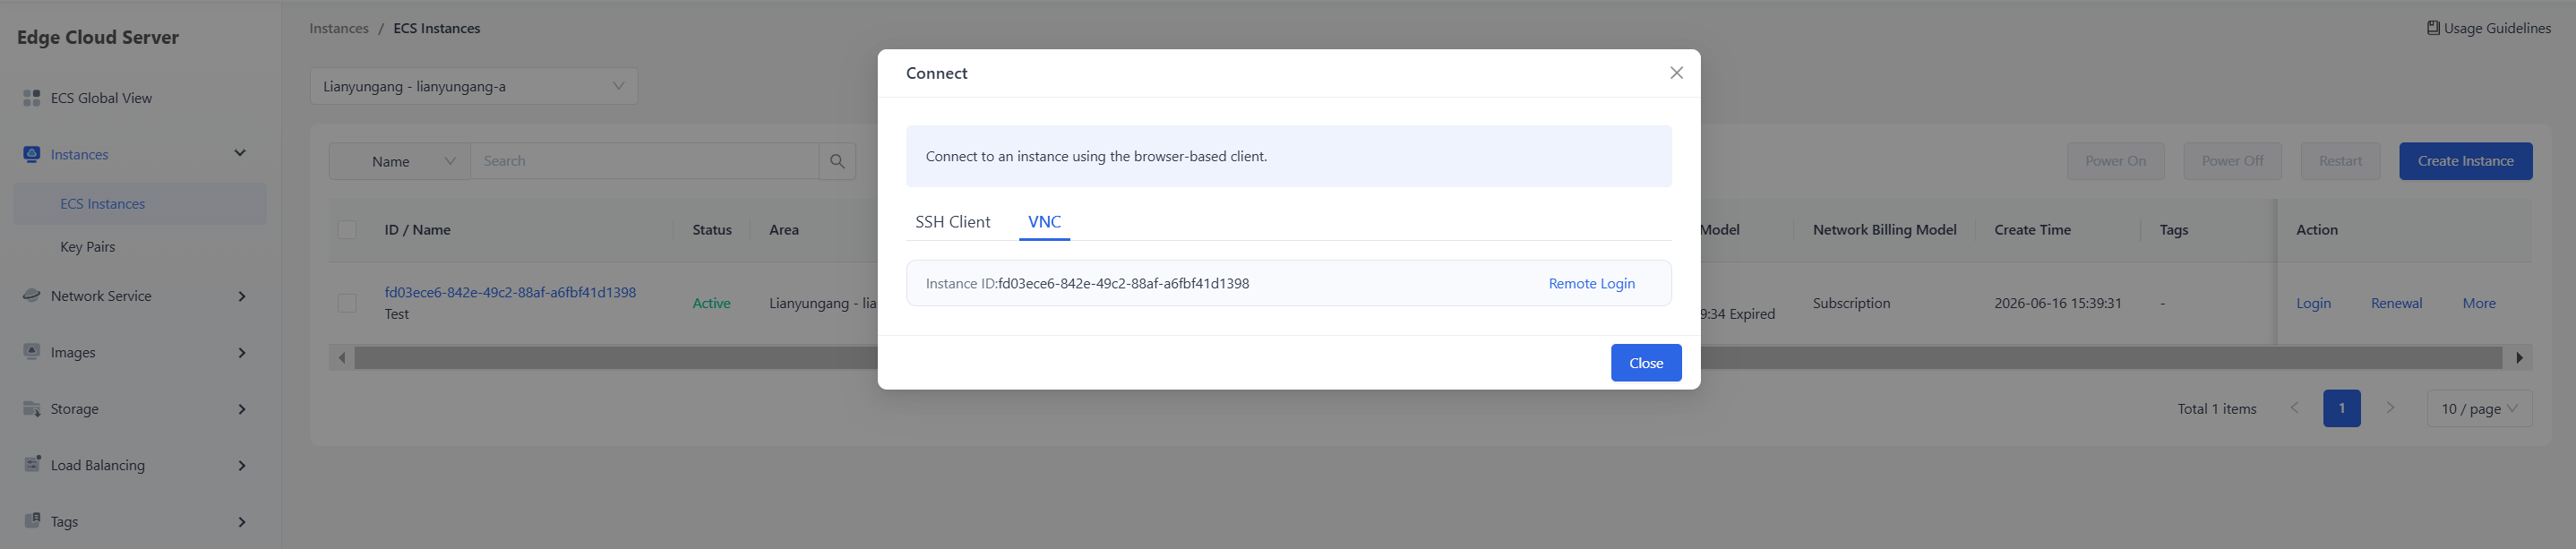
The console provides a web login entry 'VNC' in Action, you can also start the login workflow directly by click Remote Login.
Power Off an ECS Instance
To power off an ECS instance:
Go to Instances > ECS Instances and select the region where the instance is located.
Select one or more instances in the Active state.
Click Power Off in the toolbar, or choose the Power Off action from the target instance's Action - More column.
In the confirmation dialog, verify the instance name and ID, and then submit the request.
Wait until the instance status changes to Shutoff.
Power On an ECS Instance
Powering on an ECS instance starts a stopped instance so that the operating system can run again and resume workloads. Before powering on the instance, make sure its image, system disk, network, and security group configuration are still valid.
To power on an ECS instance:
Go to Instances > ECS Instances and select the region where the instance is located.
Select one or more instances in the Shutoff state.
Click Power On in the toolbar, or choose the Power On action from the target instance's Action - More column.
Submit the request in the confirmation dialog.
Wait until the instance status changes to Active, and then log in to verify that business services have started properly.
Restart an ECS Instance
Restarting an ECS instance stops and starts the operating system. Use it when system patches, configuration changes, or recovery actions need to take effect. Services are temporarily unavailable during restart.
To restart an ECS instance:
Go to Instances > ECS Instances and select the region where the instance is located.
Select one or more instances that need to be restarted.
Click Restart in the toolbar, or choose the Restart action from the target instance's Action - More column.
Verify instance information in the confirmation dialog and submit the request.
Wait until the instance status returns to Active.
Log in to the instance and check service processes, listening ports, disk mounts, and logs.
Reinstall the Operating System
Reinstalling the operating system installs a new image on the instance. The instance ID and network relationships are retained, but data on the system disk is cleared. Before this operation, back up configuration files, application data on the system disk.
Common parameters for OS reinstallation are described below:
| Parameter | Description |
|---|---|
| Image Type | Select a public image or a custom image. Public images are used for standard system initialization. Custom images are used to restore a prepared business environment. |
| Image | Select the operating system version or custom image name. The minimum disk requirement of the new image must not exceed the current system disk capacity. |
| Login Method | Configure the login method after reinstallation, such as an SSH key pair or password. |
| Password / Key Pair | Enter the new password or select an available key pair according to the selected login method. |
To reinstall the operating system:
Go to Instances > ECS Instances and select the region where the instance is located.
In the target instance's Action column, choose Reinstall OS or the corresponding reinstall action.
Stop the instance if the console requires it.
Select the image type and the image.
Configure the login method after reinstallation.
Confirm the system disk data deletion risk and submit the request.
Wait until reinstallation is complete and the instance returns to Running.
Log in with the new credentials and check the runtime environment again.
Upgrade Configuration
Upgrading configuration changes the instance specification, such as vCPU, memory, or instance tier, to support higher compute load. Before upgrading, confirm that the target specification is available in the current region and plan a maintenance window if downtime is required.
To upgrade configuration:
Go to Instances > ECS Instances and select the region where the instance is located.
In the target instance's Action - More column, choose Upgrade Configuration.
Select the target instance specification.
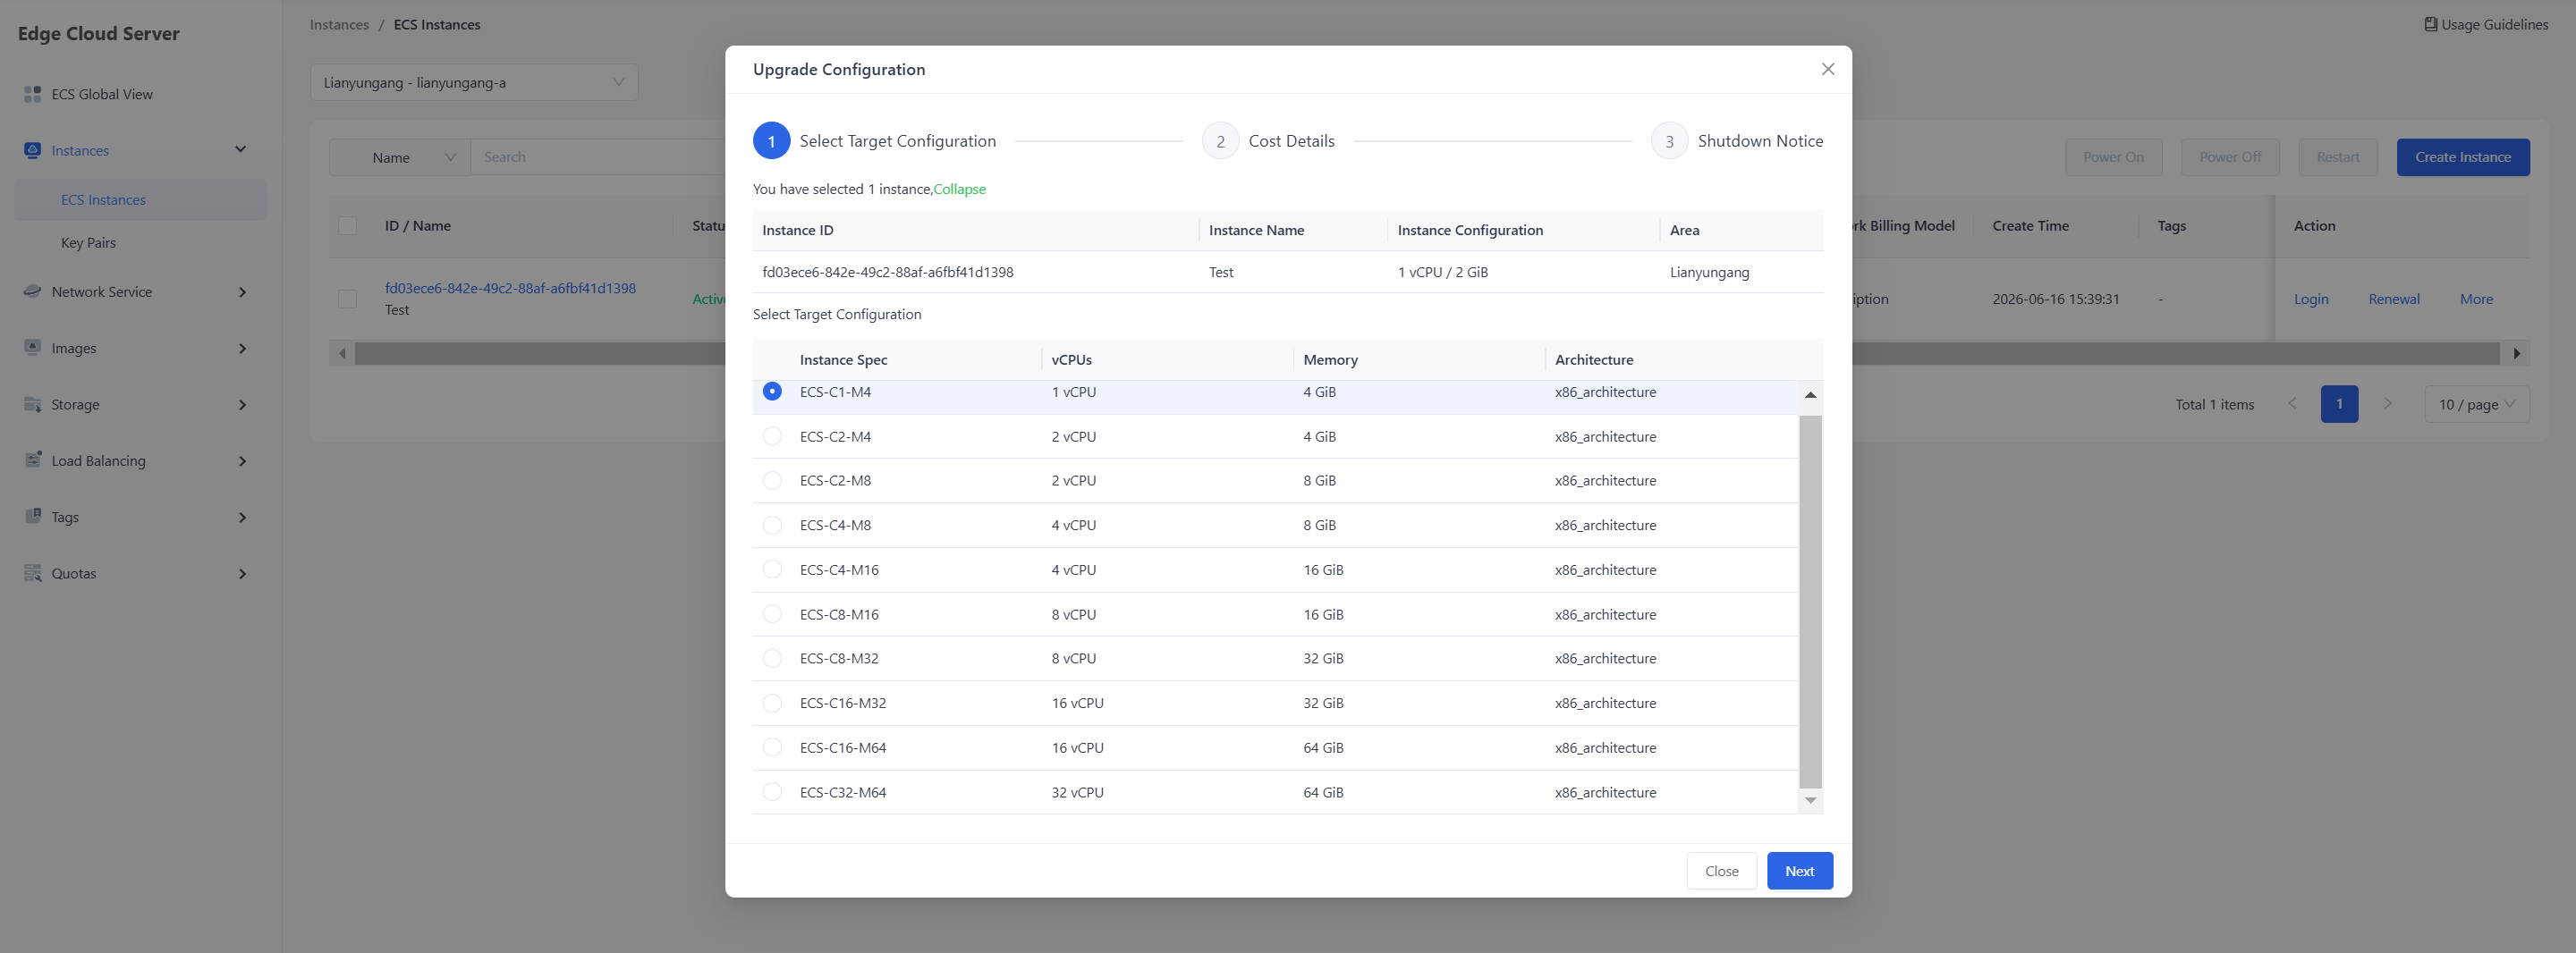
Read the change impact. If the page requires shutdown, schedule the maintenance window and agree to forced shutdown the instance.
Confirm the configuration and fee information, and then Start Adjustment.
Expand Disk Capacity
Disk expansion increases the capacity of a system disk or data disk attached to an instance. Capacity can only be increased, not reduced. Before expanding a disk, make sure business data is backed up.
To expand disk capacity:
Go to Instances > ECS Instances and select the region where the instance is located.
In the target instance's Action - More column, choose the Disk Expansion action.
Select the Target Disk and set the Target Capacity.
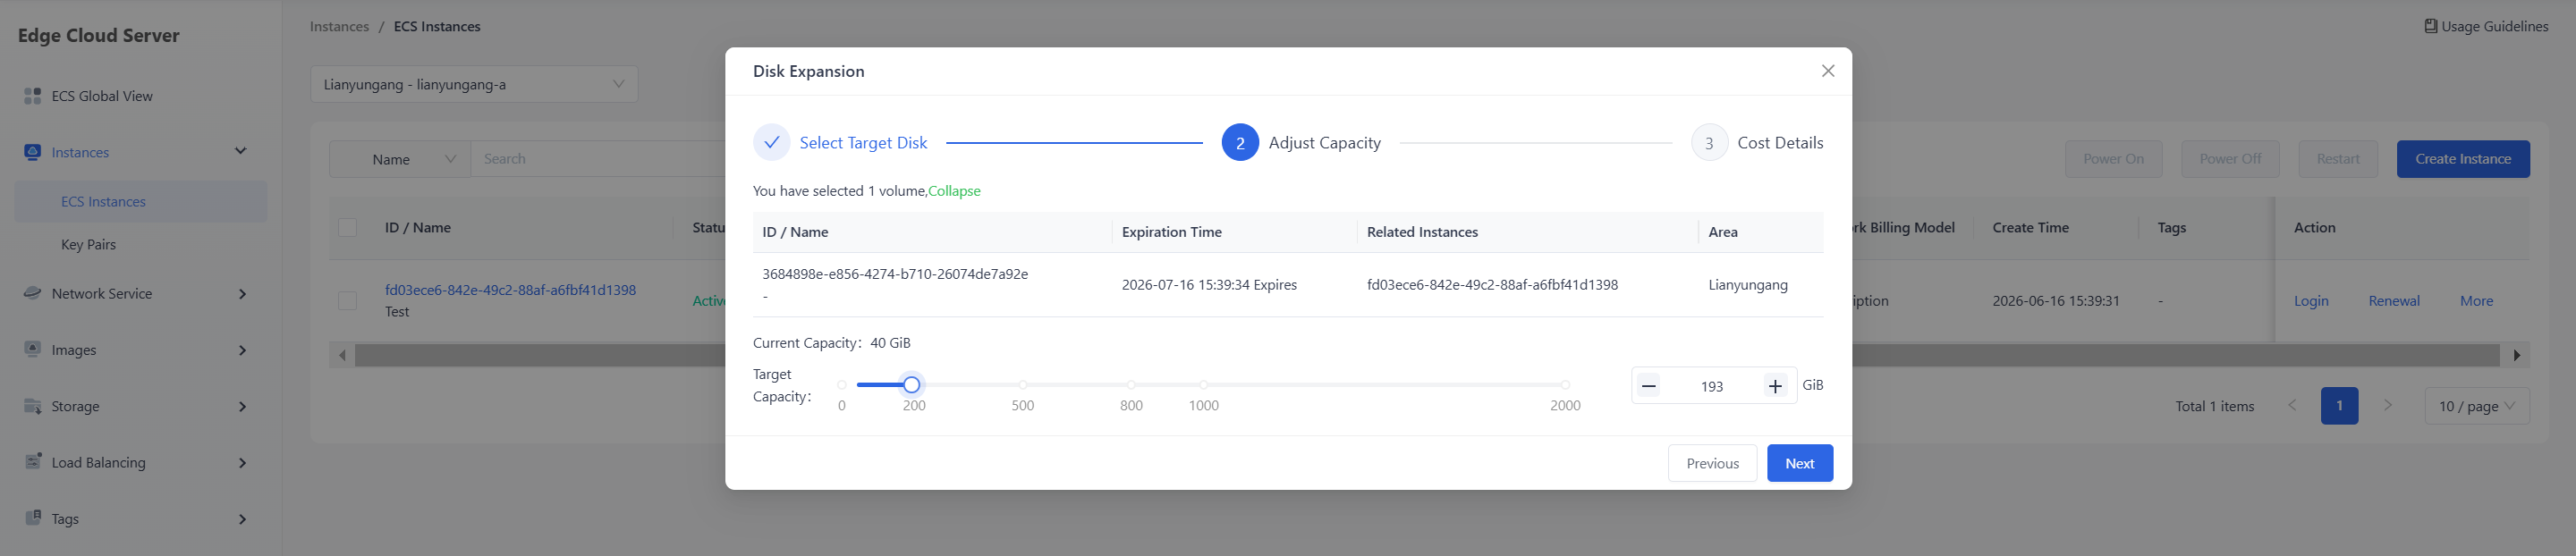
Confirm capacity and fee information, and then submit the request.
After expansion is complete, log in to the instance and extend the partition and file system in the operating system.
Check
df -h, Disk Management, or business monitoring to confirm that the capacity is recognized by the system.
Expand Bandwidth
Bandwidth expansion increases the public network capacity of an instance, by changing the Elastic IP bandwidth configuration associated with the instance. Before expanding bandwidth, confirm that the bottleneck is public bandwidth rather than security group rules, instance performance, or application throttling.
To expand bandwidth:
Go to Instances > ECS Instances and select the region where the instance is located.
In the target instance's Action > More column, choose the Bandwidth Expansion action.
Set the target bandwidth and confirm billing information.
Submit the change request.
After the change is complete, use monitoring or traffic testing to confirm that public network throughput meets expectations.
Reset Password
Reset Password changes the operating system login password of an instance. Use it when the password is forgotten, credentials are handed over, or passwords are rotated periodically. Resetting the password does not automatically change account passwords inside business applications.
To reset the password:
Go to Instances > ECS Instances and select the region where the instance is located.
In the target instance's Action > More column, choose Reset Password.
Enter and confirm the new password as required by the page. The password must meet complexity requirements and should be stored securely.
Submit the reset request.
If the page prompts that a restart is required, restart the instance during an approved maintenance window.
Log in with the new password and confirm that it has taken effect.
For Linux instances that use SSH key login, resetting the password only affects password-based login, the original key is still valid.
SSH Key Pairs
Basic Concepts
SSH Key Pair: An asymmetric key pair used to sign in to Linux instances.
Public Key: Stored by the platform and bound to instances during creation or login configuration.
Private Key: Downloaded and kept by the user. It is used to initiate SSH sign-in. Exposure of the private key creates login risk.
Fingerprint: A unique digest of the key, used to verify that the key is the expected one.
SSH key pairs are used to sign in to Linux cloud hosts. Go to Instances > Key Pairs, select a region, and view the key pair list. The list displays Name, Fingerprint, and Action.
Create a Key Pair
Creating a key pair generates a new SSH key pair on the platform or imports an existing public key. The parameters are described below:
| Configuration Area | Parameter | Description |
|---|---|---|
| Create Way | Create Key | Generates a new key pair on the platform. Download and keep the private key after creation. |
| Import Key | Imports an existing public key so that it can be reused for instance login. | |
| Basic Information | Name | The key pair name. It must start with a letter, can contain letters, digits, and hyphens, and can be up to 128 characters. |
| Public Key | Required when importing a key. Paste the public key or upload a local public key file through Upload from local. |
To create a new key pair:
On the Key Pairs page, click Create Key.
In Create Way, select Create Key.
Enter the key name.
Click OK.
When the platform prompts you to download the private key, download and store it securely.
To import an existing key:
In the Create Key dialog, select Import Key.
Enter the key name.
Paste the public key in Public Key, or click Upload from local to upload a local public key file.
Click OK.
Delete a Key Pair
Deleting a key pair removes the corresponding public key record from the platform. Before deletion, make sure no instance still depends on it for future sign-in.
On the Key Pairs page, select the key pair to delete.
Click Delete in the toolbar, or use the delete action in the key pair row.
Review the key name in the confirmation dialog.
Click OK.
Need help? Contact our support team at support@edgenext.com.
Back to documentation home