

Load Balancing
Overview
Load Balancing provides intelligent, automated, and enterprise-grade global traffic scheduling, distribution, and management services for various workloads deployed in cloud environments. It eliminates Single Points of Failure, enhances service performance, and ensures high availability and scalability. This enables development and operations (DevOps) teams to focus on business innovation rather than the stability and scalability challenges of the underlying infrastructure, thereby accelerating digital transformation and agile business delivery.
Basic Concepts
Load Balancer
Definition: The top-level logical entity in load balance service, representing a complete load balancing service instance. It holds a Virtual IP (VIP), which serves as the unique entry point for client access.
Network Load Balancer (NLB): Primarily targets Layer 4 (L4) protocols (TCP and UDP) of the OSI model.
Application Load Balancer (ALB): Primarily targets Layer 7 (L7) protocols (HTTP and HTTPS).
Core Roles:
Traffic Entry Point: Provides a stable VIP where all client requests initially arrive.
Resource Container: Manages the lifecycle of all subordinate configuration objects (Listeners, Pools, etc.).
High Availability Foundation: Ensures service continuity through multiple backend instances.
Metering Unit: Serves as the fundamental unit for billing and quota management.
Listener
Definition: A network listening endpoint configured on the Load Balancer that defines the protocols, ports, and basic processing policies.
Core Roles:
Protocol Termination: Handles the establishment and termination of connections for TCP, UDP, HTTP, and HTTPS.
SSL Offloading: Executes TLS handshakes and certificate management in
TERMINATED_HTTPSmode.Traffic Classification: Routes traffic to the corresponding backend pools based on port and protocol.
Connection Management: Controls timeout settings, connection limits, and idle connection processing.
Policy Hooks: Provides the execution context and matching foundation for L7 policies.
Health Monitor
Definition: A diagnostic mechanism that actively probes the availability of backend members to ensure traffic is only distributed to healthy nodes.
Core Roles:
Status Detection: Periodically sends probe requests (e.g., HTTP GET, TCP SYN) to verify service availability.
Self-healing: Implements automatic fault isolation through configurable thresholds (latency, timeout, retry counts).
Protocol Adaptation: Supports multiple health check protocols including HTTP, TCP, UDP, and PING.
Fine-grained Control: Allows independent check frequencies and success criteria for different pools.
Pool
Definition: A logical grouping of backend service instances that share the same load balancing algorithm and session persistence policy.
Core Roles:
Load Balancing Strategy: Executes distribution algorithms such as
ROUND_ROBIN,LEAST_CONNECTIONS, andSOURCE_IP.Session Persistence: Achieves stateful connections via
SOURCE_IP,HTTP_COOKIE, orAPP_COOKIE.Protocol Consistency: Ensures the pool protocol is compatible with the listener.
Resource Abstraction: Abstracts physical backend members into logical service groups for simplified batch management.
Algorithm Execution Point: The logical unit where traffic distribution decisions are actually made.
Member
Definition: A specific backend instance within a Pool, representing the actual compute node carrying the business load.
Core Roles:
Service Endpoint: The real server (defined by IP:Port) that ultimately processes business requests.
Weight Management: Controls the traffic allocation ratio via weight values to achieve differentiated loading.
Health Check Target: Serves as the probe endpoint for the Health Monitor to report service status.
L7 Policy
Definition: A collection of routing decision rules based on application-layer content to achieve intelligent traffic steering.
Core Roles:
Content-Aware Routing: Makes traffic decisions based on application-layer information such as HTTP headers, URLs, and Cookies.
Policy Chain Management: Defines the execution priority of policies via the
positionfield, supporting complex rule combinations.Action Execution: Supports operations such as
REDIRECT_TO_URL,REJECT, andREDIRECT_TO_POOL.Canary Release Support: Facilitates advanced deployment strategies like A/B testing and Blue-Green deployments.
L7 Rule
Definition: The specific matching conditions of an L7 Policy that define rules for application-layer content.
Core Roles:
Fine-grained Matching: Supports multi-dimensional matching including
HOST_NAME,PATH,FILE_TYPE, andHEADER.Pattern Matching: Provides matching types such as
REGEX,EQUAL_TO,CONTAINS, andSTARTS_WITH.Condition Definition: Provides the specific execution criteria that trigger a policy.
Logic Construction: Builds complex traffic filtering logic through rule combinations.
Performance Optimization: Supports rule indexing and fast matching to minimize policy execution overhead.
Network Load Balancer Operating Guide
Creating Network Load Balancer
Navigate to the Products menu and select the "Edge Cloud Server" tab under the "Edge Node Services" category. This will take you to the Load Balancer Service management console.

On the "Load Balancer Instances" page, the primary workspace displays a list of load balancer instances within the corresponding region. Click the "Create Instance" button in the upper-right corner of the list to navigate to the load balancer type selection page.
On the "Load Balancer Types" selection page, select "Network Load Balancer" and click "Confirm" to proceed to the Network Load Balancer creation page.
On the instance creation page, configure the "Basic Configuration", "Instance Configuration", "Network & Bandwidth", and "Listener" sections based on your specific business requirements. Once configured, click "Confirm Order" to provision the resources.
Parameter name Parameter description Basic Configuration Name A user-defined name used to identify the load balancer instance. Description A user-defined description providing additional details about the load balancer. Region The region where the load balancer resides. Different AZs offer distinct resource environments and network configurations. To optimize performance and minimize latency, select the AZ geographically closest to your end-users. Mode Determines whether the load balancer operates within a VPC or is exposed to the internet. Internet-facing: Creates a public-facing load balancer accessible via the internet. Internal-facing: Creates a private load balancer accessible only within the VPC. Instance Configuration Architecture The CPU core count and memory capacity for the load balancer instance. Choose a specification that aligns with your expected business traffic and workload. Network & Bandwidth Select Network The specific network (VPC/Subnet) to which the load balancer instance connects, enabling traffic to reach the service. Elastic Public IP The Elastic IP address associated with the instance, allowing the load balanced services to be accessed from the internet. Listener Name A user-defined name to identify the listener. Description A user-defined description of the listener's purpose. Protocol The network protocol the listener monitors. Supported protocols include TCP and UDP. Protocol Port The specific port number on which the listener monitors incoming traffic. Max Connections The maximum number of concurrent network connections the listener can support. 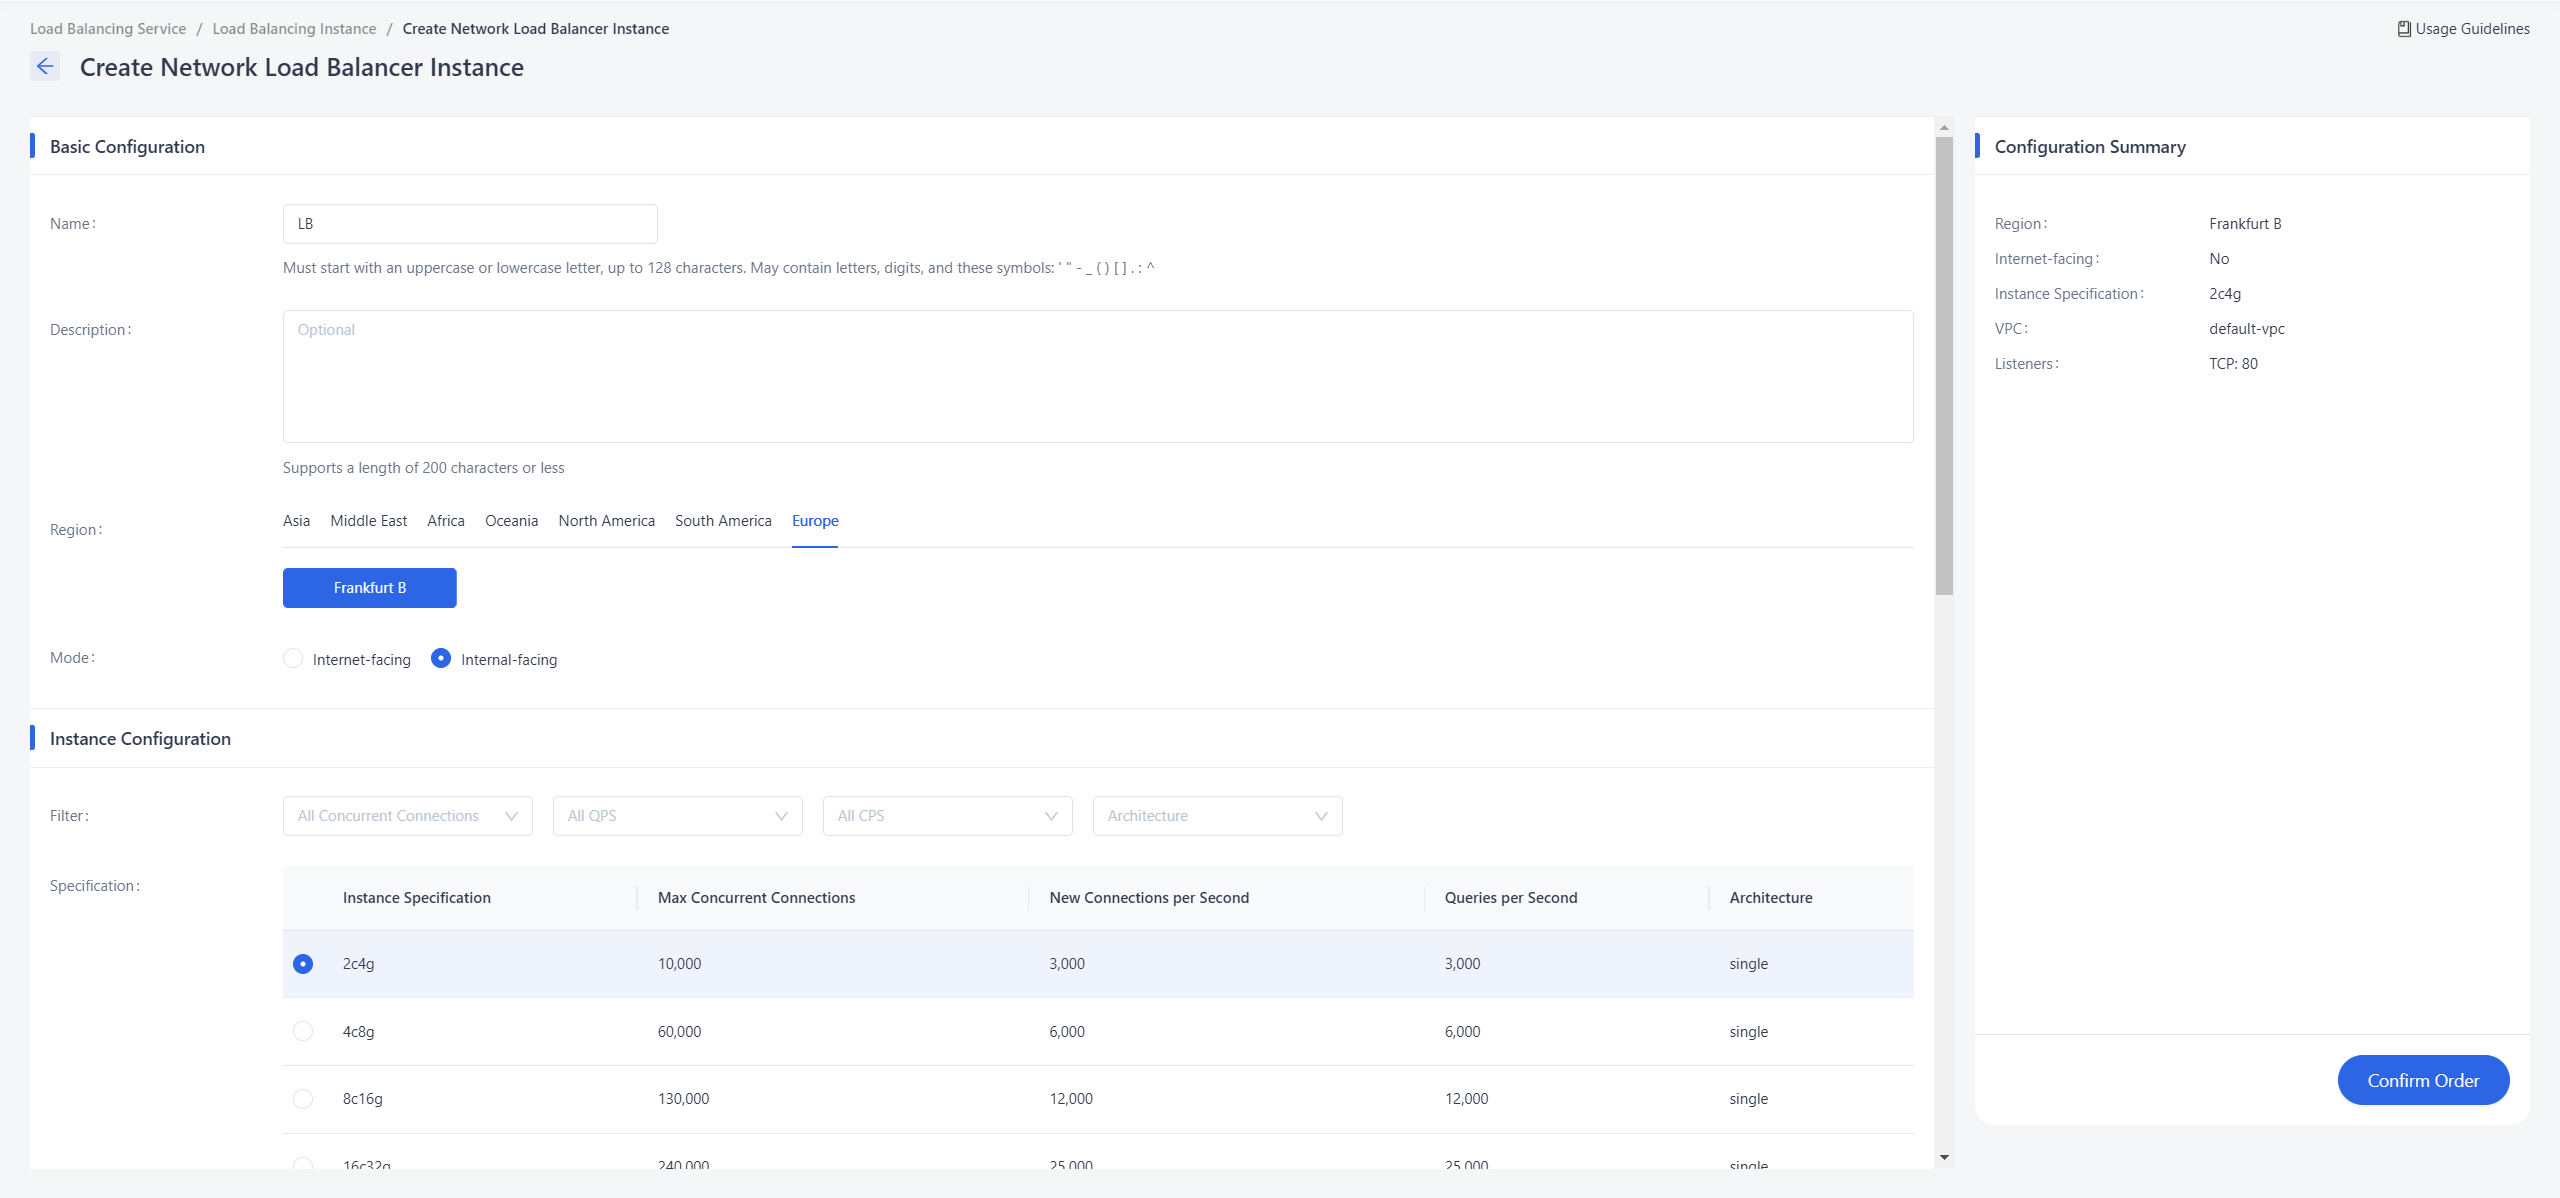
Once the "Configuration Status" in the instance list transitions to "Active" and the "Operating Status" switches to "Online", the load balancer instance is fully operational. Click the Instance ID to navigate to the load balancer's details page.
The Instance Details page provides a comprehensive overview of the configuration parameters specified during the initial provisioning process, along with other essential resource metadata and system attributes.
Deleting Load Balancer
Locate the load balancer instance you wish to remove. Click the "More" dropdown menu on the right side of the instance entry and select "Delete".

In the confirmation dialog that appears, verify the details of the load balancer instance to be removed, then click "Confirm" to finalize the deletion.
Upon confirmation, the associated load balancer instance will be terminated and automatically removed from the instance List.
Binding Elastic Public IP
Ensure the VPC where the load balancer resides has public internet reachability (route accessibility). Ensure there are available IP addresses within the public address pool.
There are two methods to bind an Elastic Public IP to a load balancer instance:
a. From the Load Balancer Instances list, click the "More" dropdown menu in the action column of the target instance and select "Bind Public IP".
b. Navigate to the Instance Details page, select the "Elastic Public IP" tab, and click the "Bind Public IP" button.
In the Bind Public IP dialog box, select the load balancer's Private IP and the target Elastic Public IP, then click "OK" to establish the association.
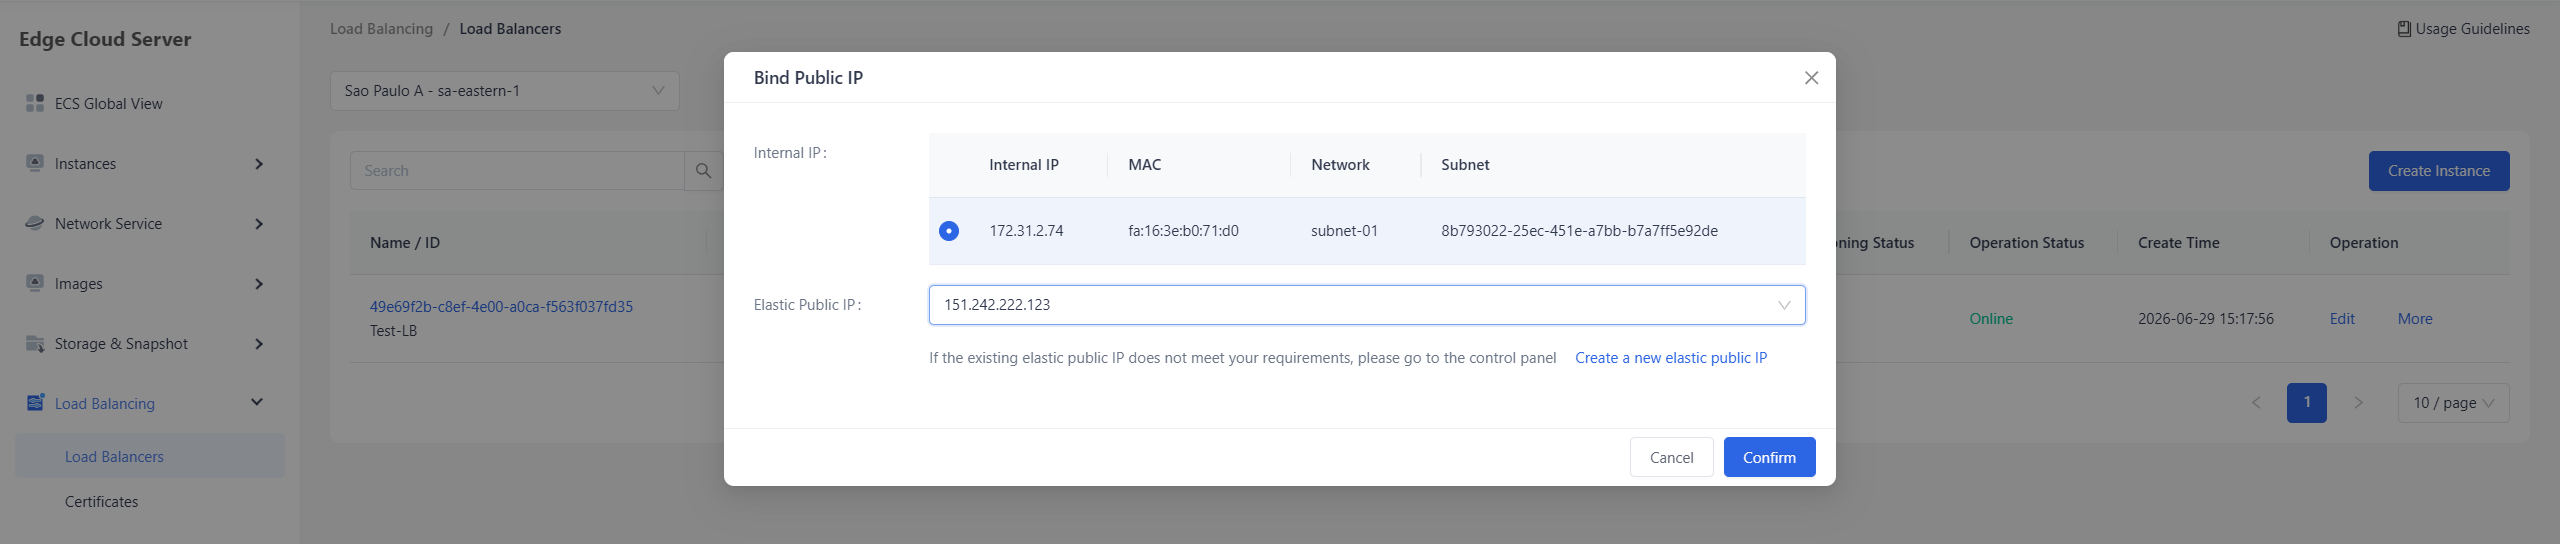
Upon successful association, the "Status" column for the IP under the Elastic Public IP tab will transition to "Active".
Unbinding an Elastic Public IP
There are two methods to unbind an Elastic Public IP from a load balancer instance:
a. In the Load Balancer Instances list, click the "More" dropdown menu in the action column of the target instance and select "Unbind Public IP".
b. Navigate to the Instance Details page, open the Elastic Public IP tab, and click the "Unbind" button located to the right of the corresponding IP address.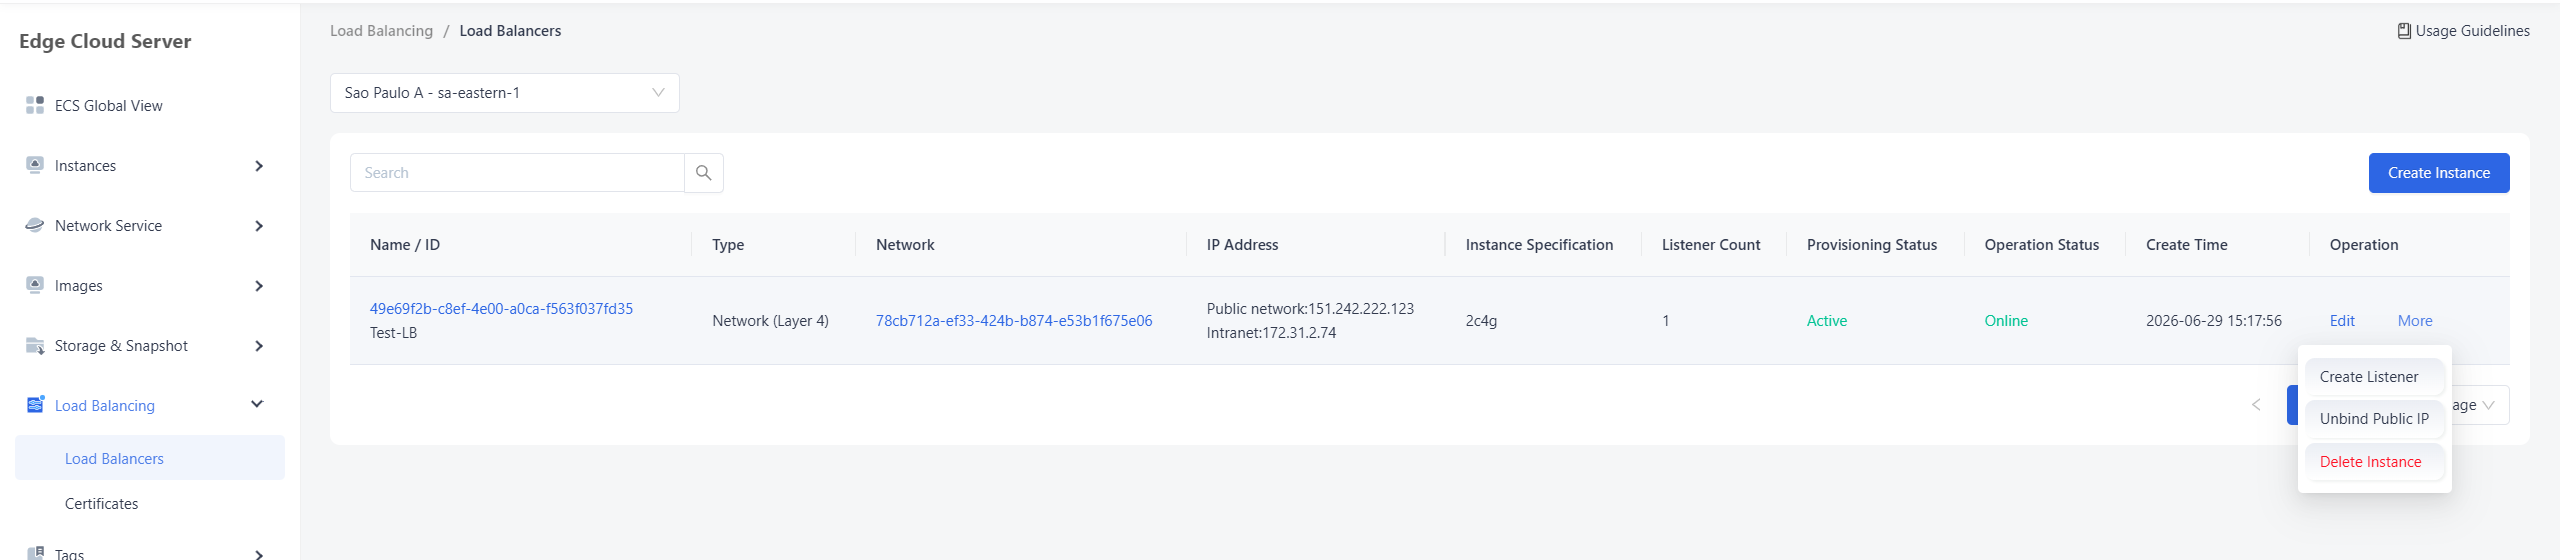
In the Unbind Public IP confirmation dialog, verify the details of the Elastic Public IP to be unbound. Once you have confirmed the information is correct, click "OK" to finalize the unbinding process.

Upon successful unbinding, the associated Elastic Public IP will be automatically removed from the Instance IP List.
Creating New Listener
There are two primary entry points to create a new listener for a load balancer instance:
a. From the Load Balancer Instances list, click the "More" dropdown menu in the action column of the target instance and select "Create Listener".
b. Navigate to the Instance Details page, select the "Listeners" tab, and click the "Create Listener" button.
In the Create Listener dialog, configure the relevant parameters according to your business requirements and click "OK" to finalize the creation.
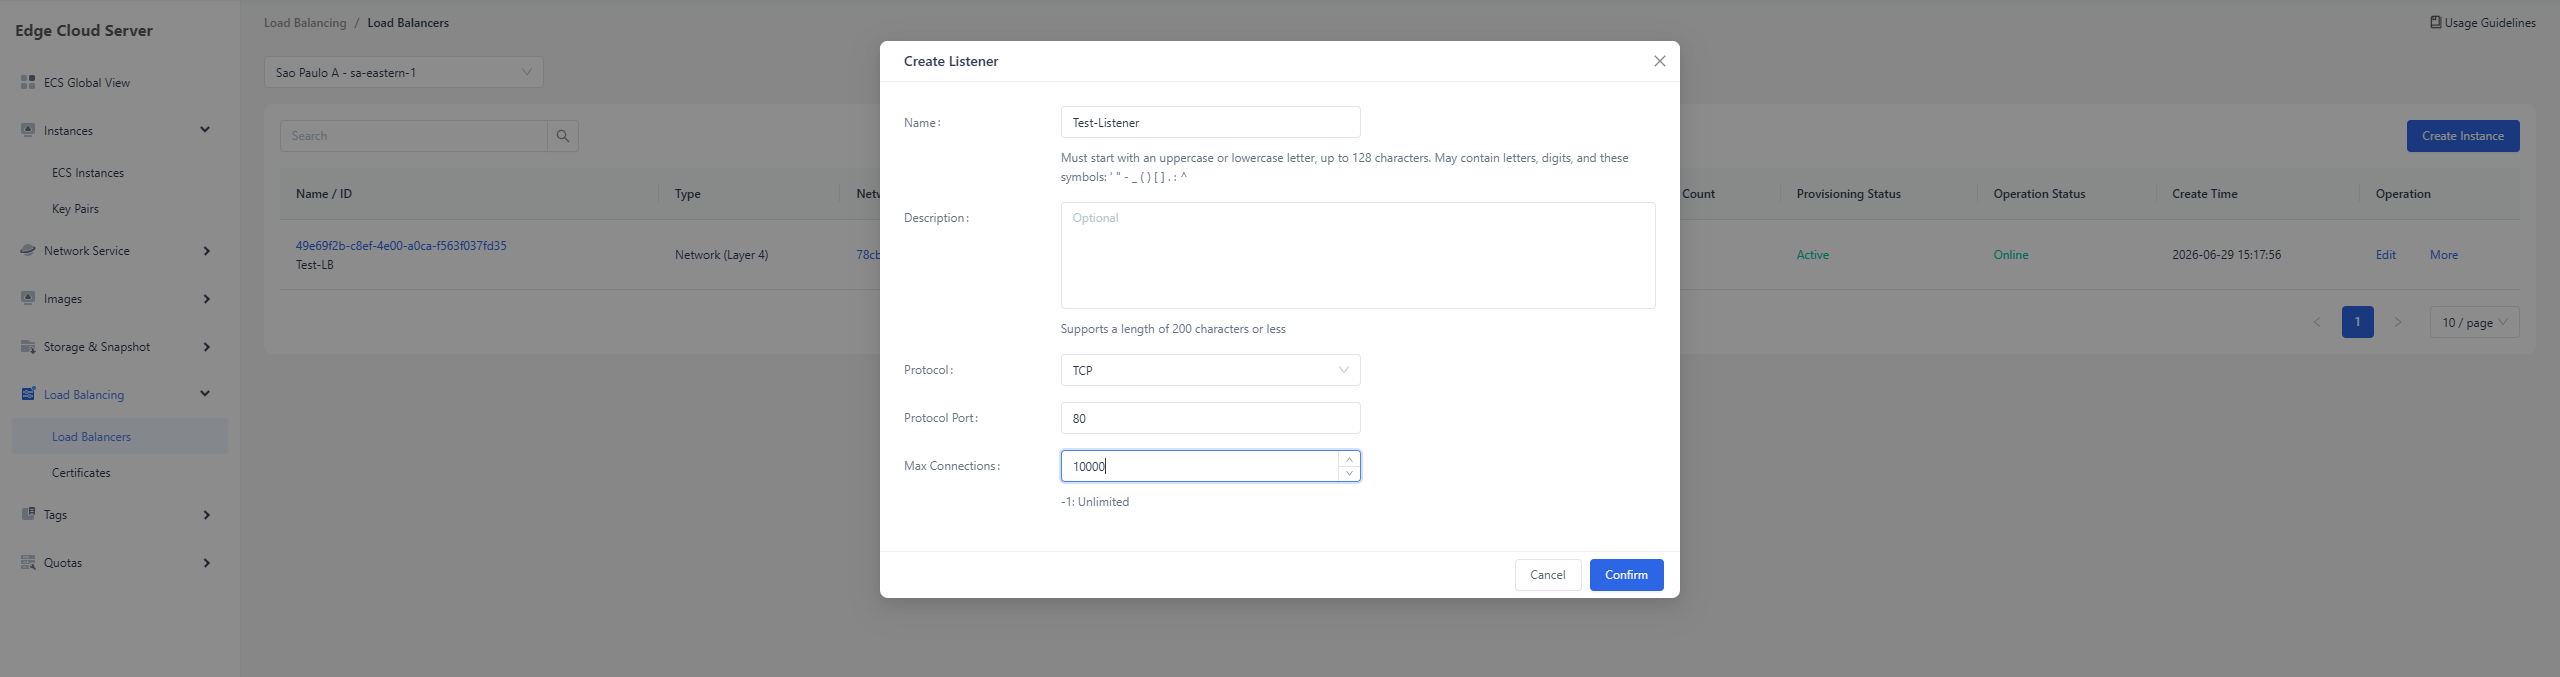
Once the listener is successfully created, its "Provisioning Status" in the listener list will transition to "Active", and its "Operating Status" will switch to "Online".
Removing Listener
In the instance details page, navigate to the listeners list, click the "More" dropdown menu to the right of the target listener, and select "Delete".
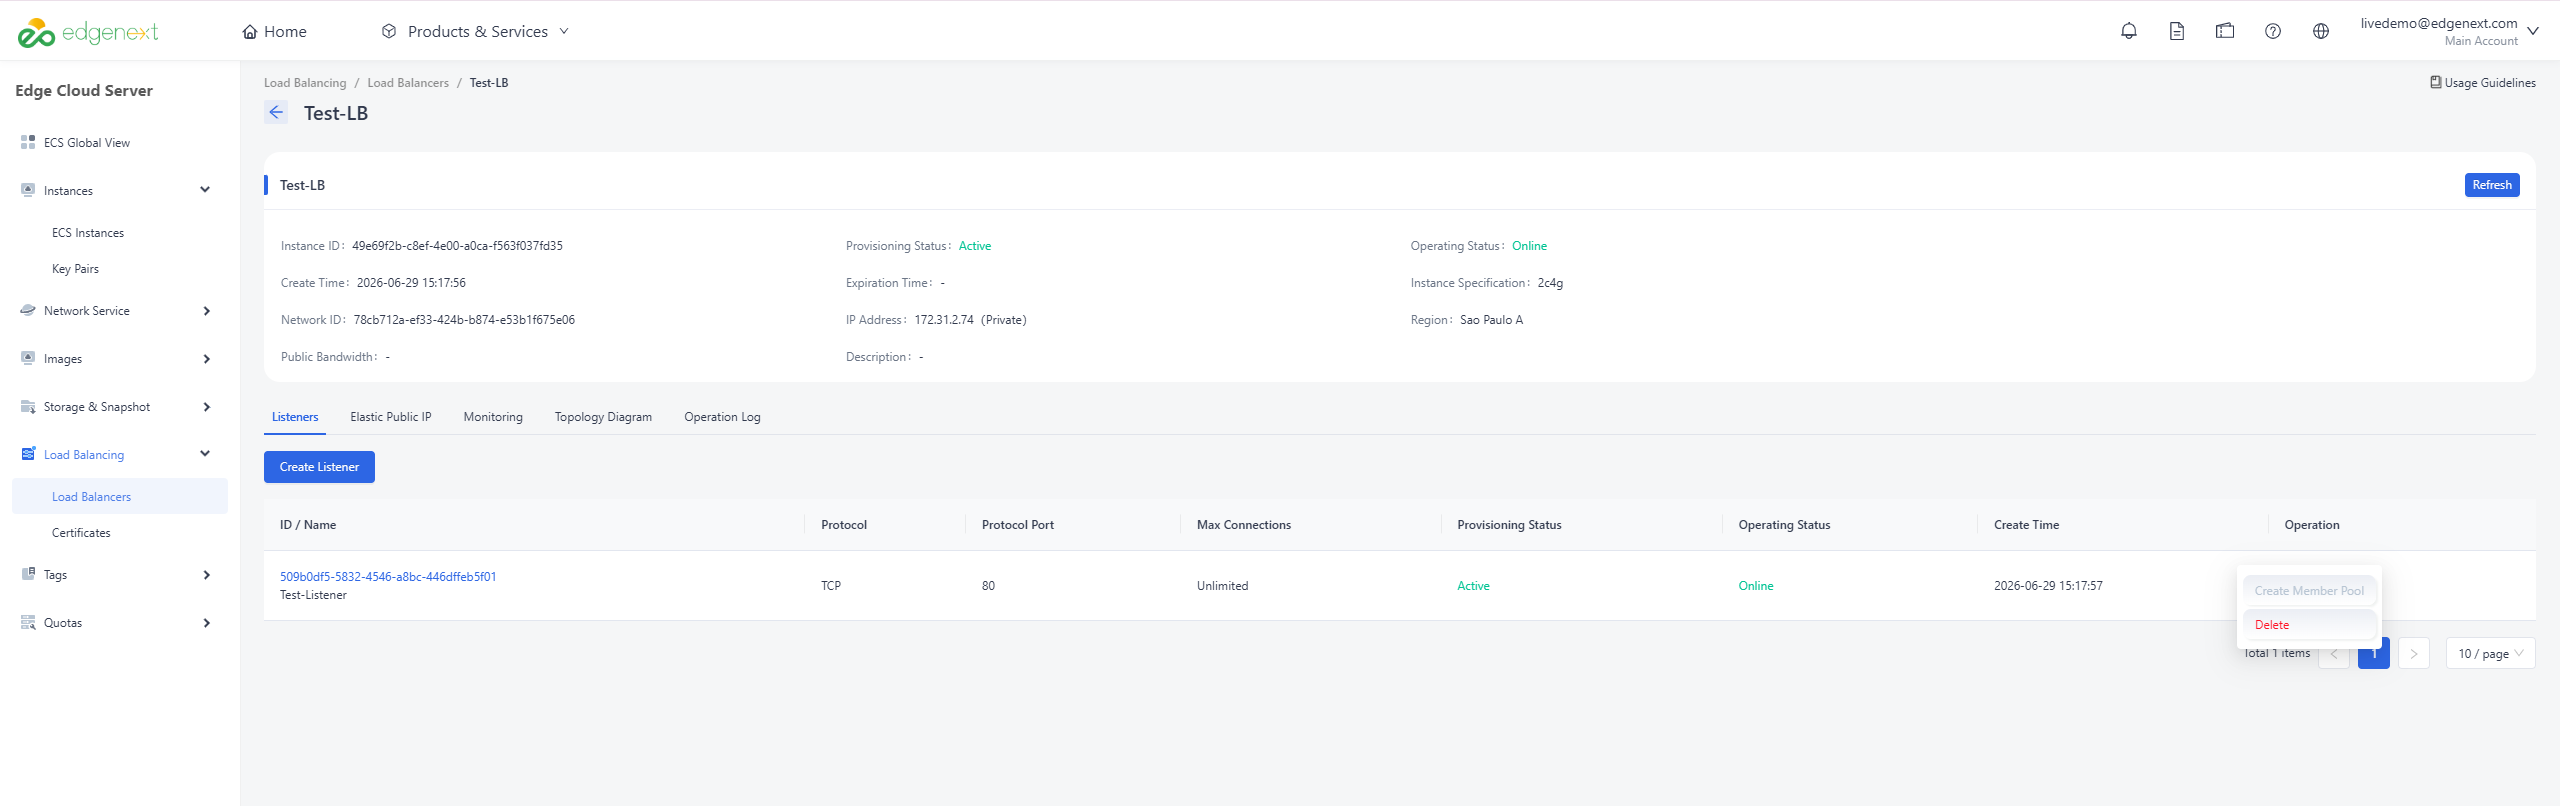
In the delete confirmation dialog, verify the details of the target listener and click "Confirm" to execute the deletion.
Upon successful deletion, the corresponding entry will be removed from the listener list.
Creating a Member Pool
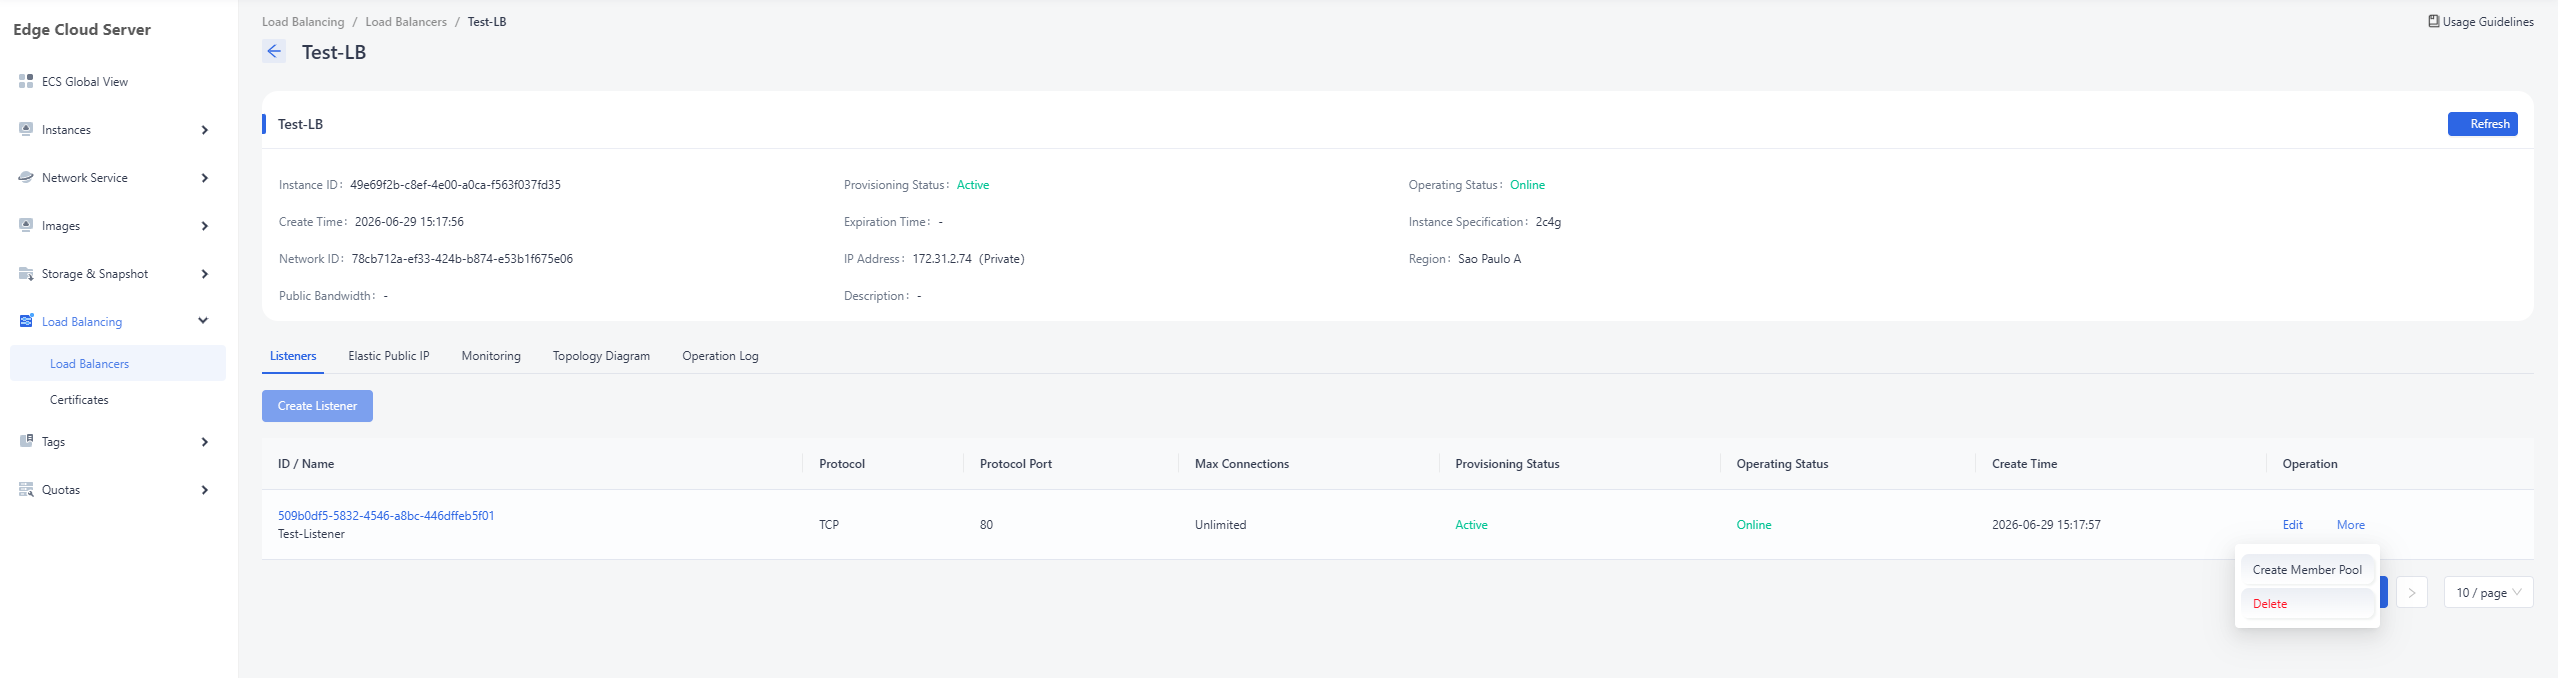
On the instance details page, locate the listeners list. Click the "More" dropdown menu to the right of the target listener and select "Create Member Pool".
On the create member pool page, configure the "Basic Configuration", "Health Check Configuration", and "Add Members" sections based on your specific business requirements. Once the setup is complete, click "Confirm Create" to provision the resource.
Parameter name Parameter description Basic Configuration Name A user-defined name used to identify the member pool. Description A user-defined description providing additional details about the member pool. Protocol The backend protocol used by the members within the pool to receive traffic (e.g., TCP, UDP). Load Balancing Algorithm The method used to distribute incoming traffic among the pool members. Supported algorithms include: - Round Robin: Distributes requests sequentially across the list of members. - Least Connections: Directs traffic to the member with the fewest active connections. - Source IP: Uses a hash of the source IP address to ensure a client is consistently routed to the same member. Health Check Configuration Name A user-defined name to identify the health monitor. Type The protocol or diagnostic method used to perform health checks (e.g., HTTP, TCP, PING, UDP-CONNECT). Add Members Port The service port on which the backend member (compute node) listens for traffic. Weight The numerical weight assigned to a member. This determines the proportion of traffic the member receives relative to others in the pool (higher weights receive more traffic). 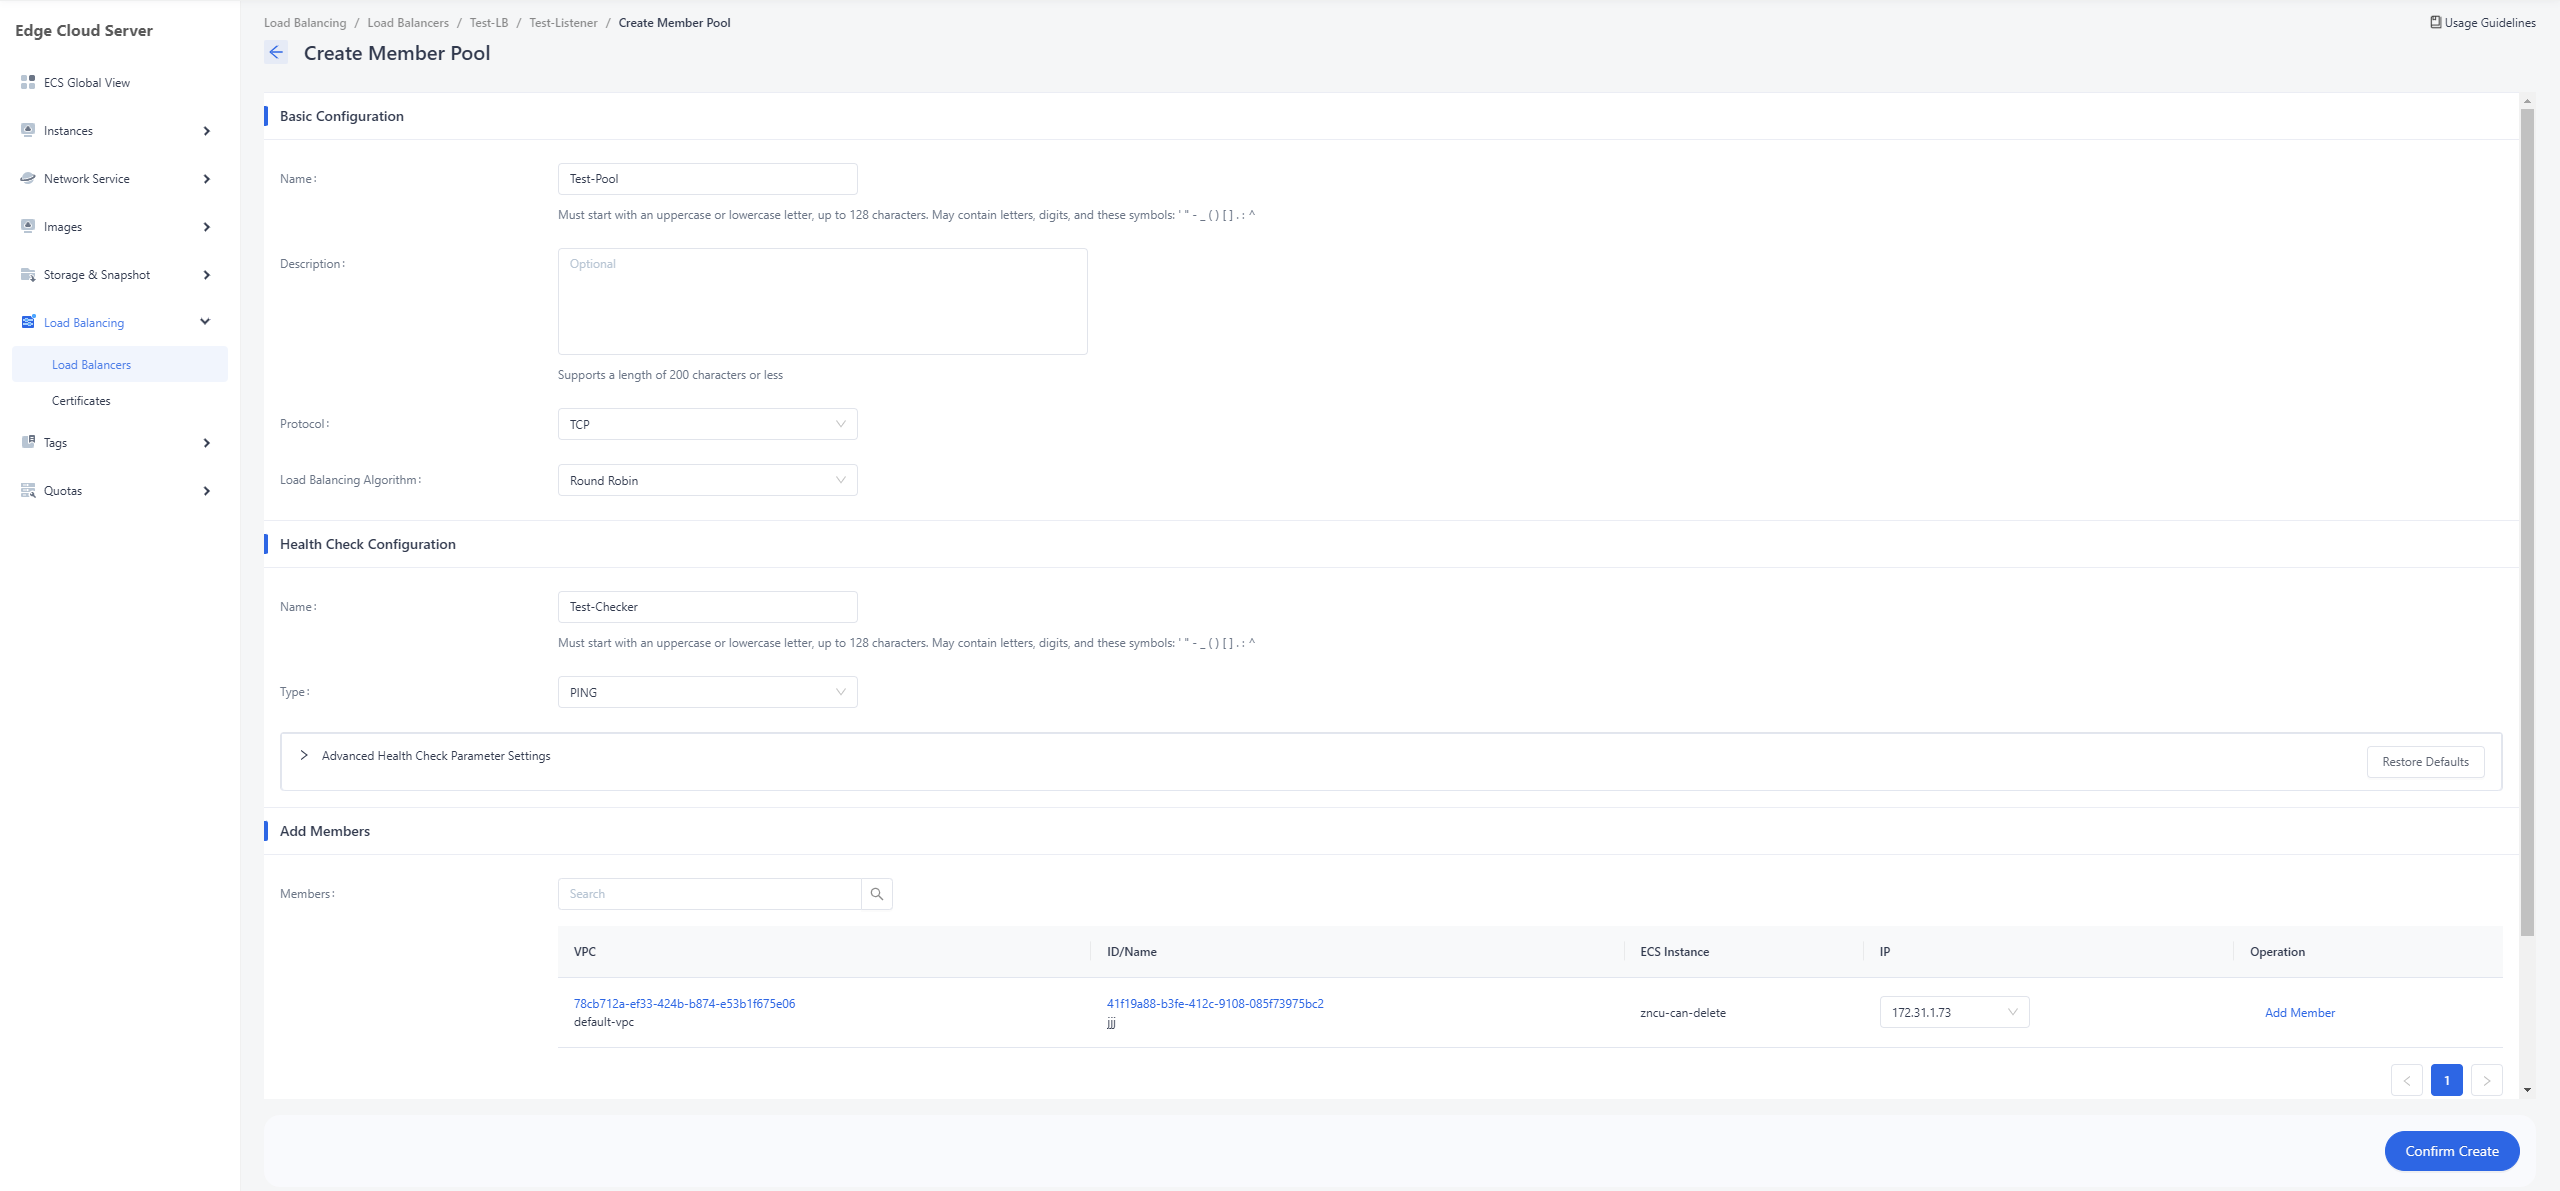
Adding Members to Pool
On the listener details page, locate the target pool in the member pools list. Click the "More" dropdown menu to the right of the pool and select the "Add Member" button.
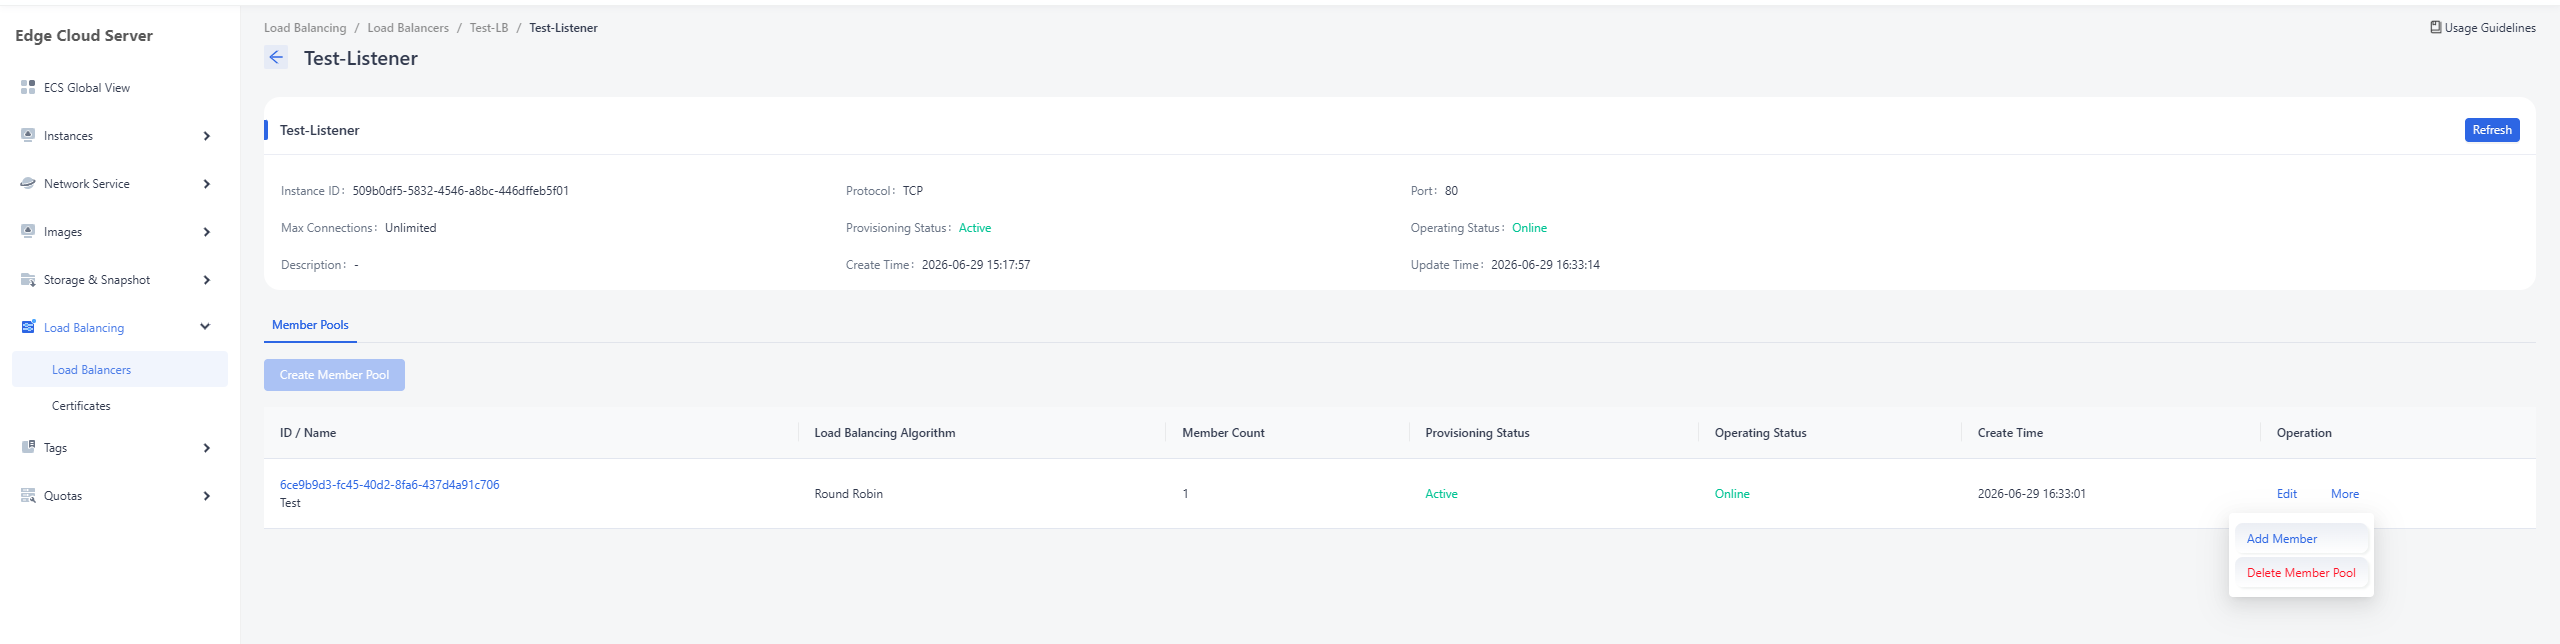
In the add member dialog box, select the IP addresses of the backend members you wish to add to the pool from the list based on your business requirements. Specify the "Port" and "Weight" for each selected member, then click "OK" to finalize the addition.
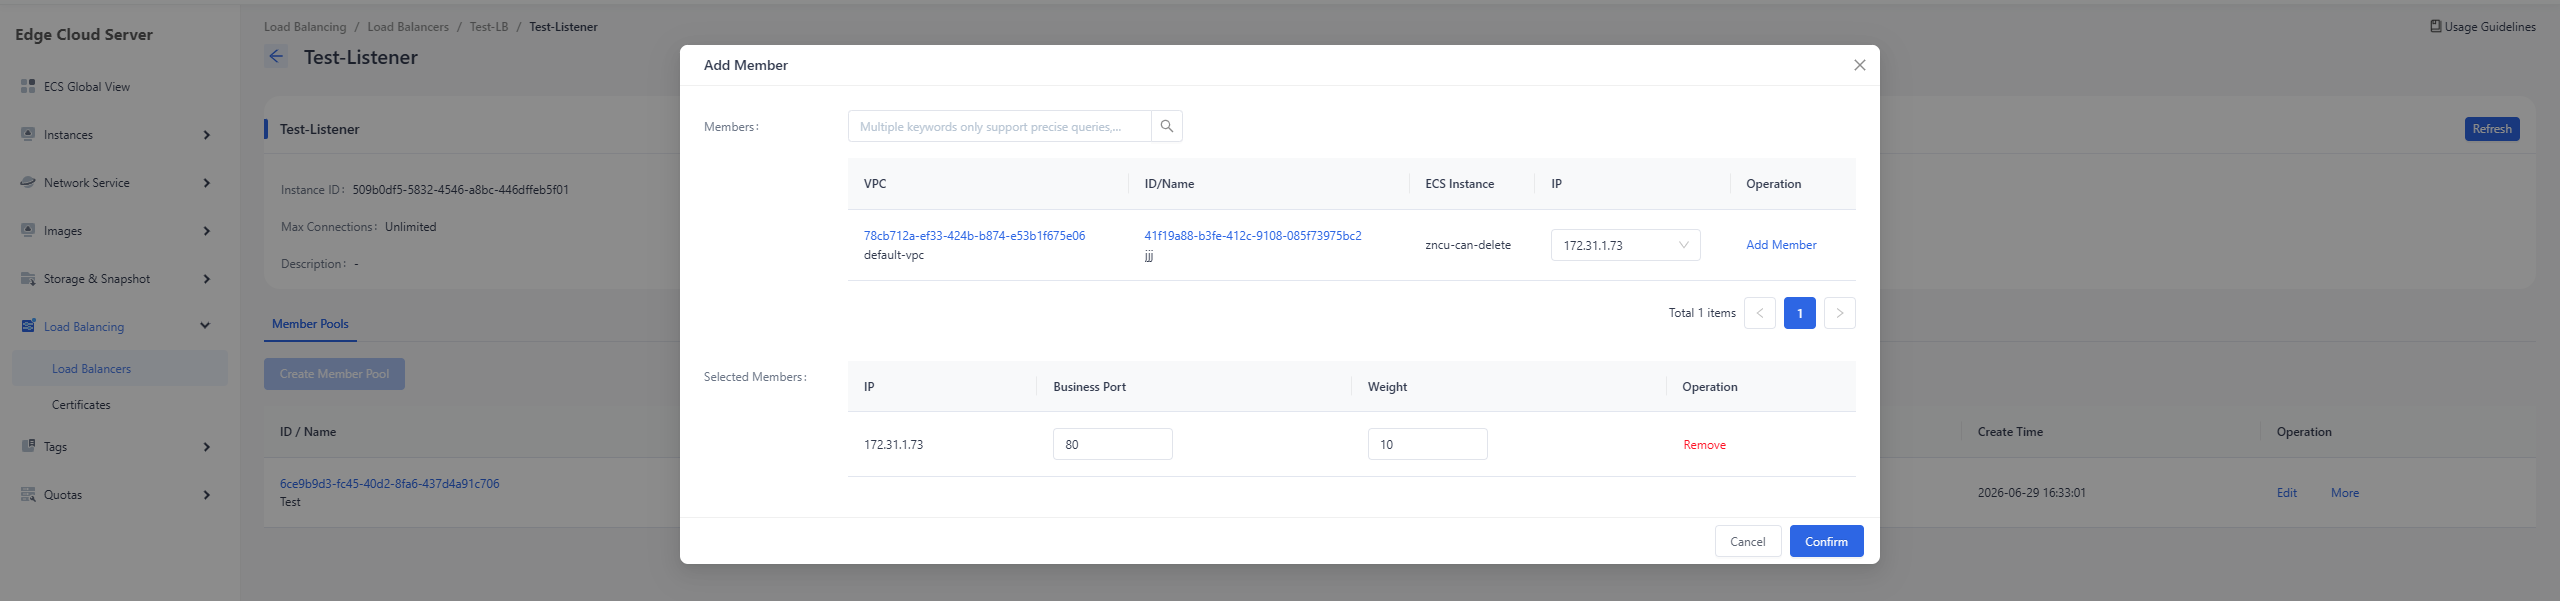
Once the member has been successfully added, its "Provisioning Status" will transition to "Active" and its "Operating Status" will switch to "Online", provided the backend member is functioning normally. When traffic is routed through the load balancer, this member will receive a proportional share of requests based on the configured load balancing algorithm and weight settings.
Modifying Member Weights
Navigate to the member pool details page. In the member list, locate the member whose weight needs adjustment, click the "More" dropdown menu on the right, and select "Change Weight" to open the weight editing interface.
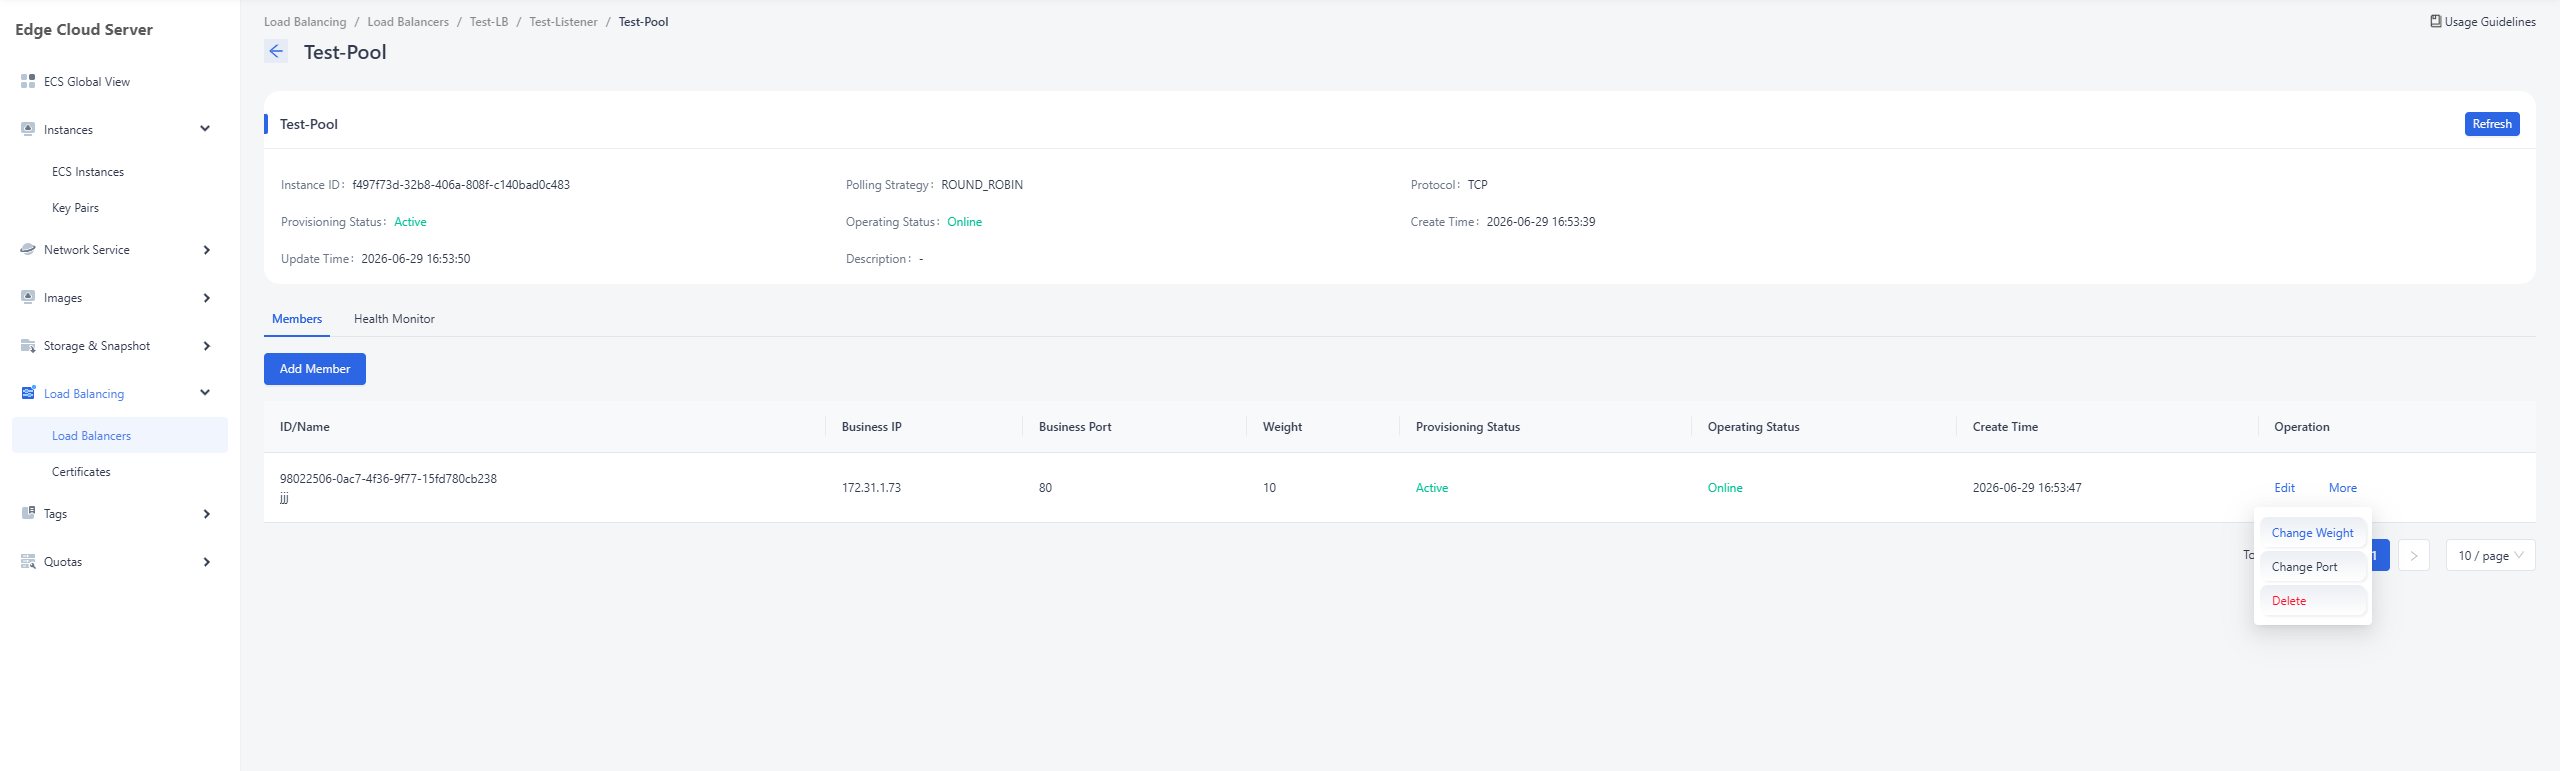
In the change weight dialog box, update the "Weight" value according to your business requirements, then click "OK" to confirm the modification.

Once the change is successful, the "Weight" column for that member will be updated accordingly.
Modifying Member Ports
Navigate to the member pool details page. In the member list, locate the member whose service port needs to be changed, click the "More" dropdown menu on the right, and select "Change Port" to open the port editing interface.
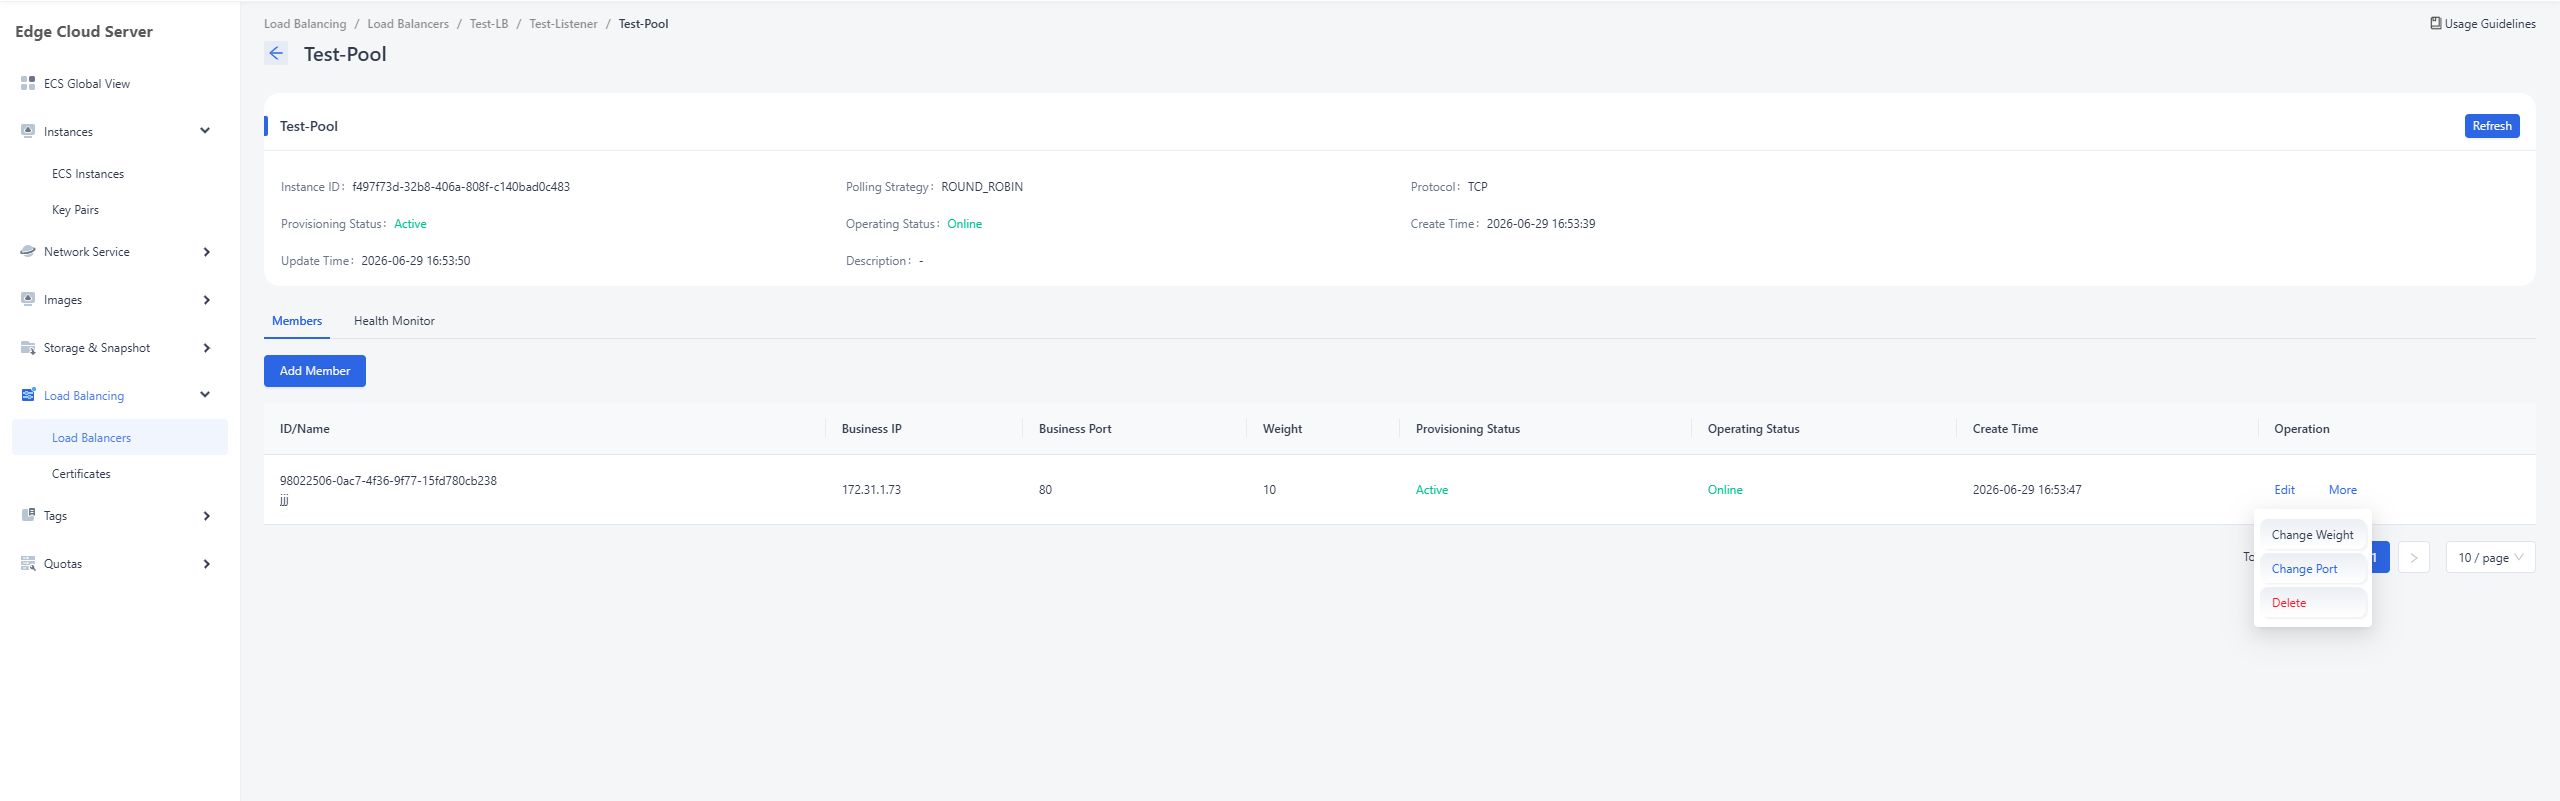
In the change port dialog box, enter the updated "Business Port" and click "OK" to confirm the modification.

Once the change is successful, the "Business Port" column for that member will be updated to reflect the new value.
Removing Member from Pool
Navigate to the member pool details page. In the member list, locate the member you wish to remove, click the "More" dropdown menu on the right, and select "Delete".
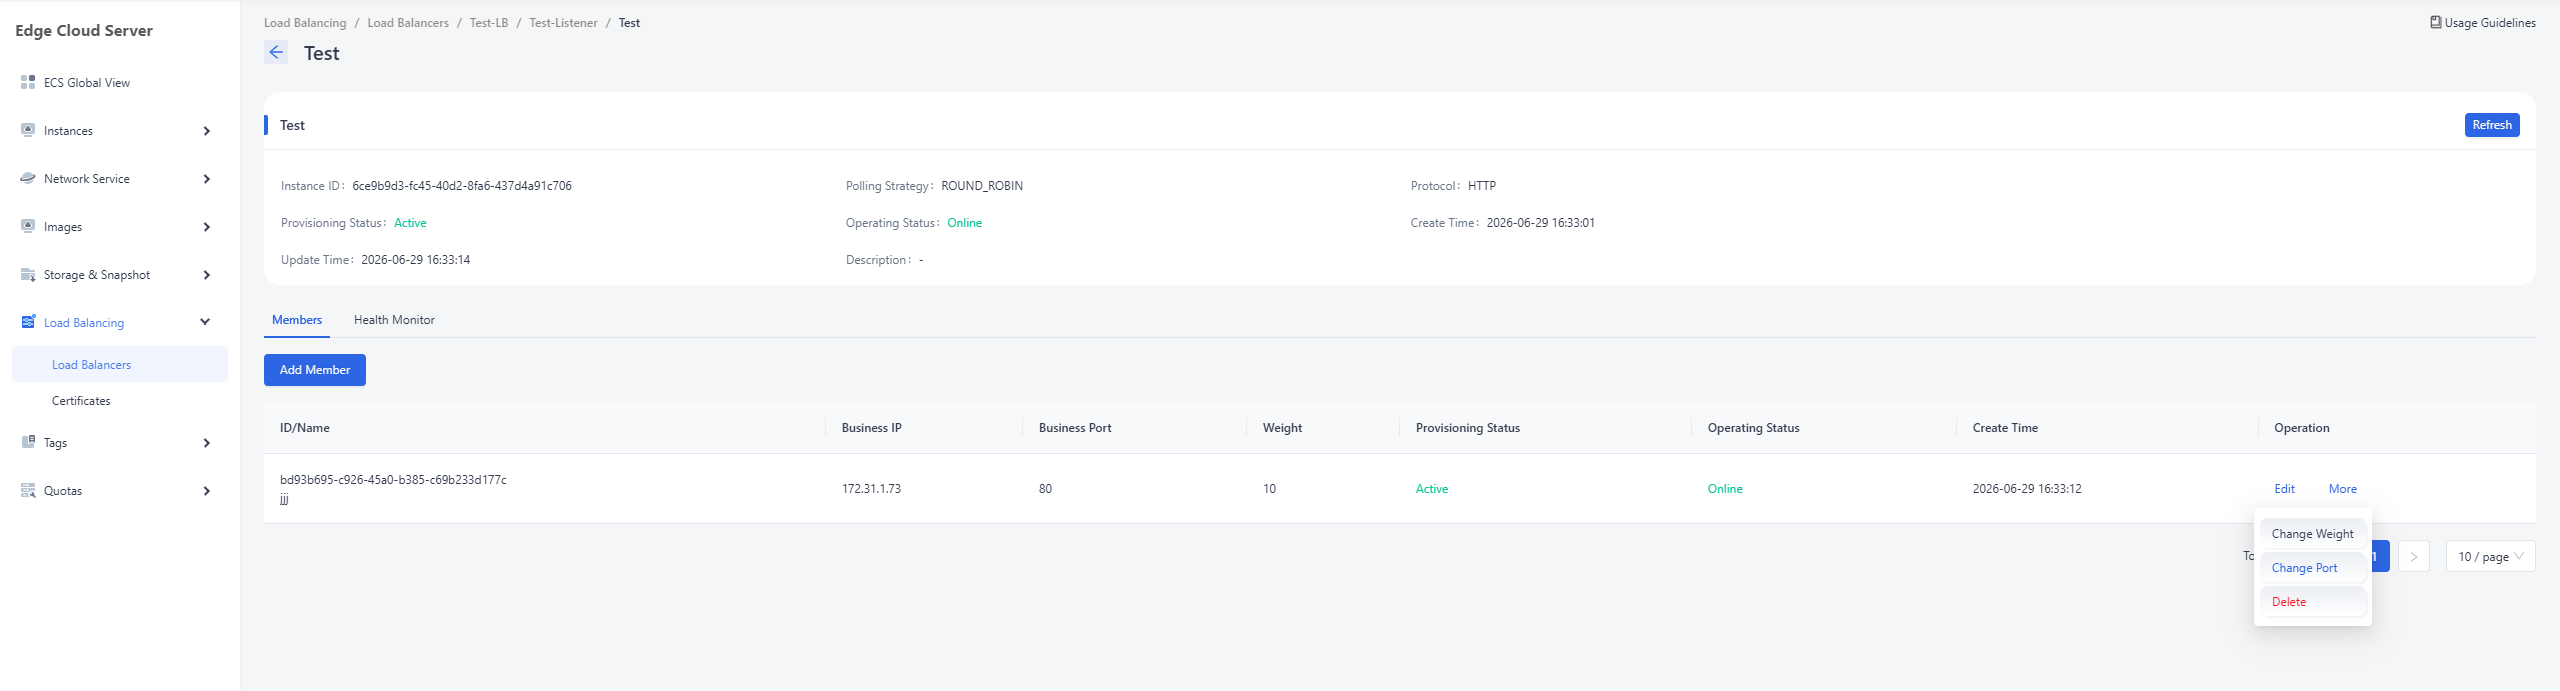
In the delete member dialog box, verify the information of the member to be removed, then click "Confirm" to execute the deletion.
Upon successful deletion, the member is removed from the member list.
Editing Health Checker
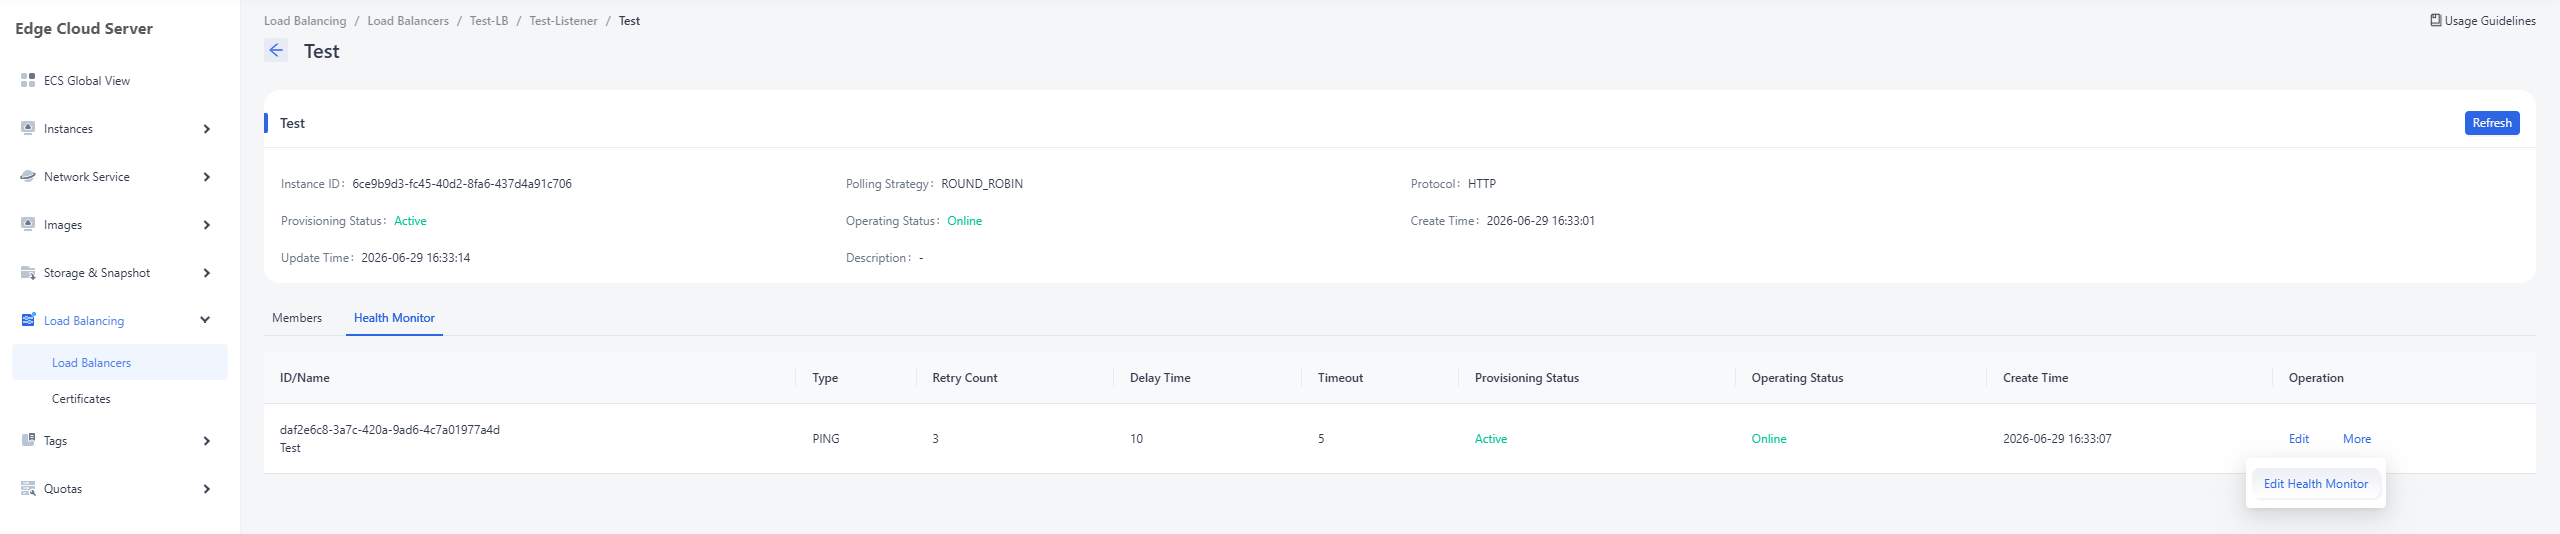
Navigate to the member pool details page. In the "Health Checker" tab, click "Edit Health Checker" under the "More" menu to the right of the target health checker to enter the health checker editing interface.
On the health checker editing interface, edit the health checker parameters based on your actual business requirements and click "OK" to confirm the modification.
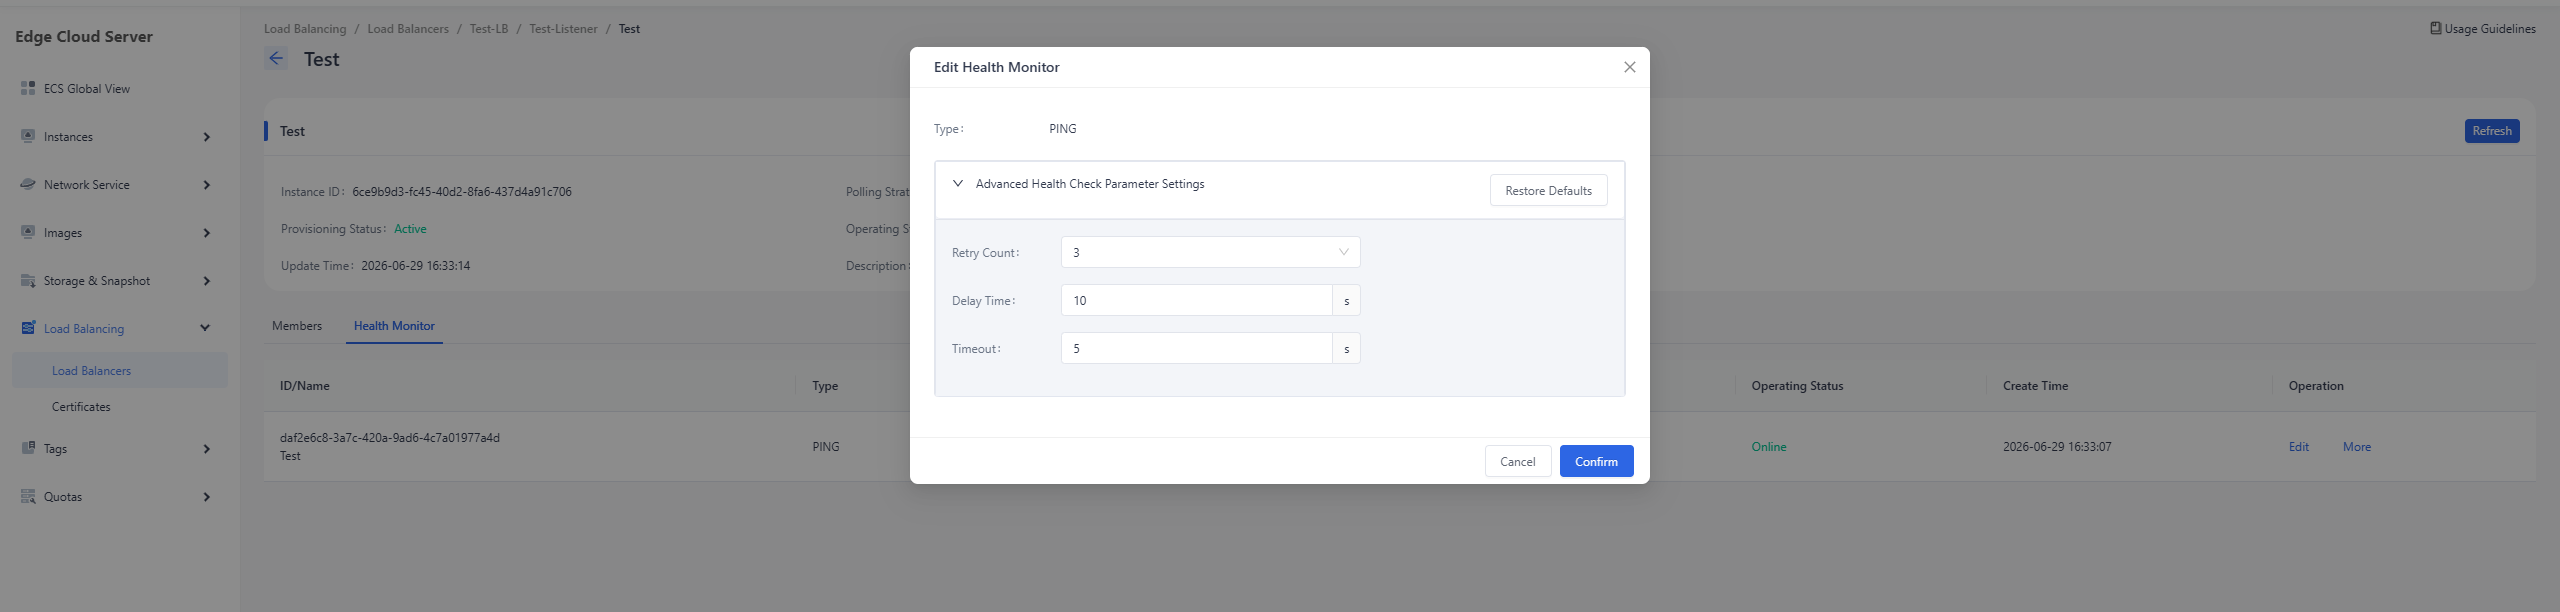
Once the update is successful, the relevant parameter columns in the health checker list will be updated to reflect the new values.
Application Load Balancer Operating Guide
Creating an Application Load Balancer
In the products column, click the "Edge Cloud Server" tab under "Edge Nodes Services" to enter the "Load Balancer Service" interface.

On the "Load Balancer Instances" function page, the main Operating area presents a list of the user's load balancer instances within the corresponding region. By clicking the "Create Instance" button in the upper right corner of the list, you will enter the load balancer type selection page.
On the "Load Balancer Types" selection page, select "Application Load Balancer" and click "Confirm" to enter the application load balancer creation page.
On the instance creation page, configure "Basic Configuration", "Instance Configuration", "Network & Bandwidth", and "Listener" based on your actual business requirements. Once the settings are complete, click "Confirm Order" to place the order and create the resources.
Parameter name Parameter description Basic Configuration Name A user-defined name used to identify the load balancer instance. Description User-defined descriptive information about the load balancer. Region The region where the load balancer operates. Different regions have different resource environments and network configurations. Users can select the nearest region based on the geographic location of their actual business operations to improve the efficiency of load balancer access. Mode Determines whether the load balancer operates within a VPC or exposes services to the Internet. Selecting "Internet-facing" creates a load balancing service accessible via the Internet, while selecting "Internal-facing" creates a load balancing service accessible only within the VPC. Instance Configuration Architecture Configuration of CPU cores and memory capacity for the load balancer instance. Select the appropriate instance configuration based on the actual business load. Network & Bandwidth Select Network The network to which the load balancer instance is connected, through which the load balancer can be reached. Elastic Public IP The Elastic Public IP associated with the load balancer instance, through which the load balanced business services can be served to the Internet. Listener Name A user-defined name used to identify the listener. Description User-defined descriptive information about the listener. Protocol The protocol the listener monitors. Options include "HTTP" and "HTTPS". When "HTTPS" is selected, the load balancer supports SSL offloading. SSL Parsing Method The method for SSL parsing when creating an HTTPS listener; currently, only the "Single-item authentication" method is supported. Server Certificates The certificates required for SSL offloading when creating an HTTPS listener. For certificate operations, refer to the "Create Certificate" and "Delete Certificate" sections later in this guide. Optional Headers Optional headers to be inserted into the HTTP packets. This includes three selectable options: "X-Forwarded-For", "X-Forwarded-Port", and "X-Forwarded-Proto". Protocol Port The protocol port the listener monitors. Max Connection The upper limit of network connections supported by the listener. 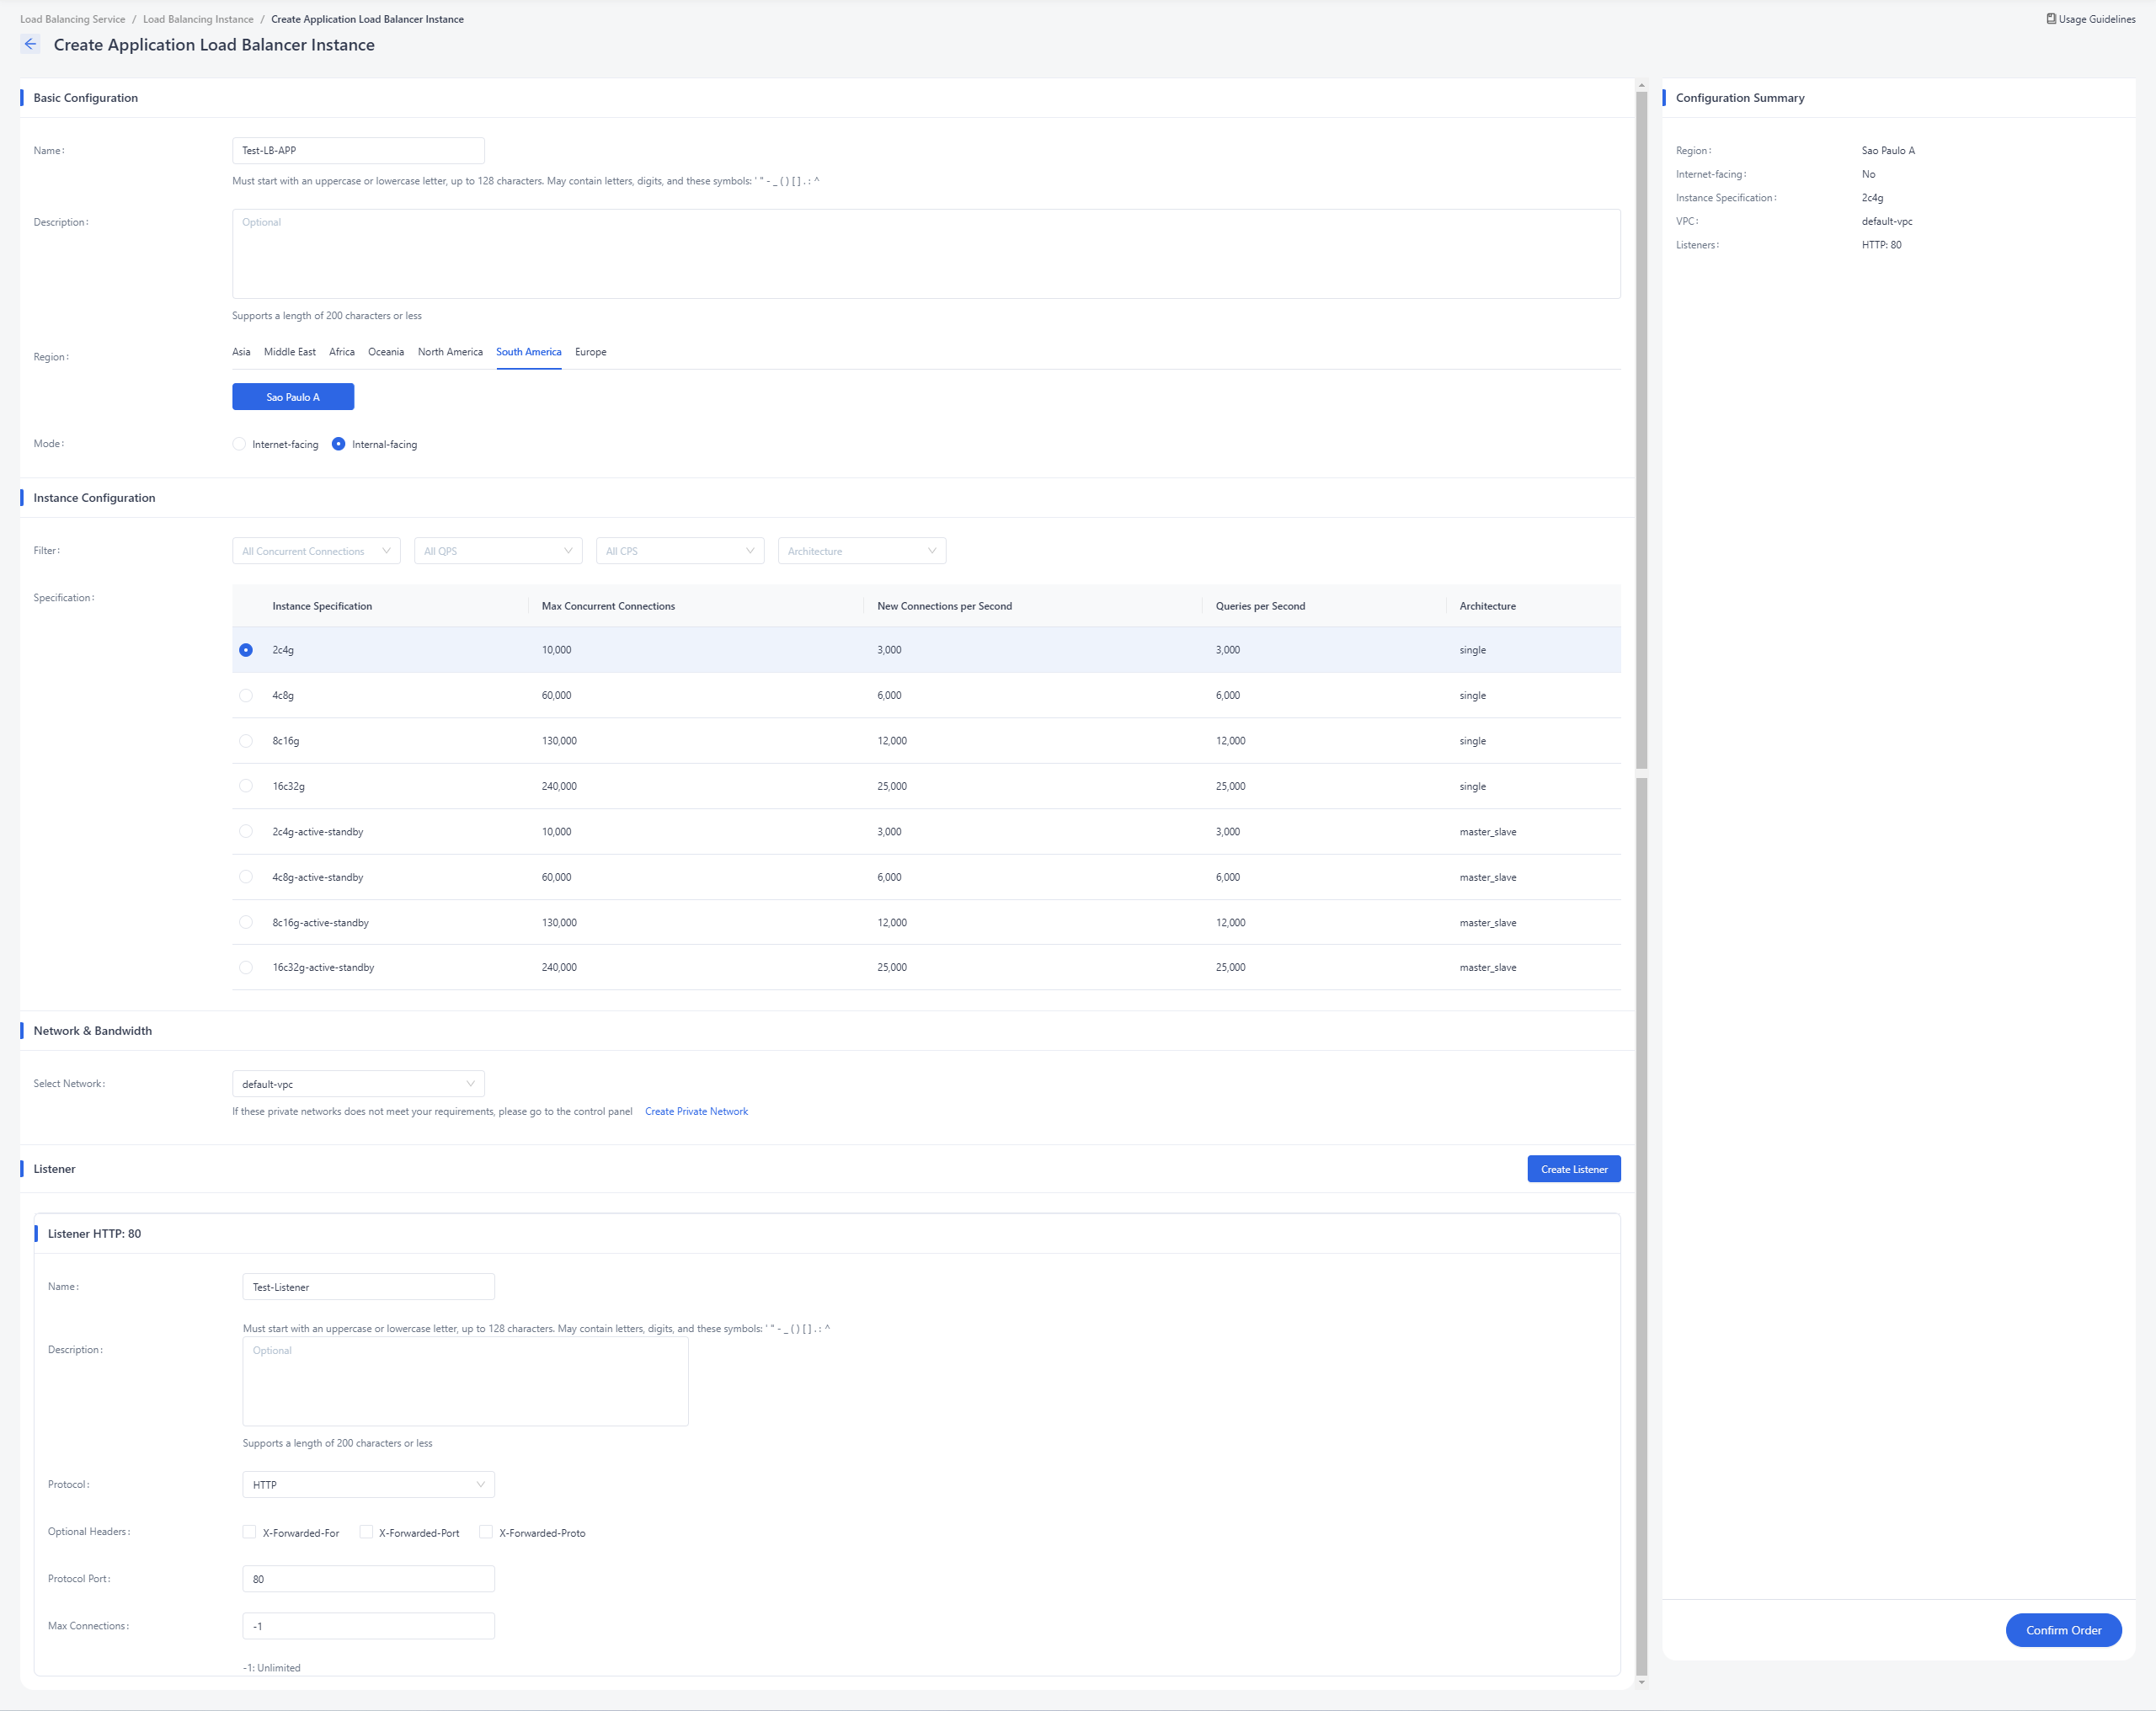
Once the "Provisioning Status" of the resource in the load balancer instance list transitions to "Active" and the "Operating Status" switches to "Online", it indicates that the load balancer instance is running normally. Click the "ID" of the load balancer instance can enter its details page.
Deleting Load Balancer
The deletion process is identical to the operation for a network load balancer.
Binding Elastic Public IP
The process for binding an "Elastic Public IP" is identical to the operation for a network load balancer.
Unbinding Elastic Public IP
The process for unbinding an "Elastic Public IP" is identical to the operation for a network load balancer.
Creating New Listener Under Load Balancer
There are two ways to create a new listener under a load balancer:
a. In the load balancer instance list, click "Create Listener" under the "More" menu to the right of the target instance.
b. Enter the load balancer instance details page and click the "Create Listener" button under the "Listener" tab.
In the listener creation dialog box, fill in the relevant parameters based on your actual business requirements and click "OK" to confirm the creation of the listener.
Parameter name Parameter description Name A user-defined name used to identify the listener. Description User-defined descriptive information about the listener. Protocol The protocol monitored by the listener. Options include "HTTP" and "HTTPS". When "HTTPS" is selected, the load balancer supports SSL offloading. SSL Parsing Method The SSL parsing method used when creating an "HTTPS" protocol listener; currently, only the "Single-item authentication" method is supported. Server Certificates The certificates required to perform SSL offloading when creating an "HTTPS" protocol listener. Optional Headers Optional headers to be inserted into the HTTP messages. This includes three selectable options: "X-Forwarded-For", "X-Forwarded-Port", and "X-Forwarded-Proto". Protocol Port The protocol port monitored by the listener. Max Connection The upper limit of network connections supported by the listener. 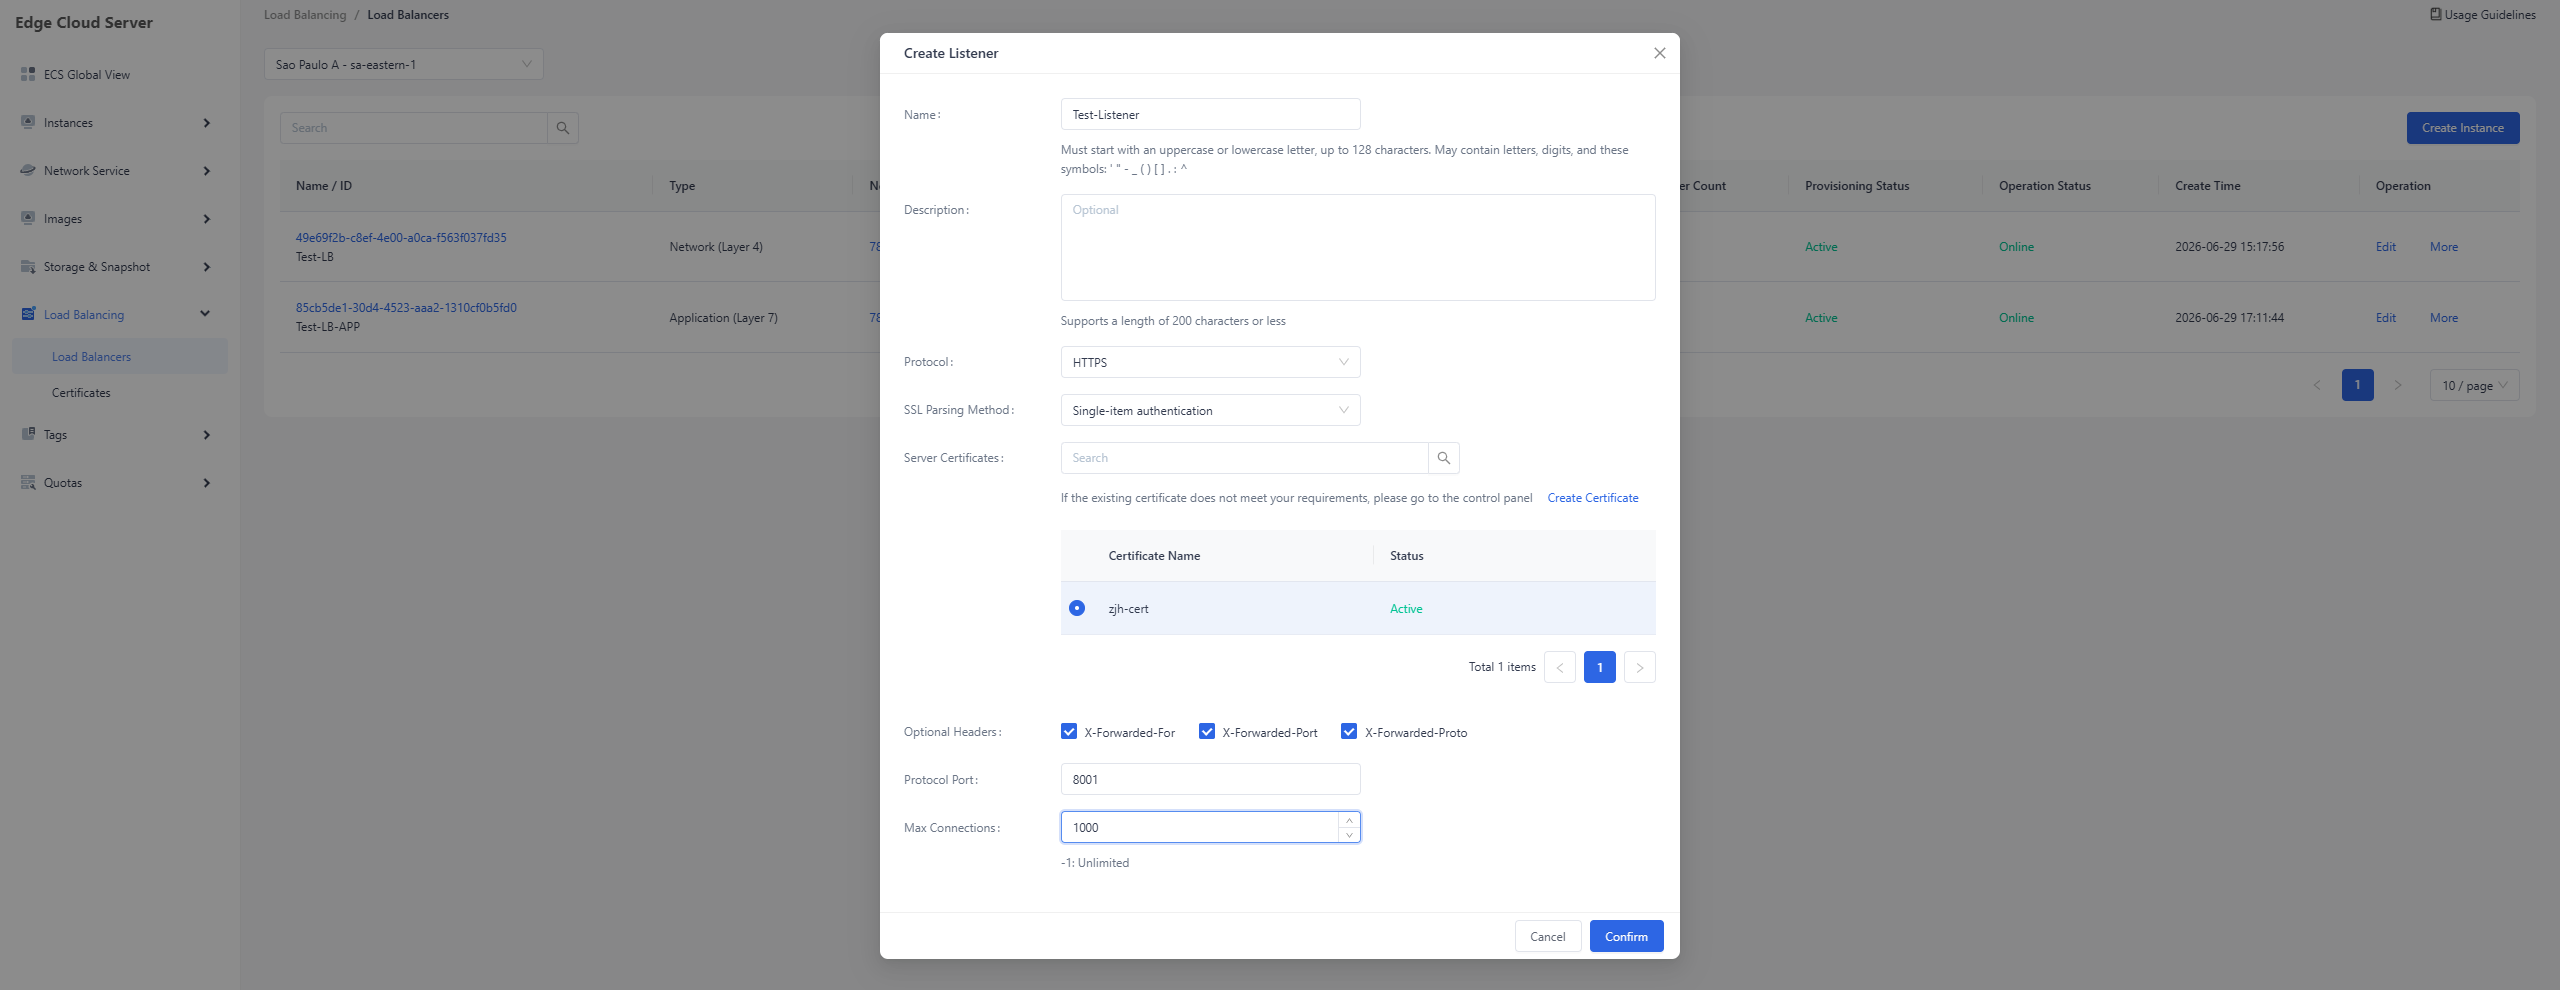
Once the listener is created successfully, the "Provisioning Status" of the relevant listener instance in the listener list will switch to "Active", and the "Operating Status" will switch to "Online".
Removing a Listener Under a Load Balancer
The operation for removing a listener is identical to that of a network load balancer.
Creating a New Member Pool Under a Listener
There are two ways to create a new member pool under a listener:
a. In the listener list on the load balancer instance details page, click "Create Member Pool" under the "More" menu to the right of the target listener instance.
b. Enter the listener instance details page and click the "Create Member Pool" button under the "Member Pools" tab.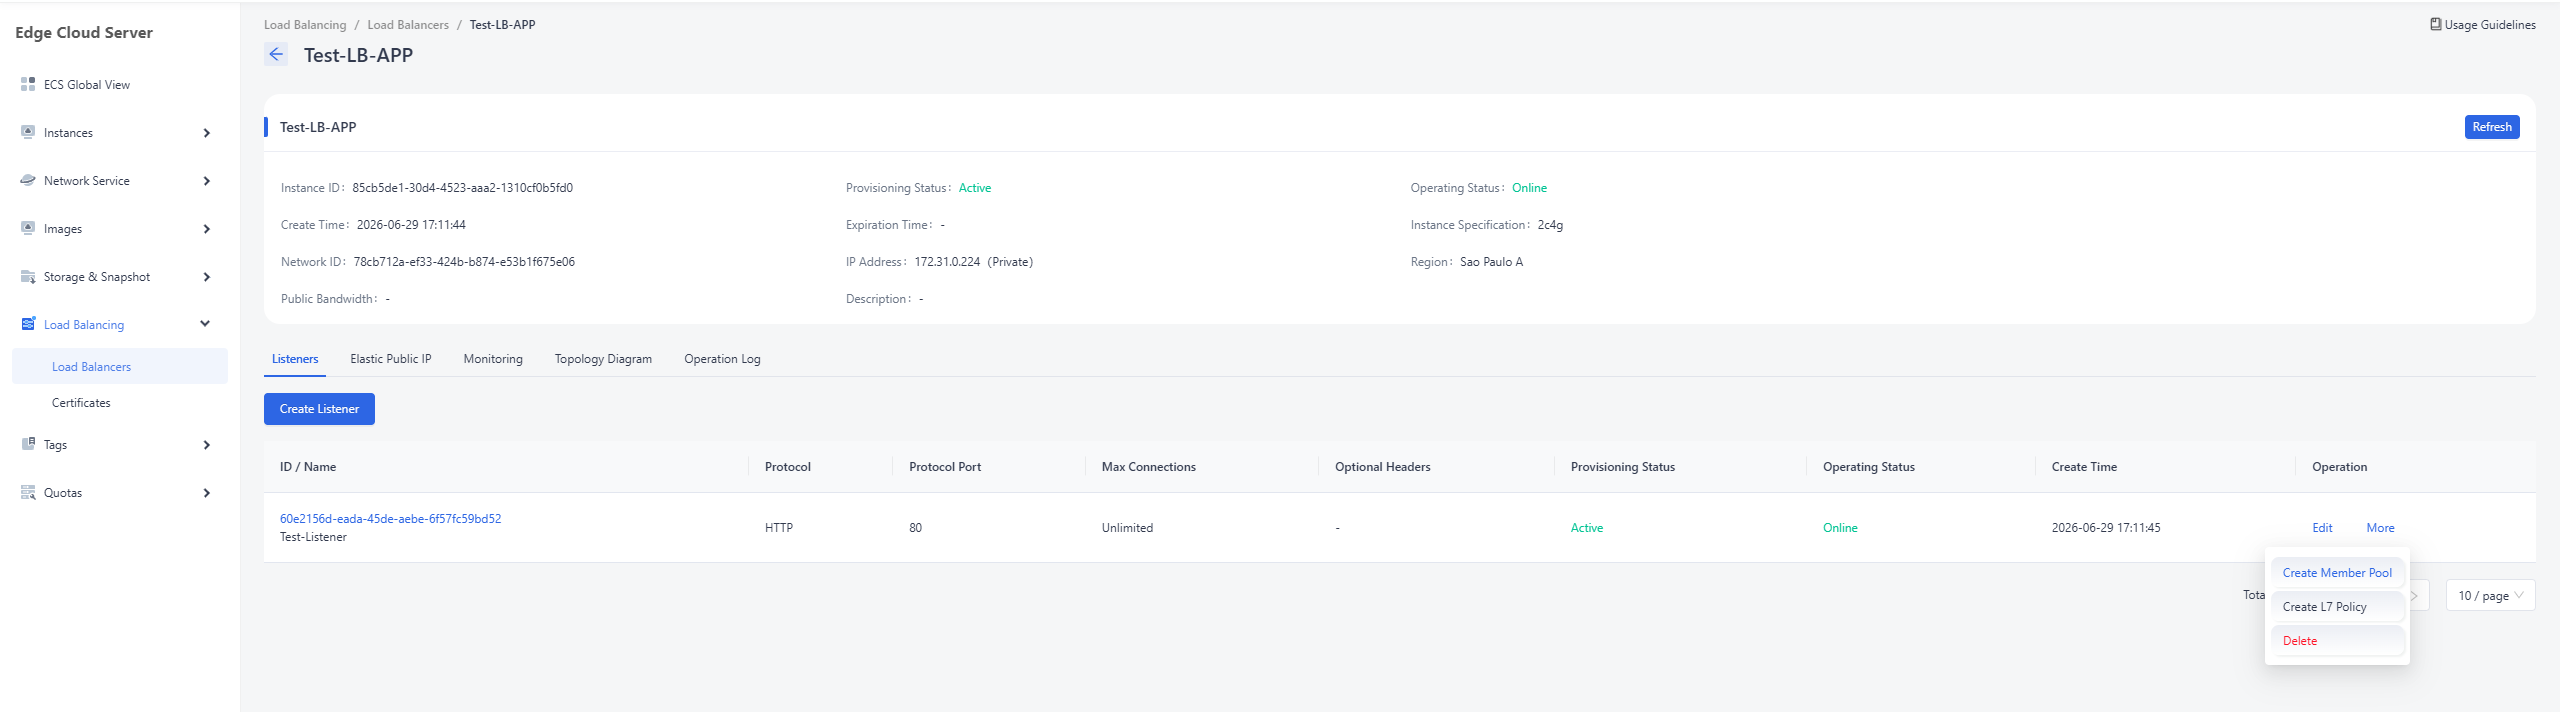
In the member pool creation dialog box, complete the configuration for "Basic Configuration", "Health Check Configuration", and "Add Members" based on your actual business requirements. Once the settings are finalized, click "Confirm Create" to place the order and create the resources.
Parameter name Parameter description Basic Configuration Name A user-defined name used to identify the member pool. Description User-defined descriptive information about the member pool. Protocol The protocol monitored by the actual backend members within the member pool. Load Balancing Algorithm The algorithm used for load balancing when accessing members in the pool. Three algorithms are supported: "Round Robin", "Least Connections", and "Source IP". Health Check Configuration Name A user-defined name used to identify the health checker. Type The type of method used by the health checker to perform health checks. Options include "HTTP", "HTTPS", "PING", "TCP", and "TLS_HELLO". Method When using an "HTTP" type health checker, this defines the HTTP request method used for the health check. Options include "GET", "POST", "PUT", "DELETE", "HEAD", "OPTIONS", and "PATCH". URL The HTTP URL path for requests used to test the health of backend members. It must be a string starting with a forward slash (/). Expected Status Code A list of HTTP status codes that should be included in the response to declare a member as operating normally. Add Members Port The port monitored by the member. Weight The weight assigned to the member for access within the member pool. 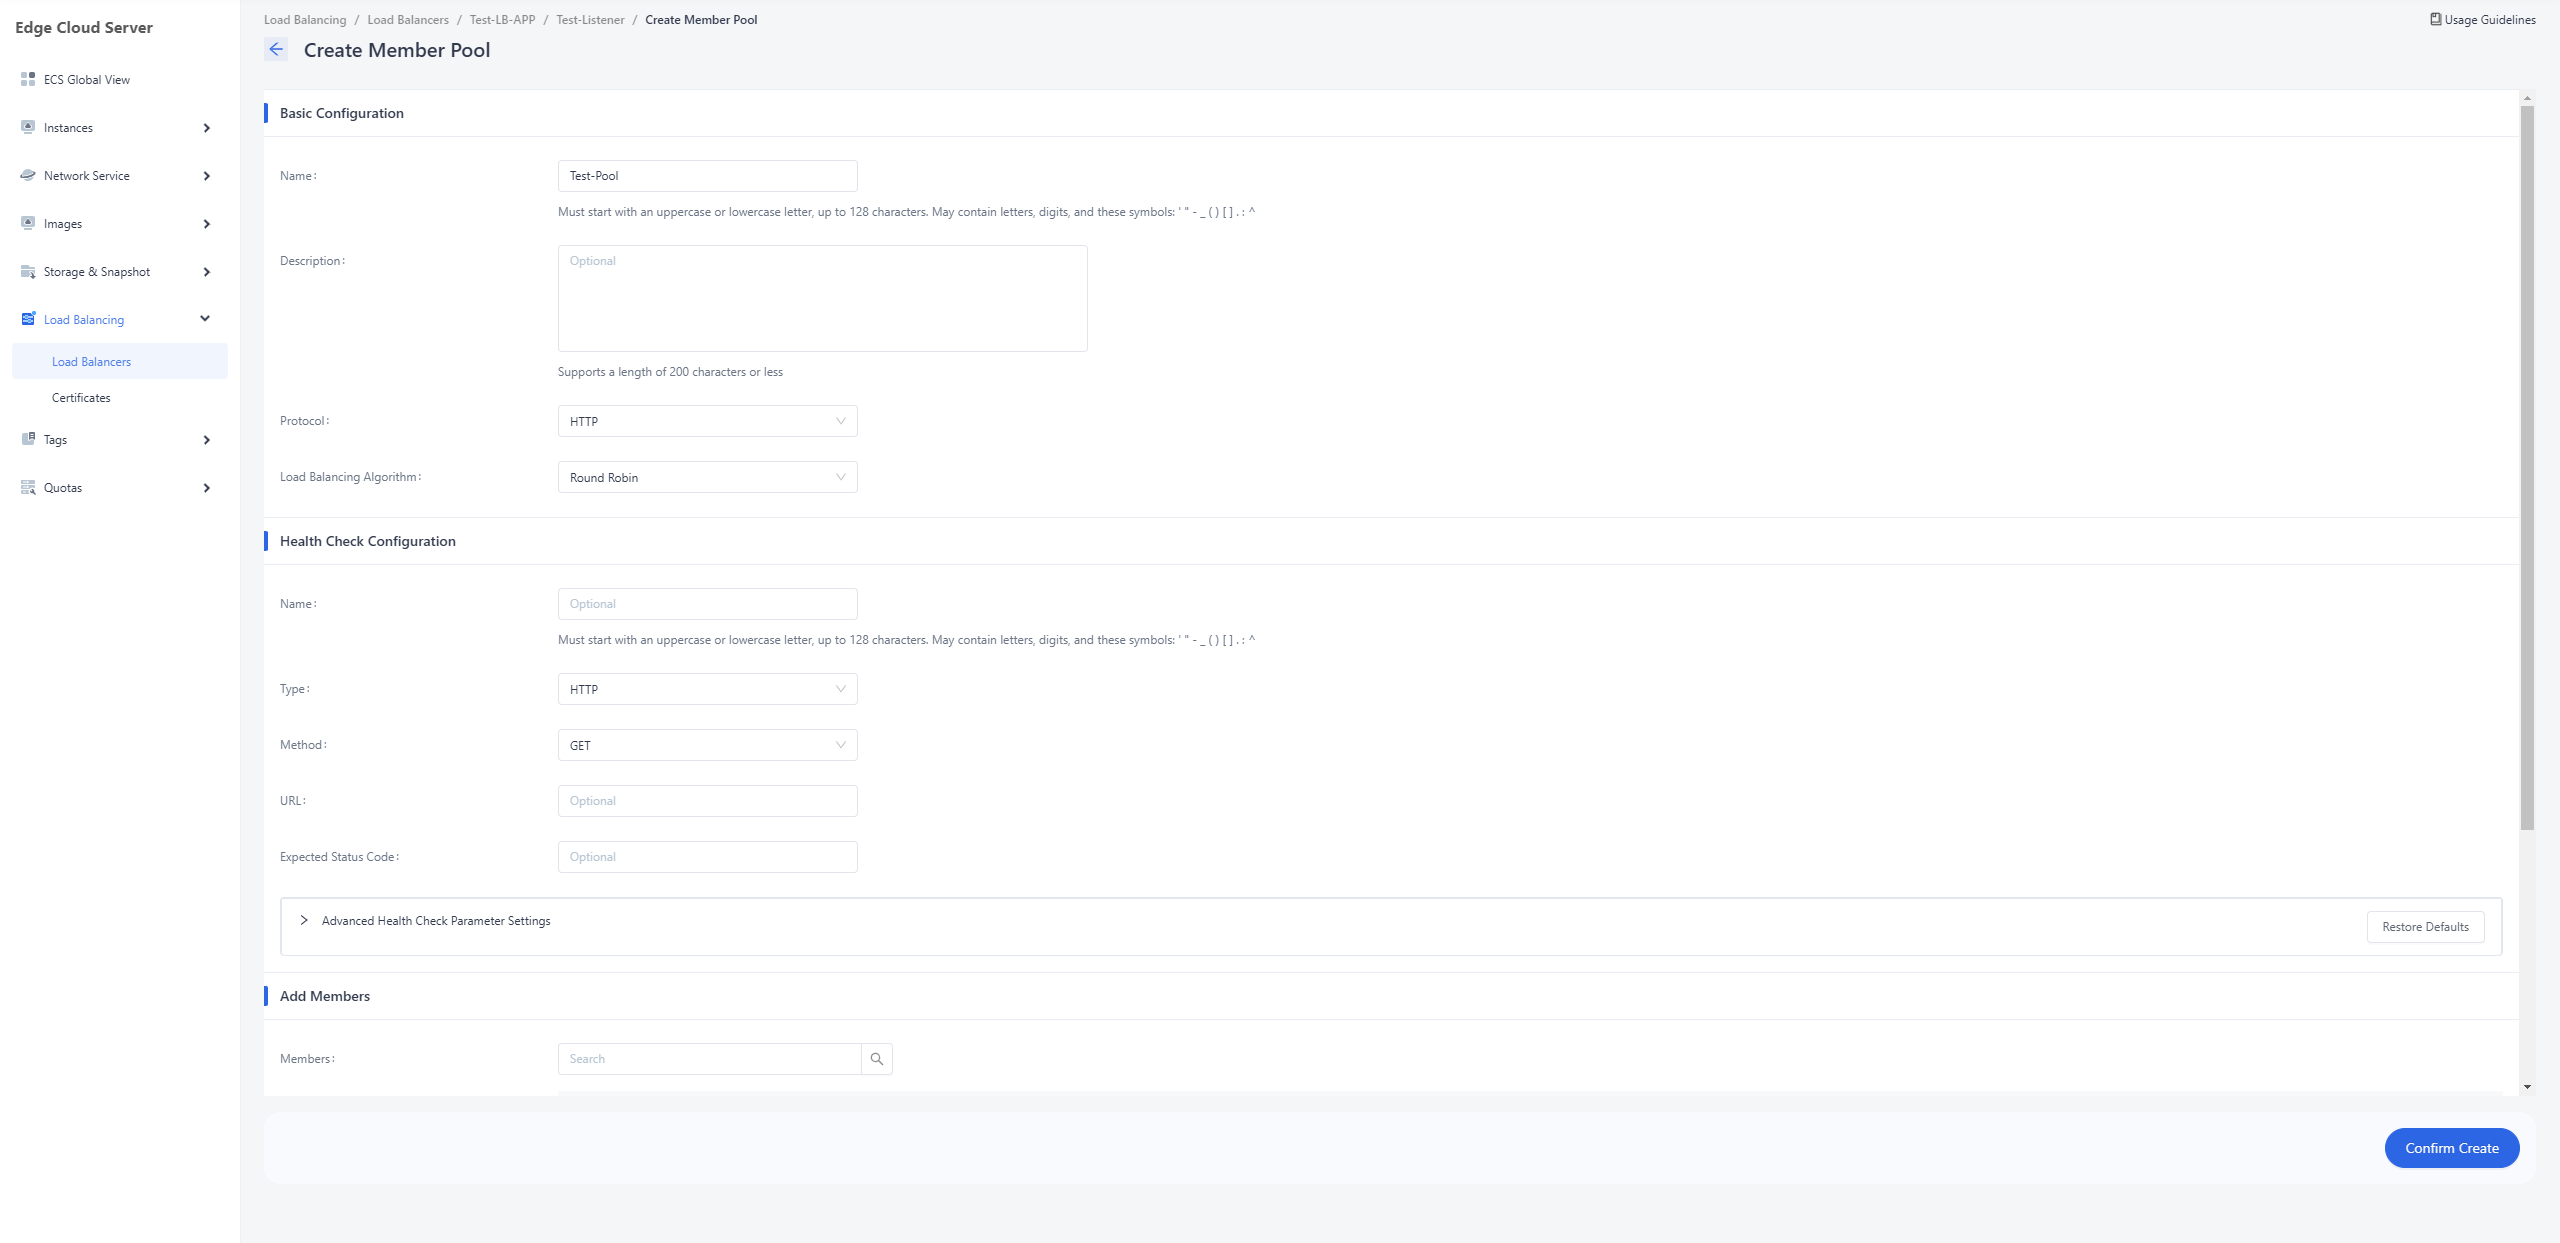
Once the member pool is created successfully, the newly created member pool will appear in the listener's member pool list, with its "Provisioning Status" as "Active" and its "Operating Status" as "Online".
Adding Member to Member Pool
The operation for adding a member to a member pool is identical to that of a network load balancer.
Modifying Member Weight
The operation for modifying a member's weight is identical to that of a network load balancer.
Modifying Member Port
The operation for modifying a member's port is identical to that of a network load balancer.
Removing Member from Member Pool
The operation for removing a member from a member pool is identical to that of a network load balancer.
Editing Health Checker
The operation for editing a health checker is identical to that of a network load balancer.
Creating L7 Policy Under Listener
There are two ways to create an L7 policy under a listener:
a. In the listener instance details page, click "Create L7 Policy" under the "More" menu to the right of the target listener instance.
b. Enter the listener instance details page and click the "Create L7 Policy" button under the "L7 Policy" tab.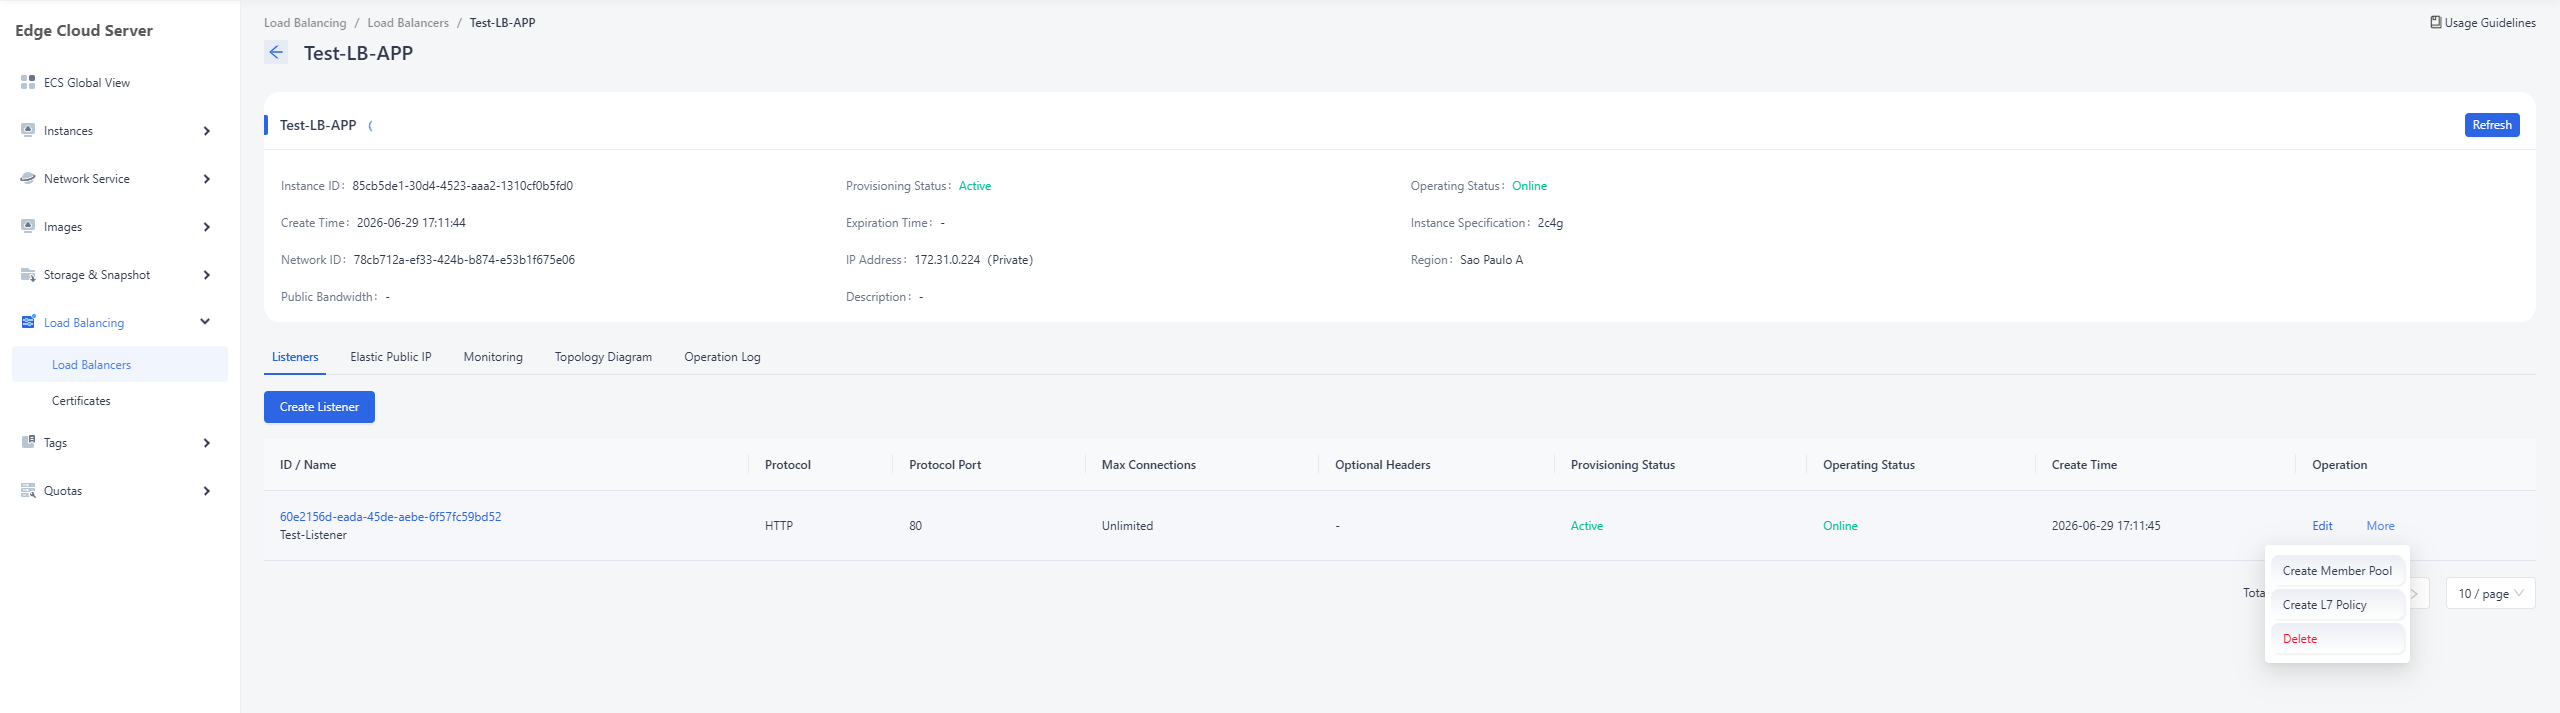
Enter the L7 policy creation page. Based on your desired load balancing effect, configure "Basic Configuration" and "L7 Rules" as needed, then click "Confirm Create" to confirm the creation of the L7 policy.
Parameter name Parameter description Basic Configuration Name A user-defined name used to identify the L7 policy. Description User-defined descriptive information about the L7 policy. Action The action to be executed by the L7 policy, including "REDIRECT_TO_POOL" and "REDIRECT_TO_URL". Redirect to URL The target URL to redirect to when the policy action is "REDIRECT_TO_URL". Redirect to Pool The target member pool to redirect to when the policy action is "REDIRECT_TO_POOL". Order The priority or sequence of the L7 policy. You can choose to insert the current policy before or after an existing policy. If left blank, the policy is inserted at the very beginning by default. L7 Rules Type The type of L7 rule, including "PATH" and "HOSTNAME". Compare Type The comparison method for the L7 rule, including "EQUAL_TO", "CONTAINS", "ENDS_WITH", "STARTS_WITH", and "REGEX". Hostname Value The user-defined hostname parameter to be compared when the L7 rule type is "HOSTNAME". Path Value The user-defined path parameter to be compared when the L7 rule type is "PATH". 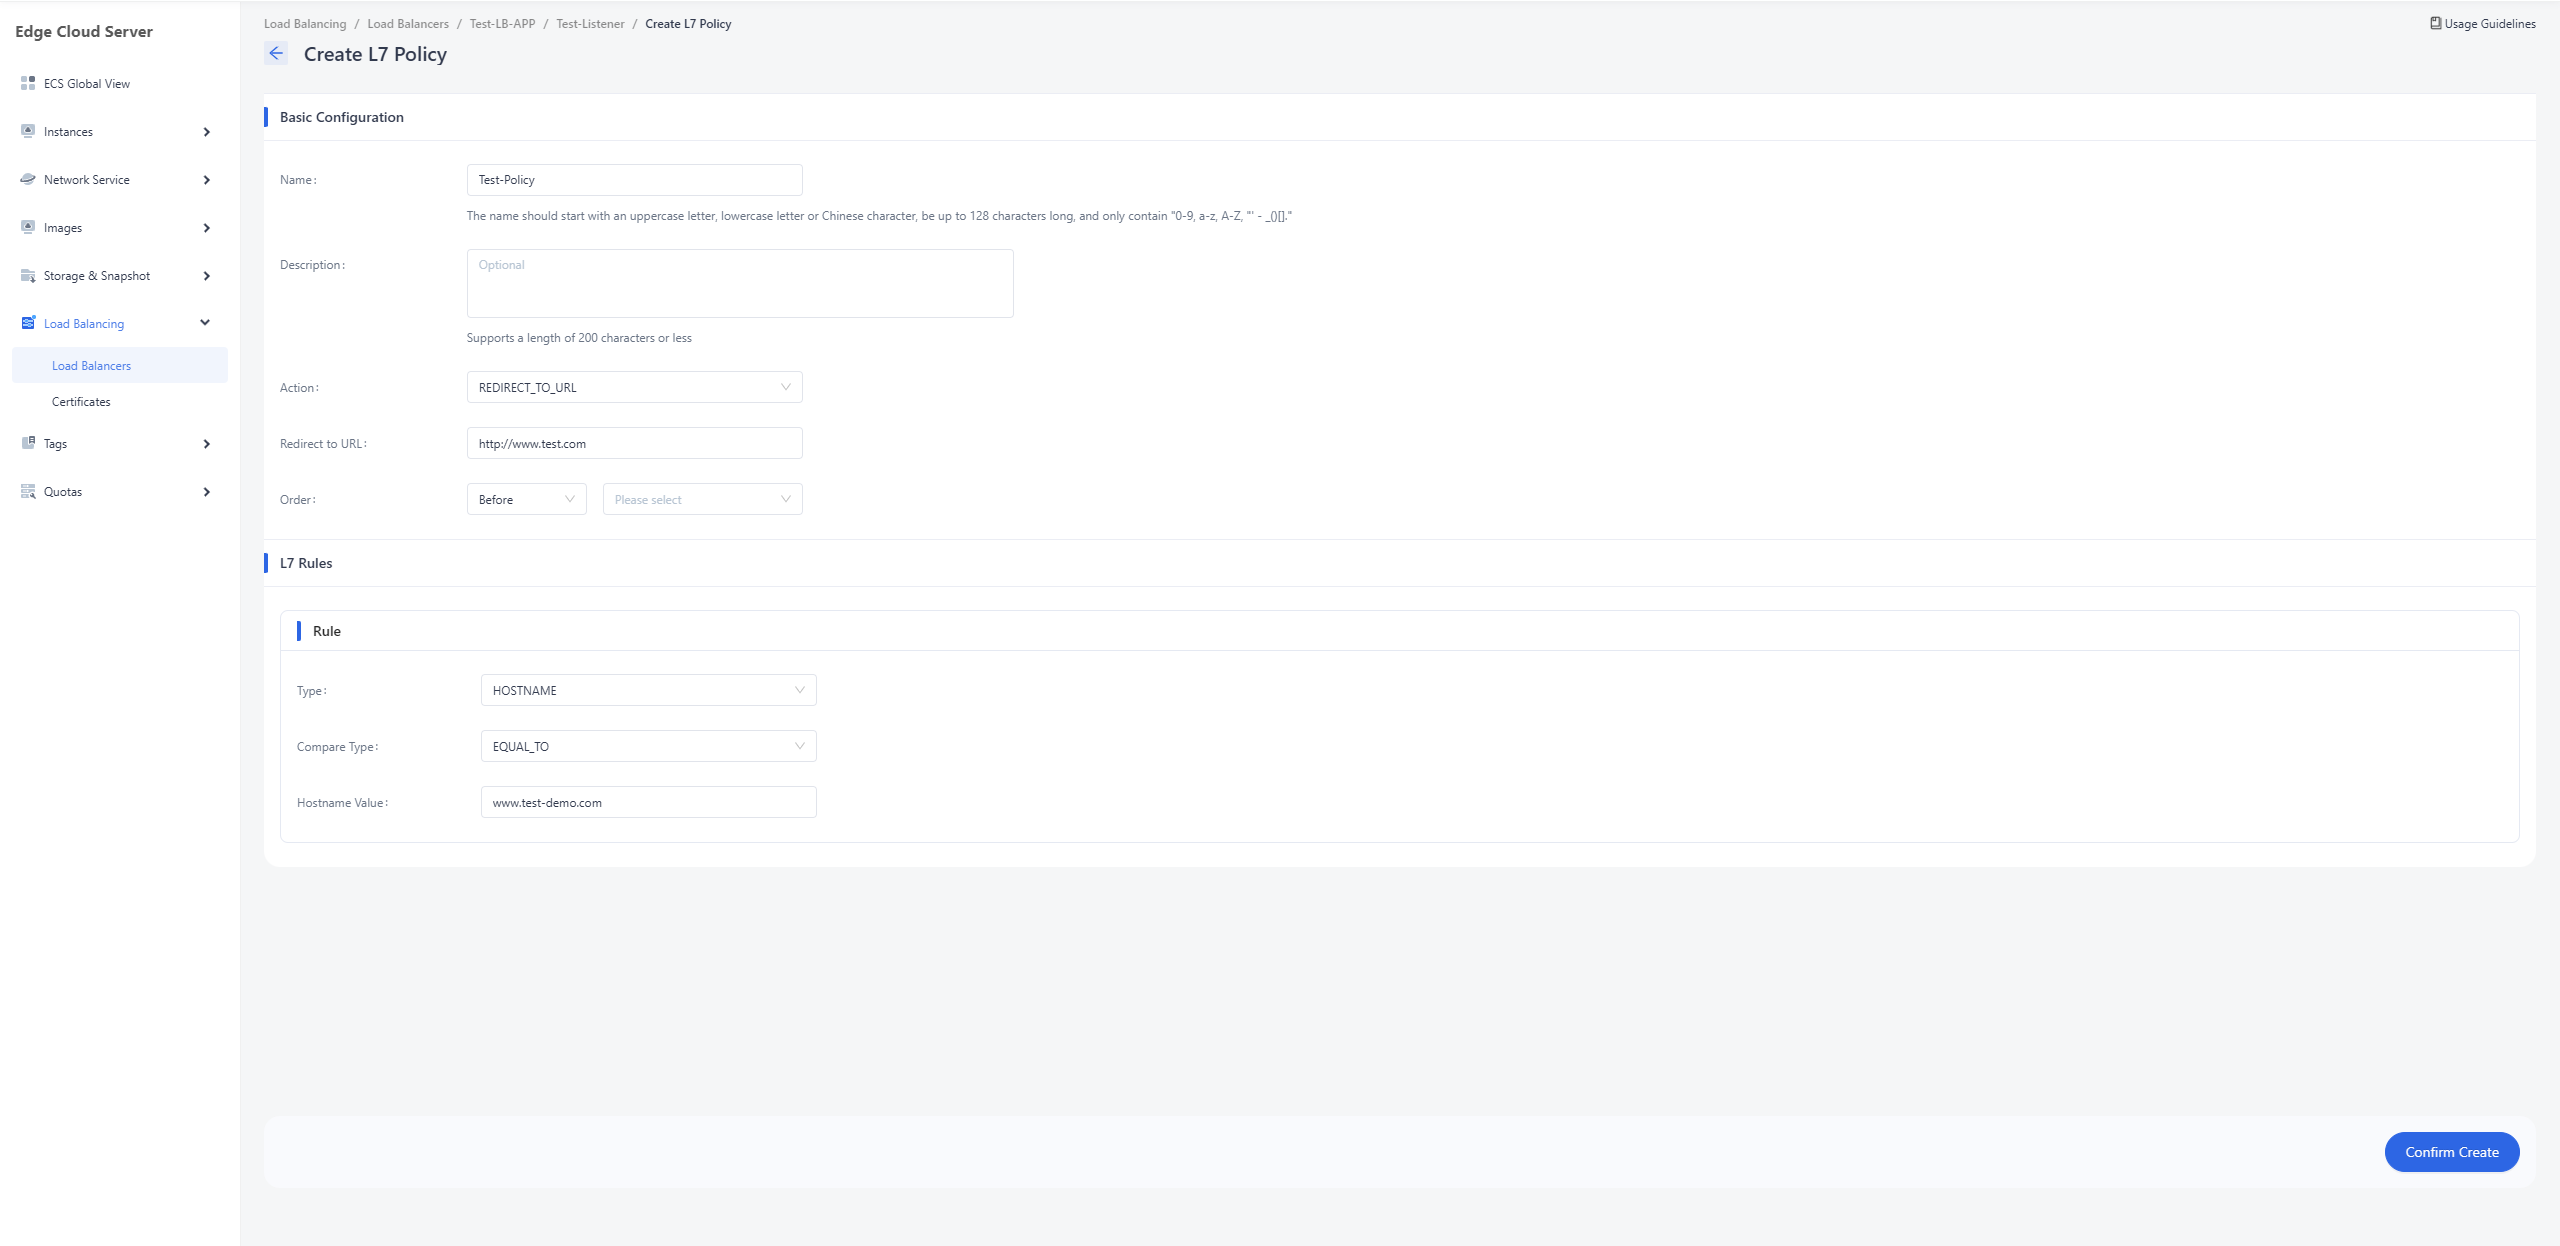
Once the creation is successful, the newly created L7 policy will be added to the L7 policy list.
Deleting L7 Policy Under a Listener
Navigate to the listener instance page. In the L7 policy list, click "Delete L7 Policy" under the "More" menu to the right of the policy you wish to delete to enter the L7 policy deletion page.
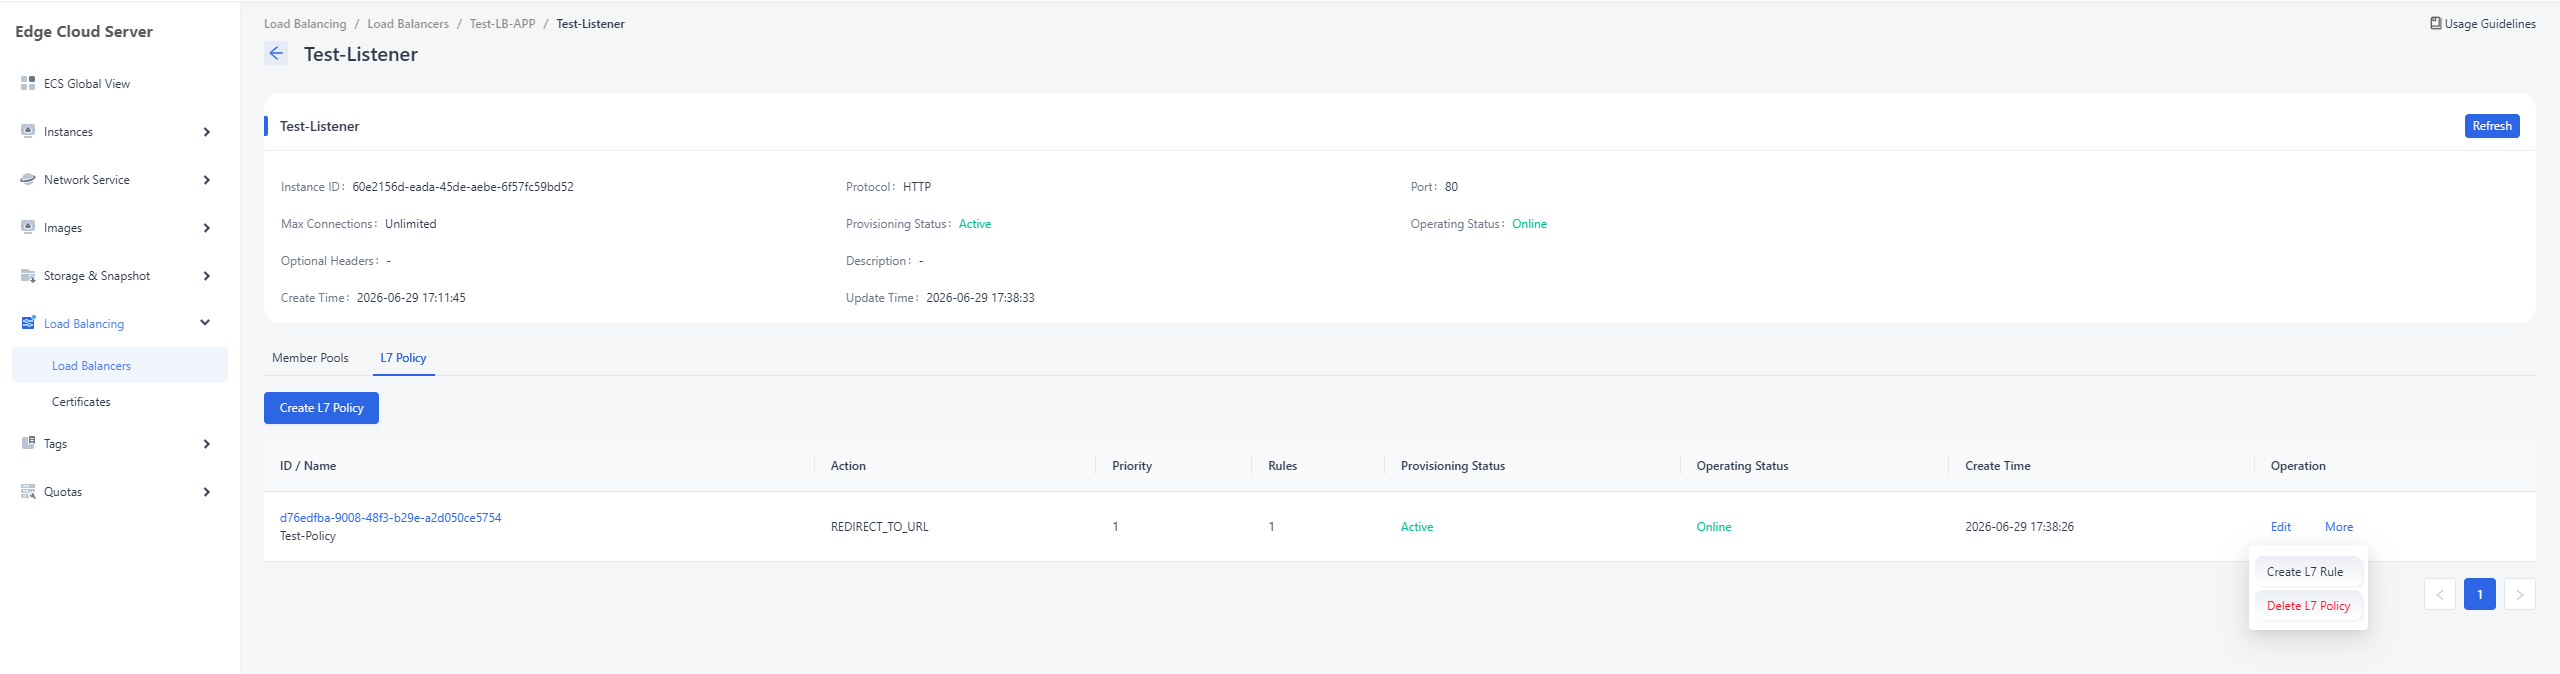
In the pop-up delete confirmation dialog box, verify the information of the L7 policy to be removed, then click the "Confirm" button to confirm the deletion.
Once the deletion is successful, the original L7 policy is removed from the list.
Creating a New L7 Rule Under an L7 Policy
There are two ways to create an L7 rule under an L7 policy:
a. In the L7 policy list on the listener instance details page, click "Create L7 Rule" under the "More" menu to the right of the target policy.
b. Enter the L7 policy details page and click the "Create Rule" button under the "L7 Rules" tab.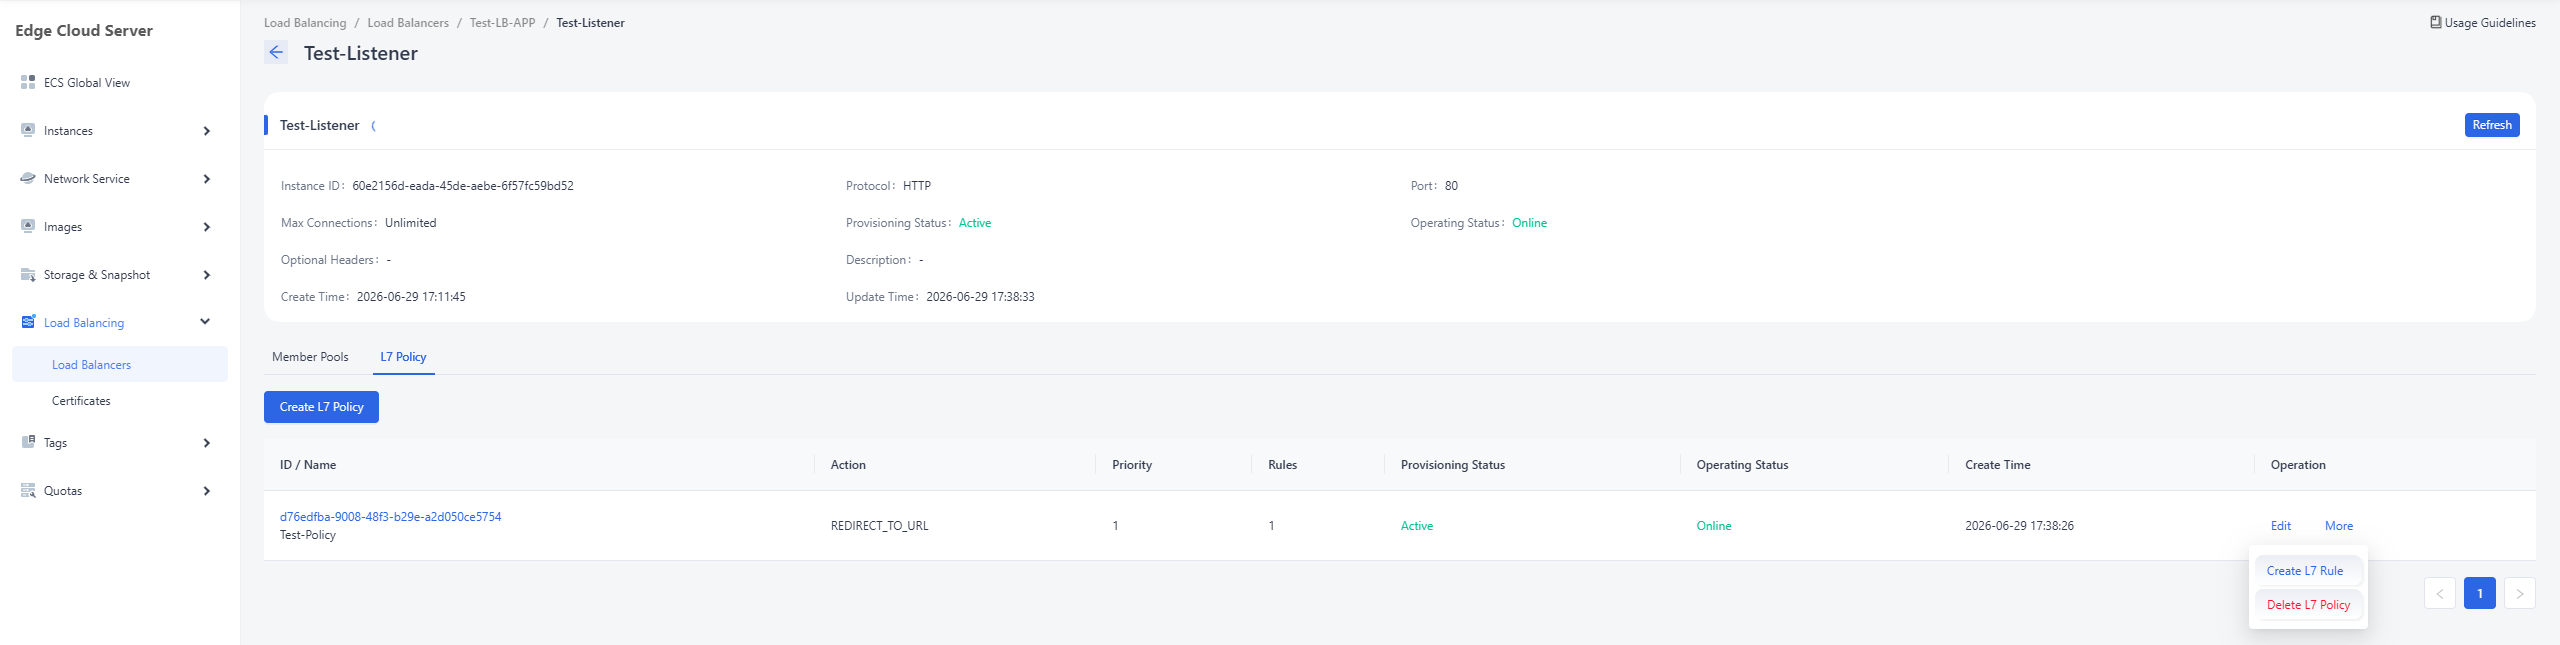
In the pop-up rule creation dialog box, fill in the "Type", "Compare Type", and "Path Value" or "Host Value" information based on your load balancing business requirements, then click "Confirm" to confirm the creation of the new rule.
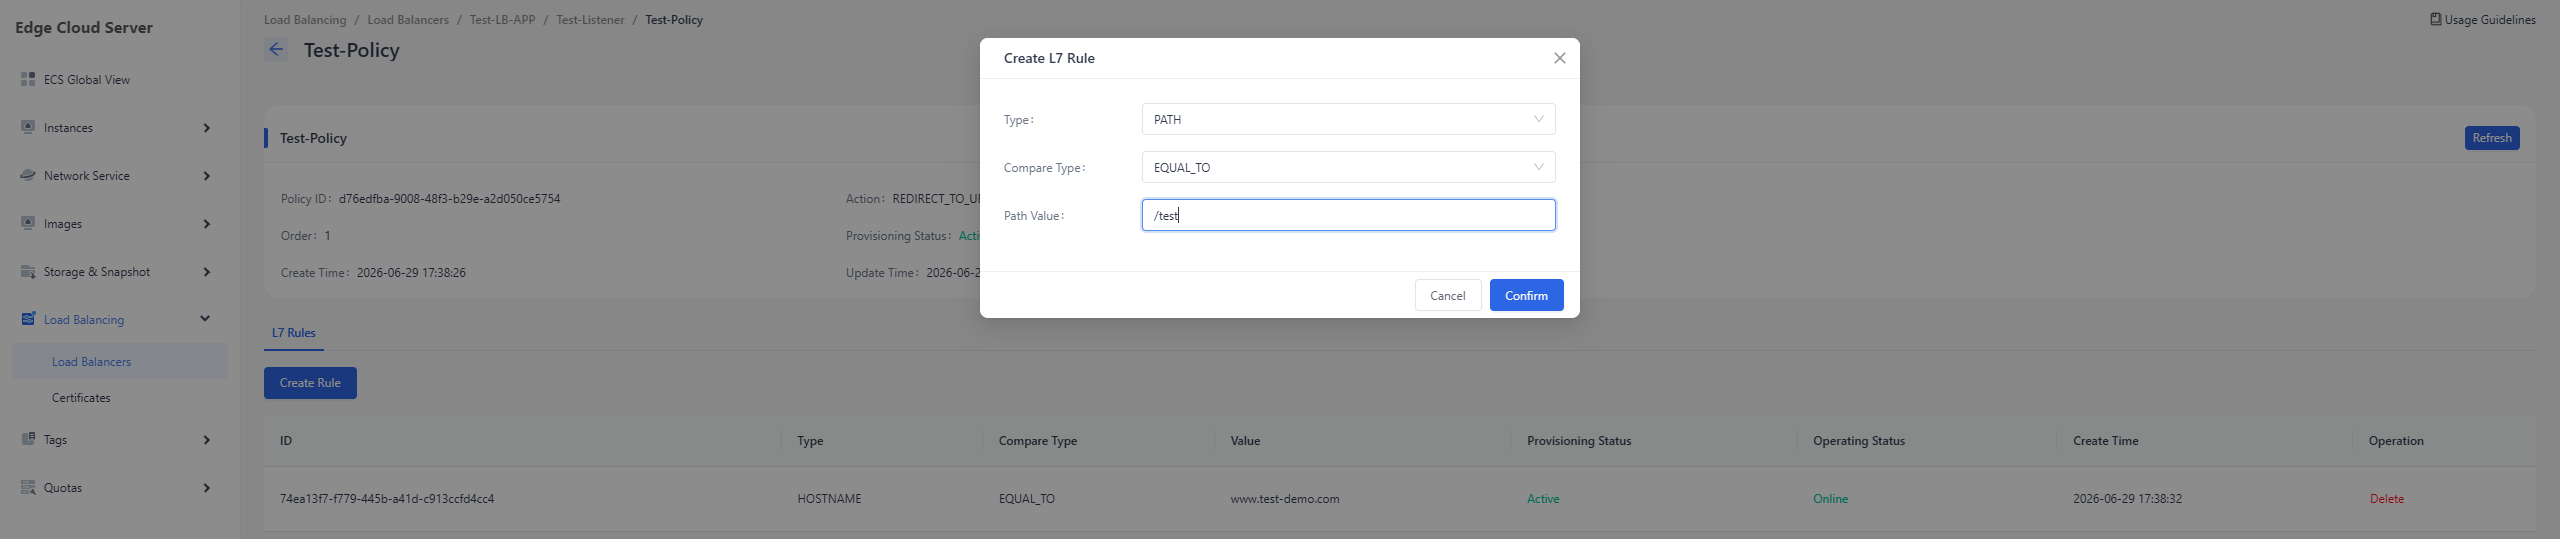
Once the creation is successful, the "Provisioning Status" of the newly created rule in the L7 policy rule list will switch to "Active", and the "Operating Status" will switch to "Online".
Deleting an L7 Rule Under an L7 Policy
The action of deleting a rule under an L7 policy cannot be undone. Deletion will cause the policy behavior of the original load balancer to exhibit unexpected behavior. Please proceed with caution.
Navigate to the L7 policy details page. In the rules list, click "Delete" to the right of the rule you wish to remove to enter the L7 rule deletion page.
In the pop-up L7 rule deletion dialog box, click "Confirm" to confirm the deletion of the rule.
Once the deletion is successful, the deleted rule is removed from the original rule list.
Certificate Operating Guide
Creating Certificate
In the products column, click the "Edge Cloud Server" tab under "Edge Nodes Services" to enter the "Certificates" service interface.

On the "Certificates" function page, the main Operating area presents a list of the user's certificate instances within the corresponding region. By clicking the "Create Certificate" button in the upper right corner of the list, you will enter the certificate creation page.
On the certificate creation page, fill in the "Basic Configuration" and "Certificate Information" based on your existing certificate details. After completing the required information, click "Confirm Create" to create the certificate.
Parameter name Parameter description Basic Configuration Name A user-defined name used to identify the certificate. Region The region where the certificate is stored. Different regions contain different virtualized resources that may need to access the certificate. Users can store the certificate in the same region as the resources that will use it. Certificate Information Certificate The certificate used when storing certificates in a detached format. You can directly paste the certificate content or choose to import it from a file. When importing, files with "pem", "crt", or "cer" extensions are supported. Private Key The private key used when storing certificates in a detached format. You can directly paste the private key content or choose to import it from a file. When importing, files with "pem" or "key" extensions are supported. 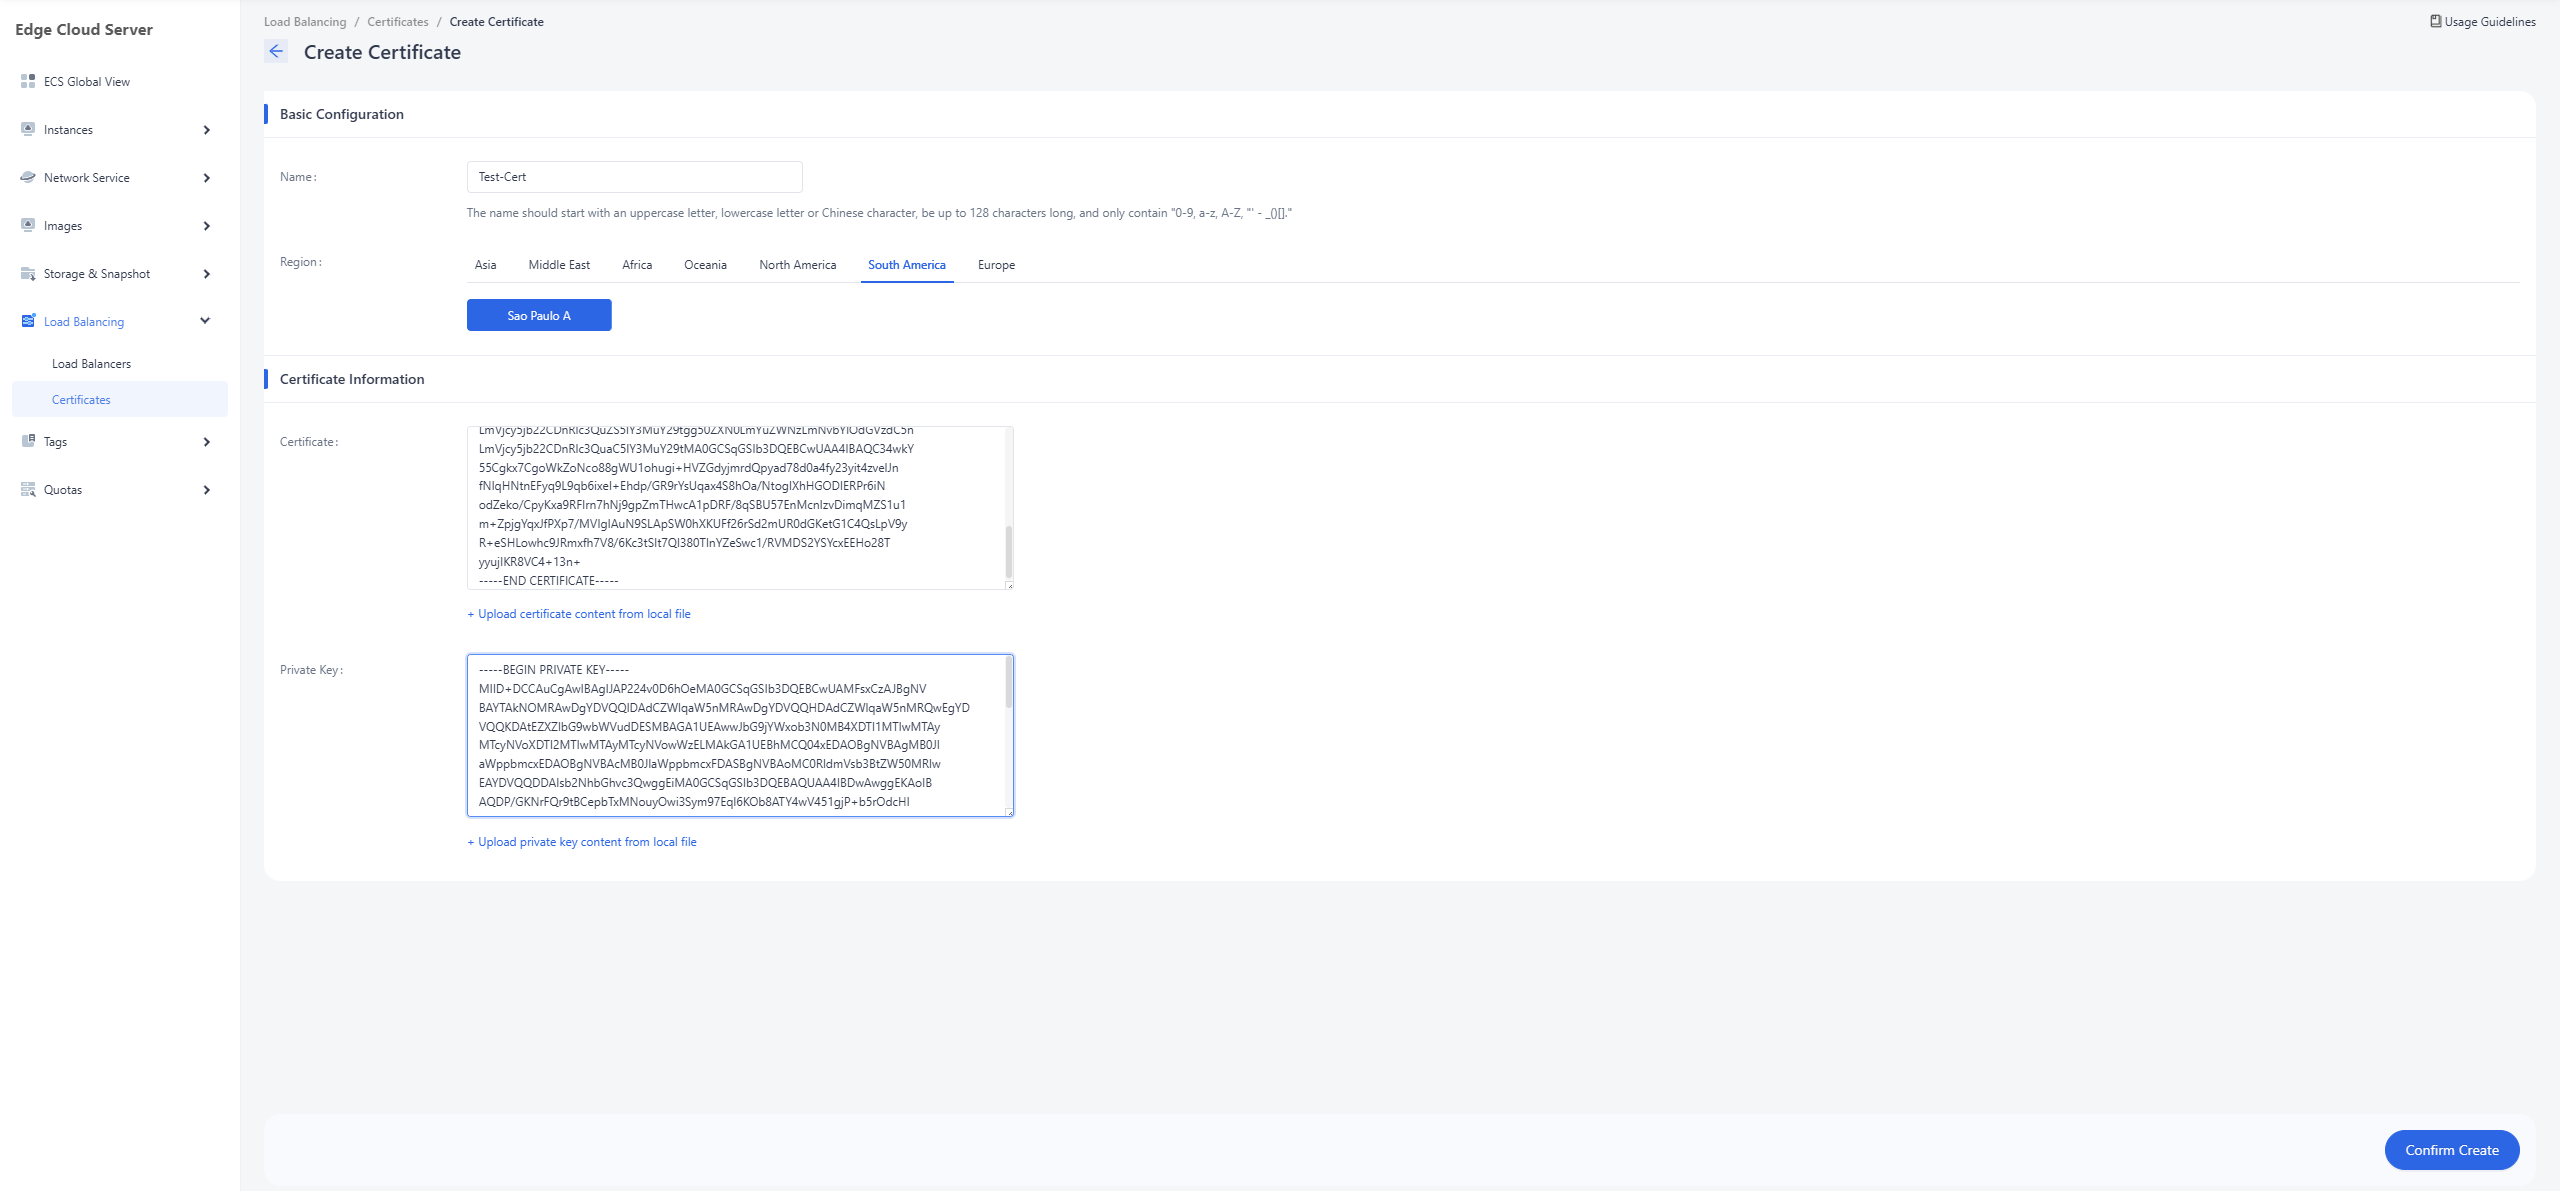
Once the certificate is created successfully, the "Status" of the new certificate in the certificate list will switch to "Active".
Deleting Certificate
Click the "Delete" button to the right of the certificate you wish to remove.
In the pop-up certificate deletion confirmation dialog box, verify the information of the certificate to be deleted, then click "OK" to confirm the deletion.
Once the deletion is successful, the deleted certificate is removed from the certificate list.
Understanding of Operating Status & Provisioning Status
Provisioning Status
This primarily describes the lifecycle status of various entities (Load Balancers, Listeners, Member Pools, etc.). It reflects whether the system has finished processing your configuration request.
Operating Status
This primarily describes the runtime status of the entities. It reflects the actual functional health and connectivity of the resource at that moment.
| Status | Value | Description |
|---|---|---|
| Operating Status | ONLINE | Entity is operating normally All pool members are healthy |
| DRAINING | The member is not accepting new connections | |
| OFFLINE | Entity is administratively disabled | |
| DEGRADED | The number of connections monitored by the listener under the load balancer has reached the maximum connection limit set by the user. There are members in the member pool that have failed the health check. | |
| ERROR | For Load Balancer Instances: The load balancer instance is operating abnormally. For Listeners: The listener is operating abnormally. For Member Pools: All members in the member pool are in "ERROR" status. For Members: The member has failed the health check. | |
| NO_MONITOR | No health monitor is configured for this entity and it's status is unknown | |
| Provisioning Status | ACTIVE | The entity was provisioned successfully |
| DELETED | The entity has been successfully deleted | |
| ERROR | Provisioning failed | |
| PENDING_CREATE | The entity is being created | |
| PENDING_UPDATE | The entity is being updated | |
| PENDING_DELETE | The entity is being deleted |
Health Monitor Description
HTTP
The HTTP health check sends a request using the specified HTTP method to a designated URL path on the backend. The health check passes if the received response code matches the Expected Status Code.
Performance Note: The page at the URL path should be highly lightweight. It should return results in under one second and should not impose a significant load on the application server.
Efficiency Tip: Since the health checker only cares about the HTTP status code and runs frequently, using the "HEAD" or "OPTIONS" methods is recommended to reduce unnecessary processing of the full page body.
PING
A PING health check periodically sends ICMP PING requests to the backend servers. Your backend servers must be configured to allow ICMP access for the check to pass.
Constraint: This type only verifies if the member is reachable and responding to echo requests; it cannot detect if the specific application running on the instance is healthy.
TCP
A TCP health check initiates a TCP connection to the backend server's protocol port.
Requirement: Your custom TCP business application should be designed to respond as "OK" when the load balancer opens a connection, completes the TCP handshake, and closes the connection without sending any data.
HTTPS
HTTPS health checks function identically to HTTP checks but are specifically for SSL-encrypted backend servers.
Note: This method may encounter issues if the server performs client certificate verification, as the load balancer (HAProxy) cannot provide a valid client certificate. In such cases, use the TLS-HELLO type as an alternative.
TLS-HELLO
The TLS-HELLO health check only ensures that the backend server can respond to an SSLv3 Client Hello message. It does not verify other health indicators, such as HTTP status codes or response body content.
UDP-CONNECT
The UDP-CONNECT health check performs a basic UDP port connection.
Caution: This check may not function correctly if "Destination Unreachable (ICMP Type 3)" messages are disabled on the member server or blocked by security rules. In such cases, a member might be incorrectly marked as "ONLINE" even if it is actually down.
Description of L7 Policies and L7 Rules
An L7 Policy is a collection of L7 rules associated with a listener. It defines the forwarding action that the load balancer should execute when all rules within that policy return "true."
Logic and Operations
Intra-policy Logic (AND): Within a single L7 policy, the relationship between multiple L7 rules is an "AND" operation. All rules in the policy must be satisfied for the action to trigger.
Inter-policy Logic (OR): Between different L7 policies under the same listener, the relationship is an "OR" operation. Policies are evaluated one by one according to their defined priority.
Matching Process
When a request passes through a listener, it is matched against the L7 policies sequentially based on their priority.
If the request satisfies all rules within a specific policy, the load balancer executes the action (e.g.,
REDIRECT_TO_POOL) defined for that policy.Default Handling: If no policies match the incoming request, the request is routed to the listener's Default Member Pool (if one exists).
a.If there is no default member pool configured for the listener, the system returns a 503 Service Unavailable error.
FAQ
Troubleshooting: Member Operating Status is "ERROR"
When a member within a member pool shows an "Operating Status" of "ERROR", it indicates that the member has failed its health check.
To resolve this, you can perform the following checks:
Verify Health Monitor Settings: Double-check the health checker's Type and Method (e.g., HTTP vs. TCP) to ensure they match your backend application's configuration.
Service & Port Status: Confirm that the specific port and service intended to handle health checks on the member are running normally.
Security Groups: Inspect the Security Group bound to the member instance to ensure it allows inbound traffic from the load balancer for the health check protocol and port.
Internal Firewalls: Check for built-in firewalls (such as
iptablesorfirewalldin Linux, or Windows Firewall) to verify they are not blocking the relevant network ports or protocols.
Need help? Contact our support team at support@edgenext.com.
Back to documentation home