

Relational Database Service
Relational Database Service User Guide
Overview
RDS (Relational Database Service) is a fully managed online database service. The core value of RDS lies in transforming complex, highly repetitive O&M (Operations and Maintenance) tasks—which traditionally require manual intervention by Database Administrators (DBAs)—into automated, "out-of-the-box" features on the cloud platform. This allows developers to focus entirely on business logic and data management. In the RDS model, the cloud service abstracts the underlying virtual machines and operating systems, providing users directly with a database connection endpoint. Users no longer need to manage "servers"; they only need to manage the "database."
Currently, the RDS service supports MySQL versions 8.0 and 5.7. Supported features include the management of database instances, databases, database users, and user permissions.
Relational Database Operation Guide
Creating New Database Instance
Locate the "Product" section in the navigation sidebar. Under the "Database Services" category, click the "RDS" tab. You will be redirected to the RDS Service Console.

On the RDS management page, the main operation area displays a list of your relational database instances within the selected region. Click the "Create" button in the upper-right corner of the list to access the database instance creation page.
On the instance creation page, users should configure the "Basic Configuration", "Instance Configuration", "Network Configuration", "Database Configuration", and "User Configuration" sections based on their specific business requirements. After completing the settings, click "Confirm Order" to initiate the resource provisioning process.
Parameter name Parameter description Basic Configuration Name A user-defined name used to identify the database instance. Database Type Currently, only MySQL is supported. Database Version Supports MySQL 8.0 and MySQL 5.7. For technical differences between these versions, please refer to MySQL official documentation ( [https://dev.mysql.com/doc/refman/8.0/en/](https://dev.mysql.com/doc/refman/8.0/en/) ; [https://dev.mysql.com/doc/refman/5.7/en/](https://dev.mysql.com/doc/refman/5.7/en/) ). Region The region (AZ) where the database instance will operate. Different AZs provide distinct resource environments and network configurations. It is recommended to select the AZ geographically closest to your application's deployment to minimize latency and optimize performance. Instance Configuration Architecture Specifies the computing resources for the database instance, including the CPU core count and RAM capacity. Storage Defines the storage type and disk capacity allocated to the database instance. Network Configuration Networks The specific Virtual Private Cloud (VPC) or network segment to which the database instance is connected. This ensures the instance is reachable within your network topology. Database Configuration Database Name The name of the initial database created within the instance. Character Set The character encoding standard (e.g., utf8mb4) for the database. Collation The set of rules used for comparing and sorting characters in the database. User Configuration User Name The primary administrative username created for the database instance. Password The authentication credential for the database user. Note: Please ensure the password meets the required complexity standards for security. Confirm Password Re-enter the password to ensure accuracy. 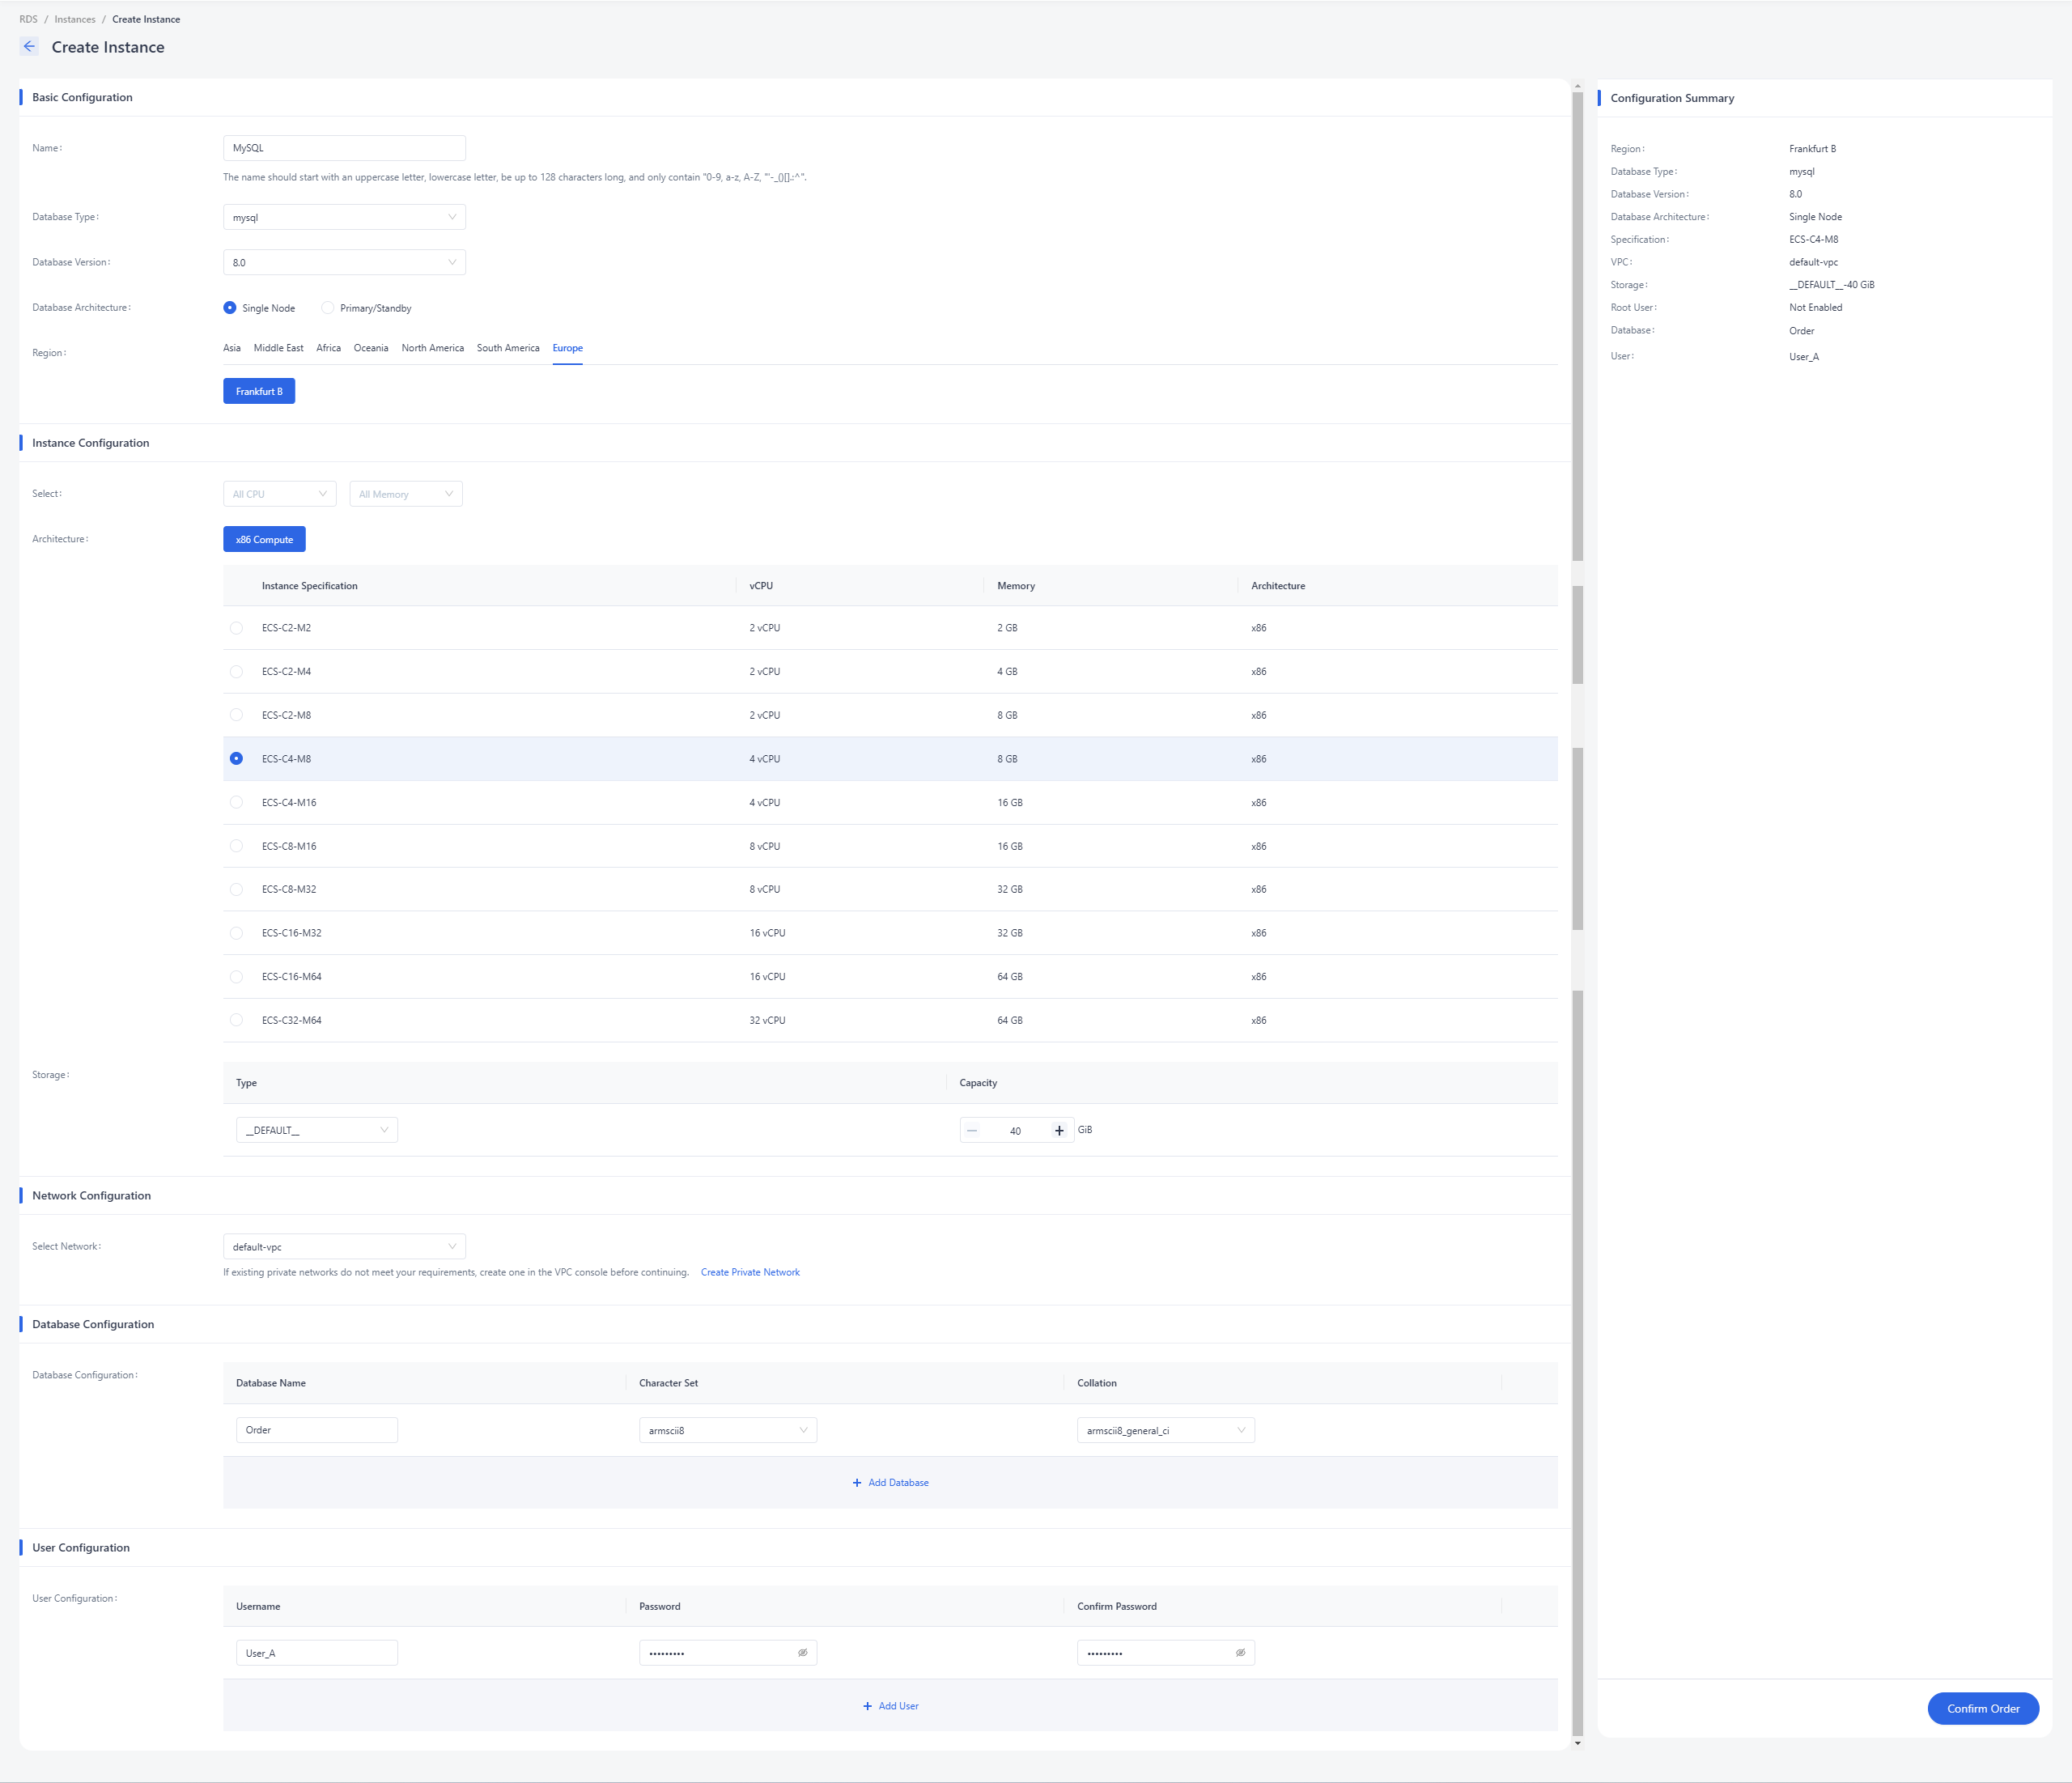
The database instance is successfully created once its "Operation Status" in the instance list changes to "Healthy".
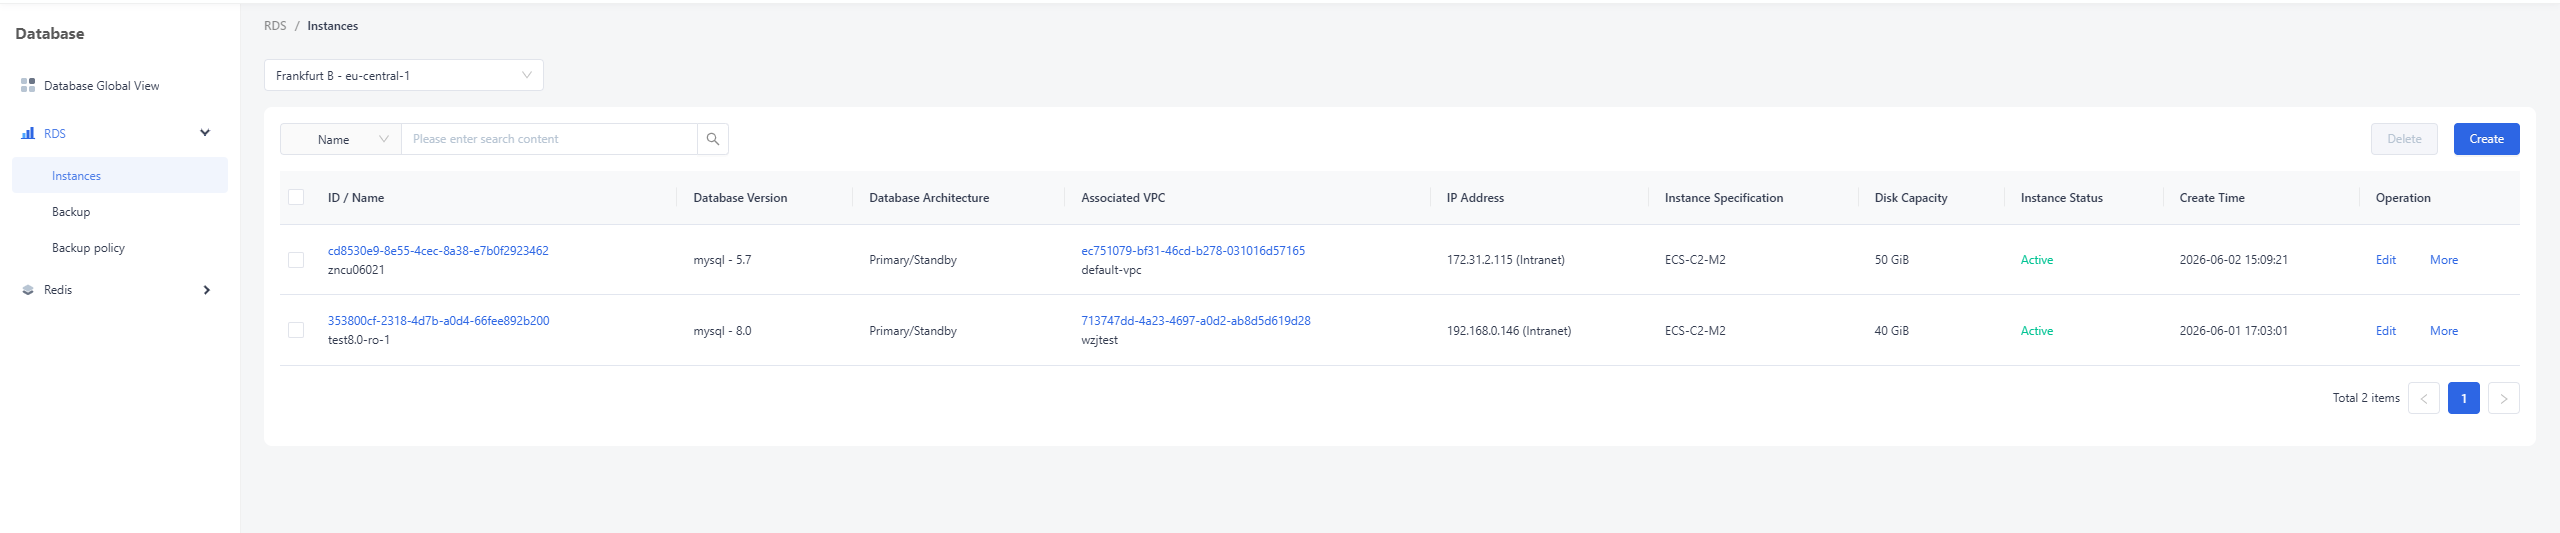
Click the Instance ID to access the instance details page. The Instance Details page displays the parameter configurations specified during the initial creation of the instance, along with other essential resource information.
Terminating Database Instance
There are two methods to delete a database instance:
- Batch Deletion: Select the target database instance(s) using the checkboxes and click the "Delete" button located at the upper-right corner of the table;
- Individual Deletion: Locate the target instance in the list and select "Delete" from the "More" dropdown menu on the right side of the entry;
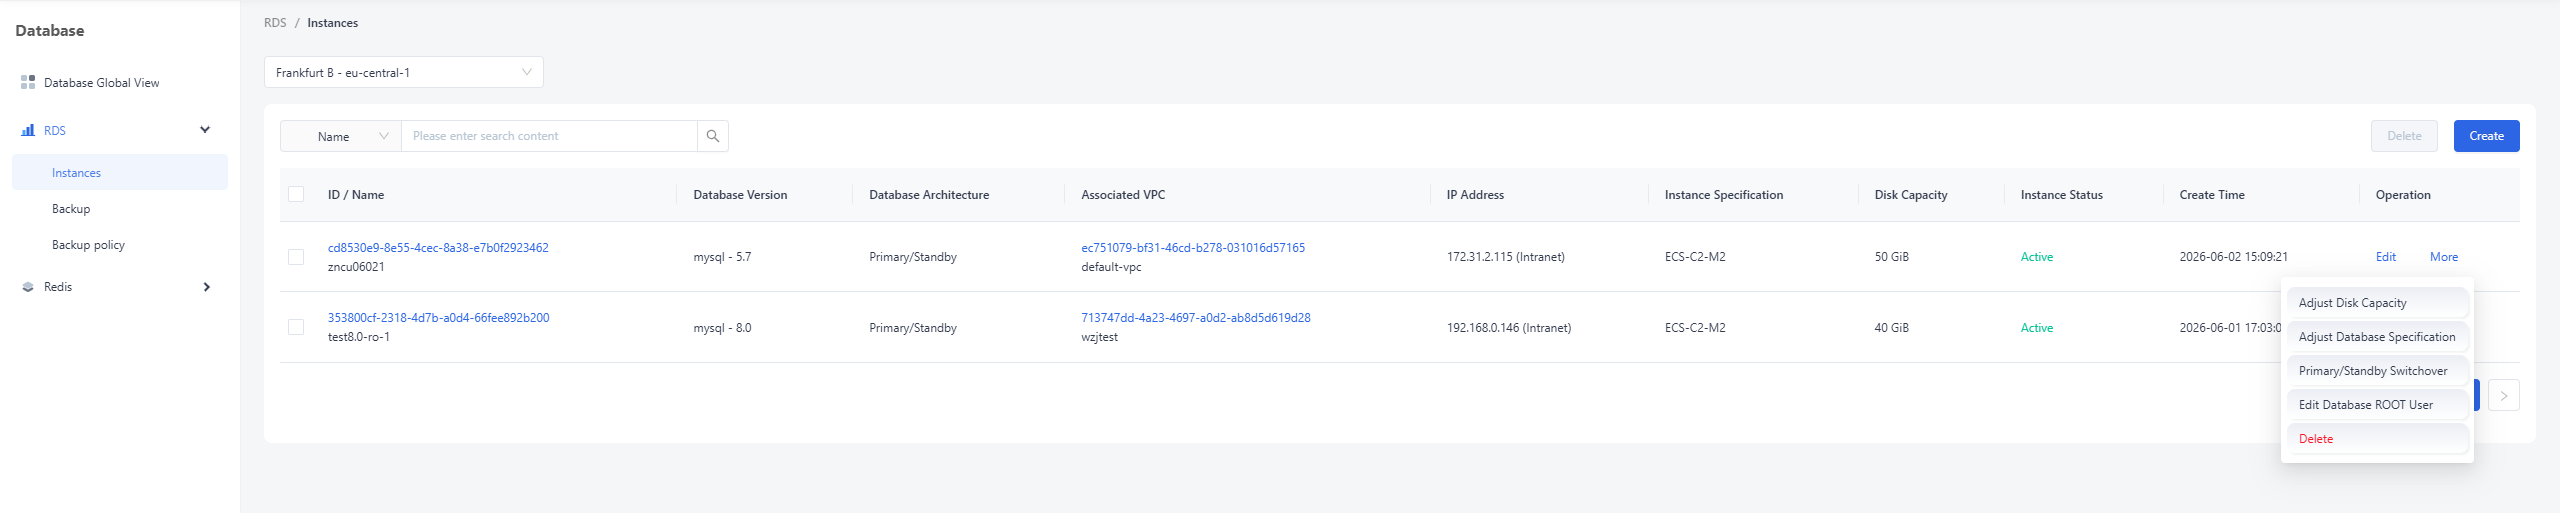
In the confirmation dialog box that appears, click "Confirm" to finalize the deletion.
Once the deletion is confirmed, the database instance will be shut down and deleted.
Creating Database
In addition to the initial database created during the instance provisioning process, users can also create new databases via the "Databases" tab on the Database Instance Details page. Navigate to the "Databases" tab. Click the "Create Database" button. In the pop-up dialog, enter the required "Database Name", "Character Set", and "Collation". Click "Confirm" to finalize the creation.
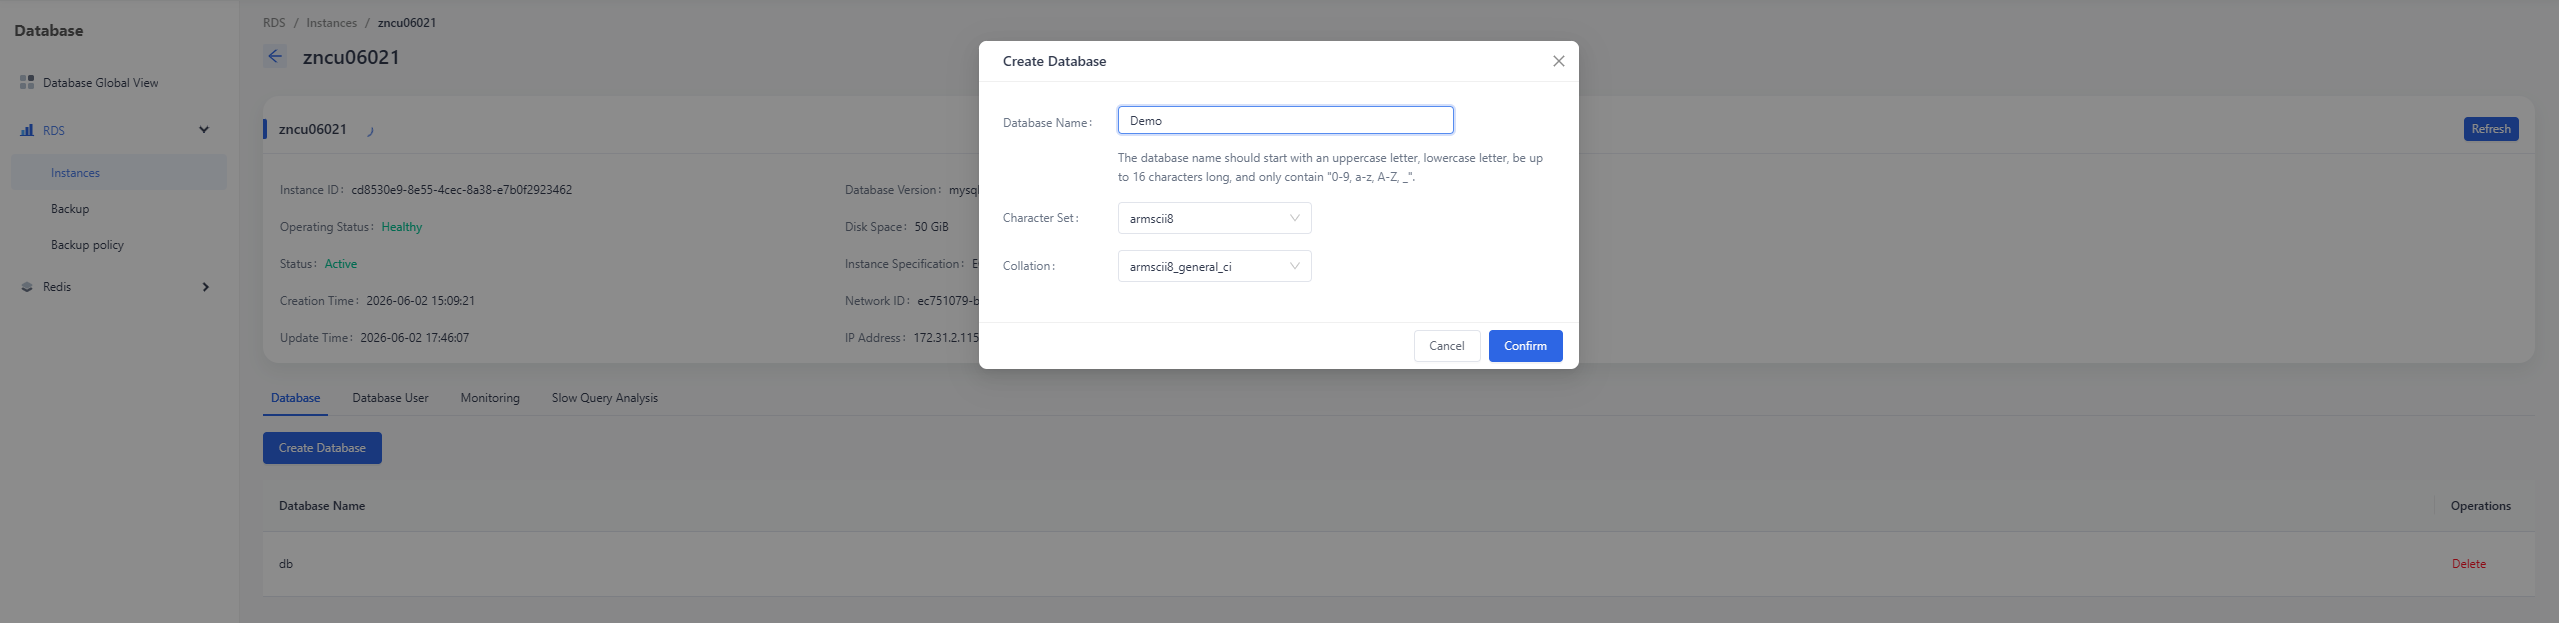
Once successfully created, the new database will be displayed in the database list.
Deleting Database
To delete a database within a database instance, locate the database you wish to remove in the list and click the "Delete" button on the right side to initiate the process.
In the confirmation dialog that appears, review the details of the database to be deleted and click "Confirm" to finalize the removal.
Upon successful completion, the system will display the notification "Operation successful," and the deleted database will be removed from the list.
Creating Database User
In addition to the database user created during the initial instance provisioning, users can also create new database users via the "Database User" tab on the Database Instance Details page. Click "Create Database User" to initiate the process.
In the Create Database User dialog box, enter the "Username", "Password", and "Confirm Password", then click "Confirm" to finalize the creation of the database user.
Once successfully created, the user details will be displayed in the Database User list.
Modifying User Permissions
After successfully creating databases and database users, you must grant the necessary authorizations to a user if they require access to specific databases.
In the Database User list, locate the relevant user and select "Change Database Permissions" from the "More" dropdown menu to access the permission management page.
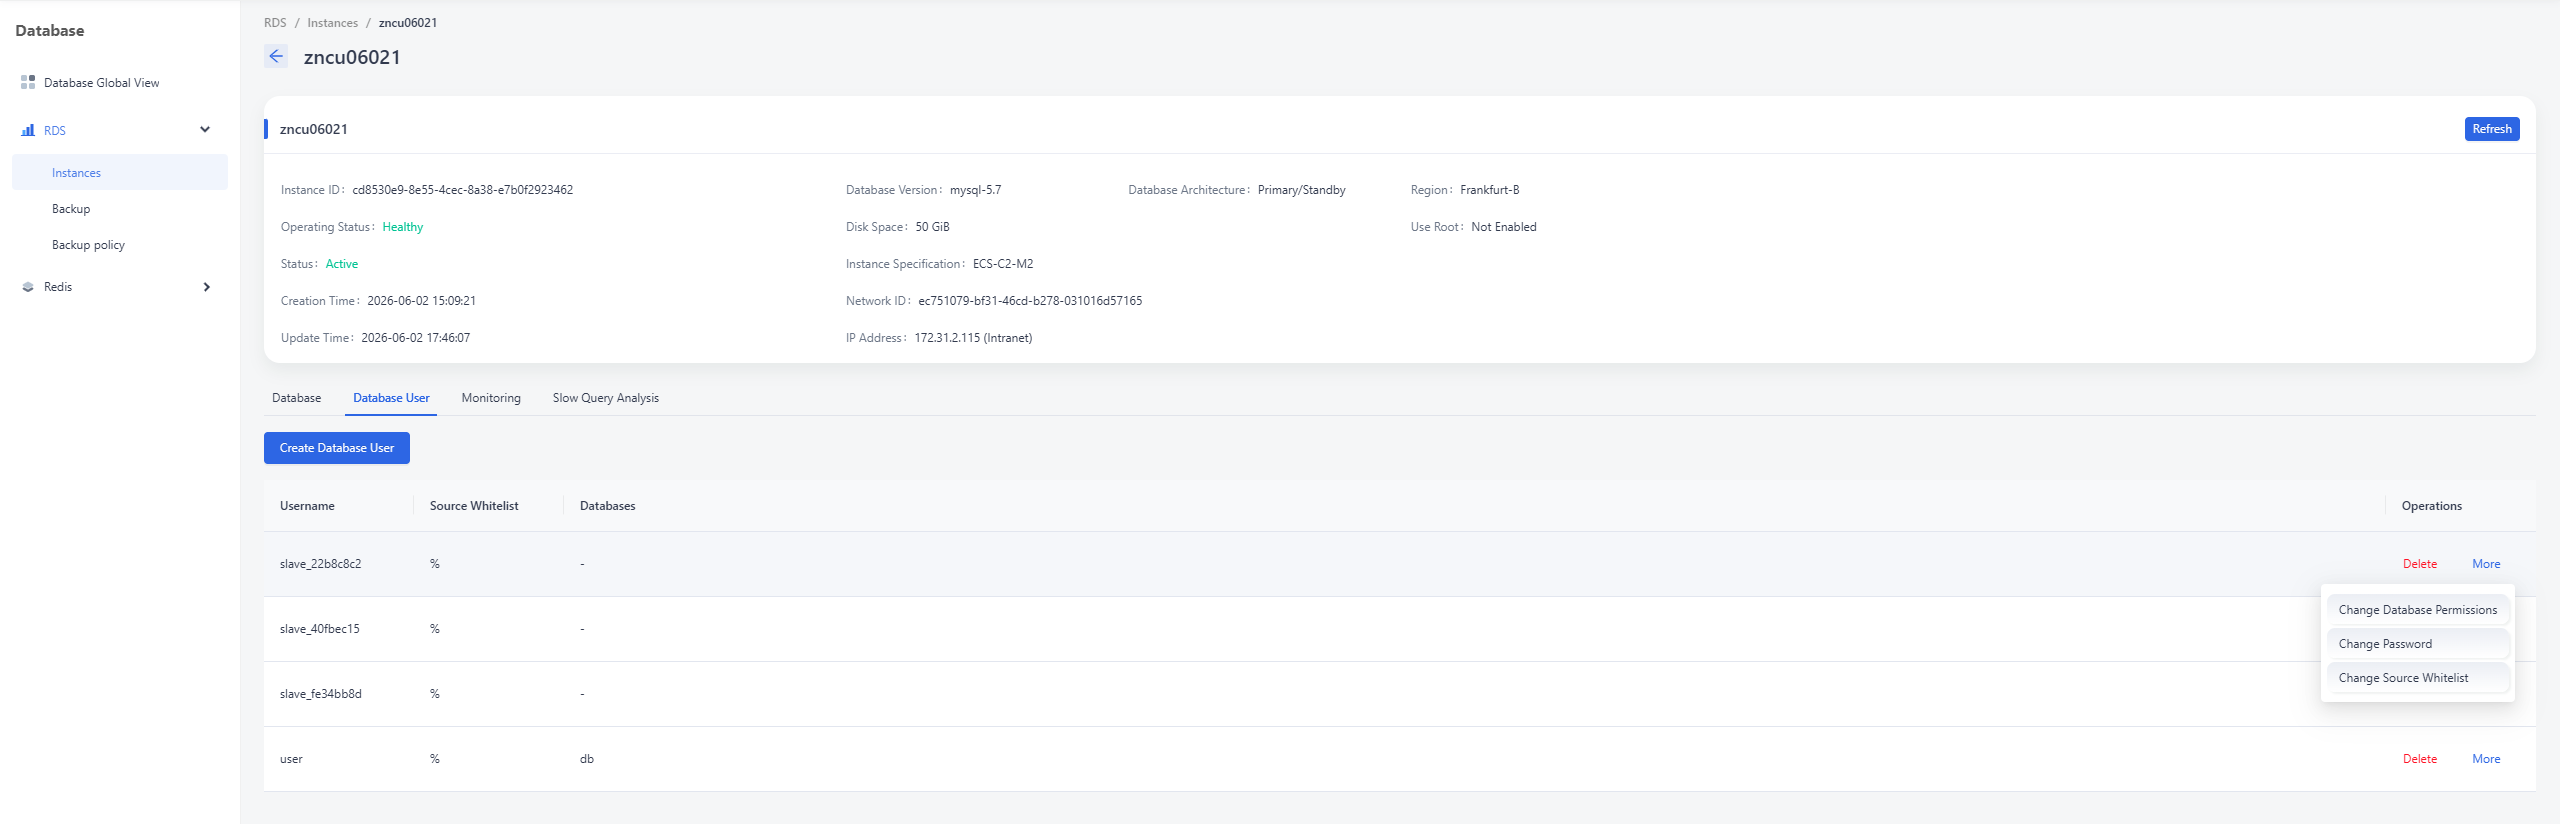
In the pop-up permission editing dialog, select the databases the user is permitted to access and click "Confirm" to grant authorization.
! Carefully verify the user and database details to prevent security risks, such as data breaches, caused by excessive privileges or permission sprawl.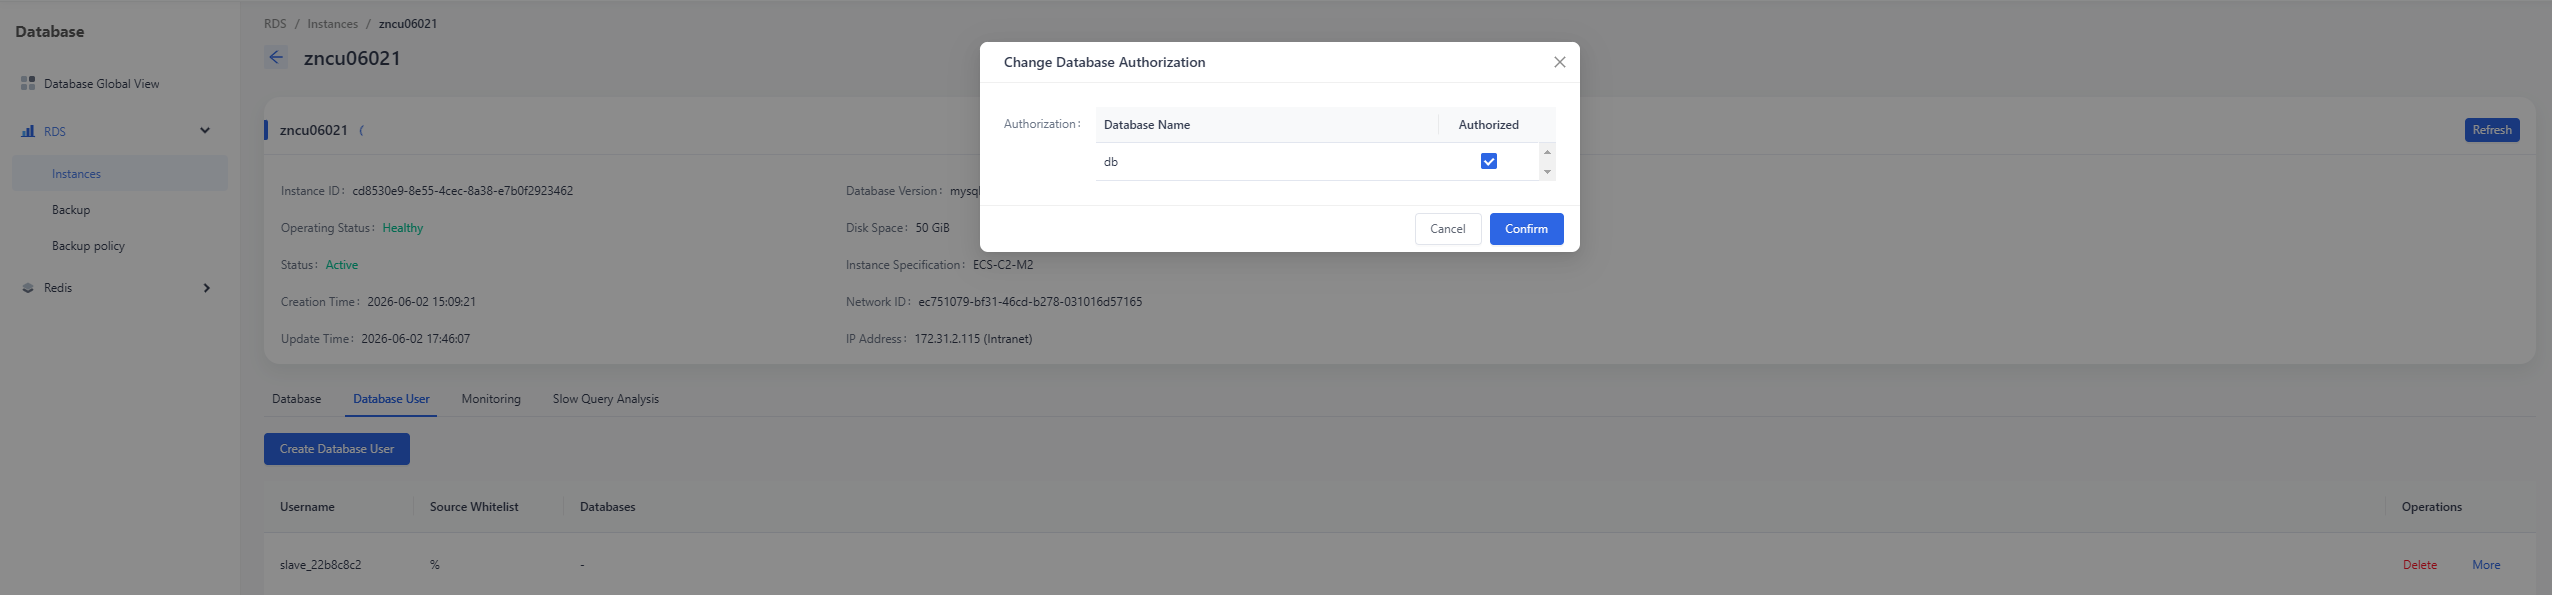
After completing the permission configuration for database access, the "Databases" column in the Database User list will display the information of the databases authorized for that user.
Editing the IP Whitelist
In a database instance, you can restrict access to specific source IP addresses. This feature is essential when your business environment requires that database access be routed exclusively through designated bastion hosts (jump servers) or database auditing platforms. By default, the wildcard character "%" is used to indicate that there are no IP restrictions, allowing access from any source.
In the Database User list, locate the relevant user, click "More", and select "Change Source Whitelist" to access the whitelist editing page.
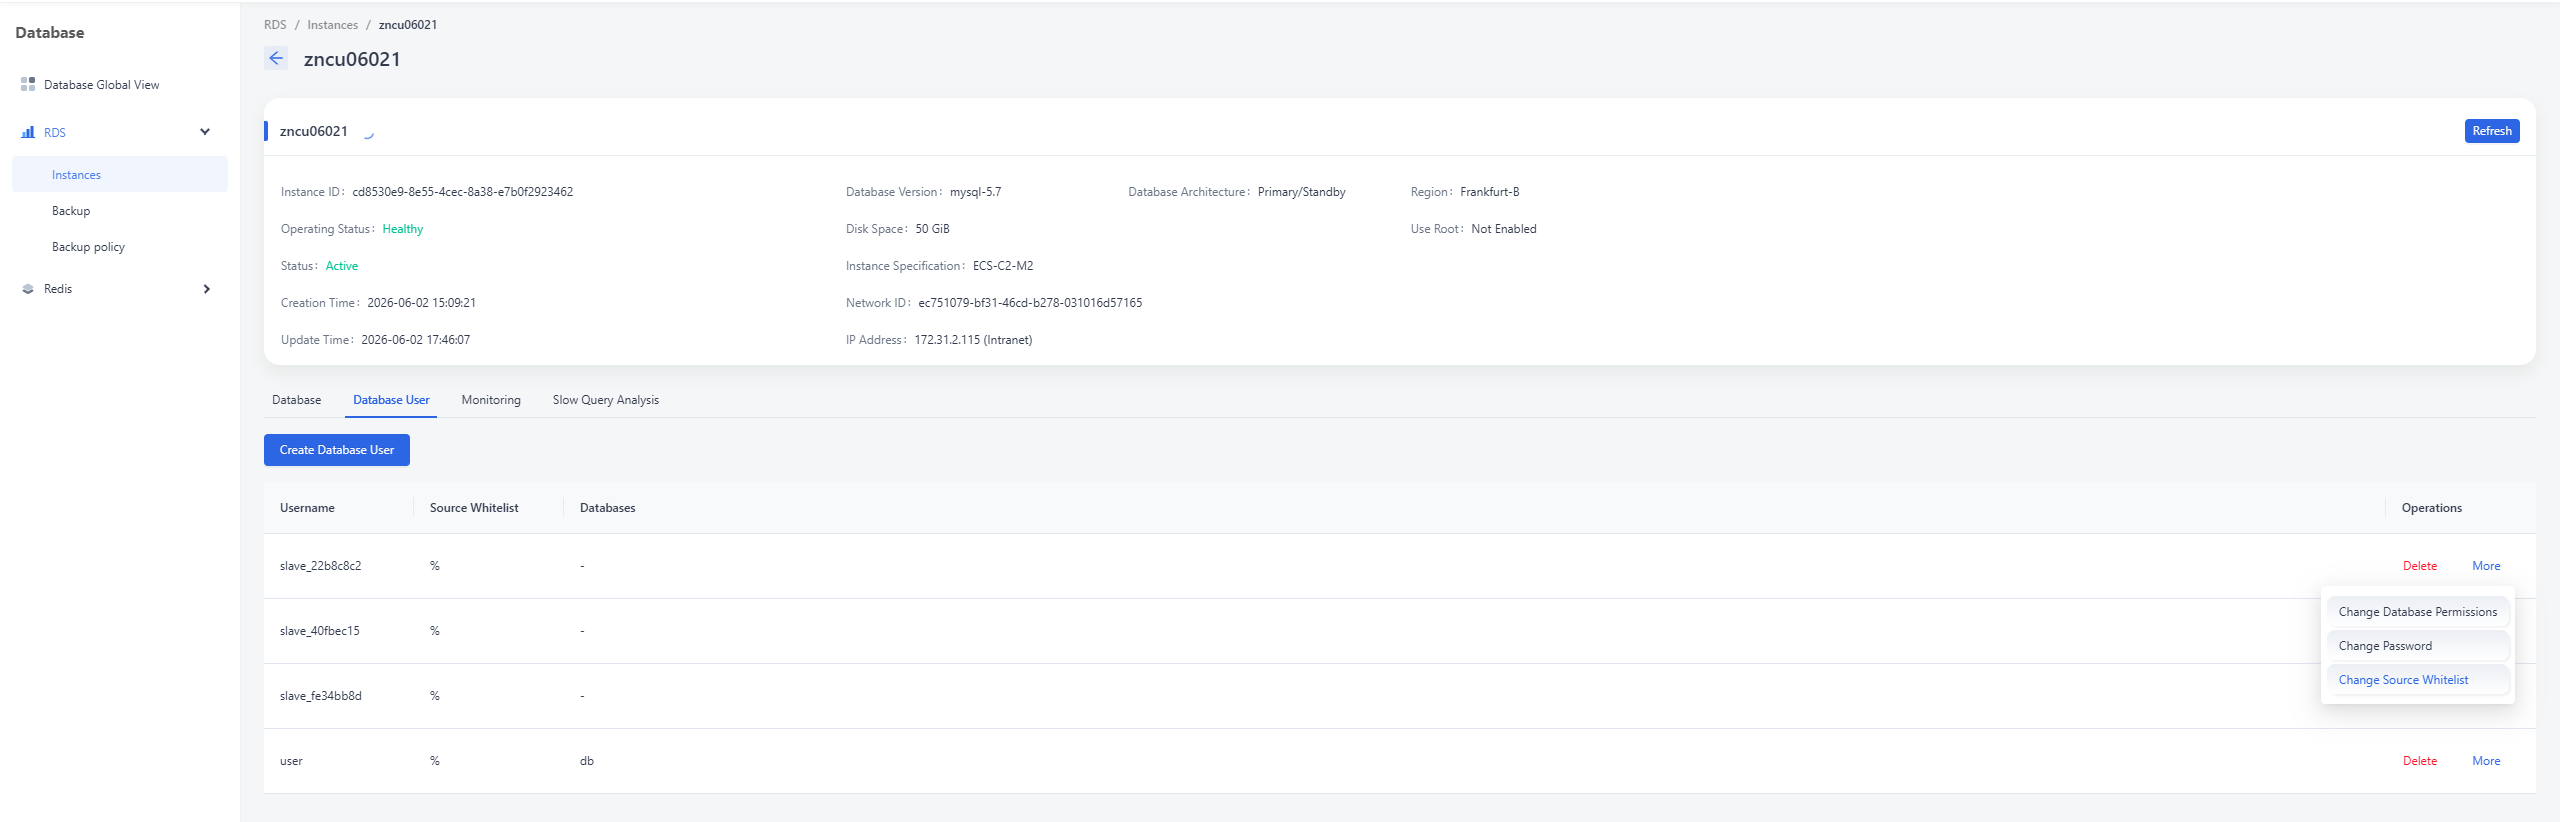
In the Edit Whitelist dialog box, enter the target "Source Address", then click "Confirm" to complete the configuration.

After successful editing, the "Source Whitelist" column in the Database User list will display the authorized IP whitelist information for that user.
Resetting User Password
In the event that a database user password is lost or compromised, you can update it using the following procedure.
In the Database User list, locate the relevant user. Click the "More" dropdown menu on the right and select the "Change Password" button to access the password reset page.
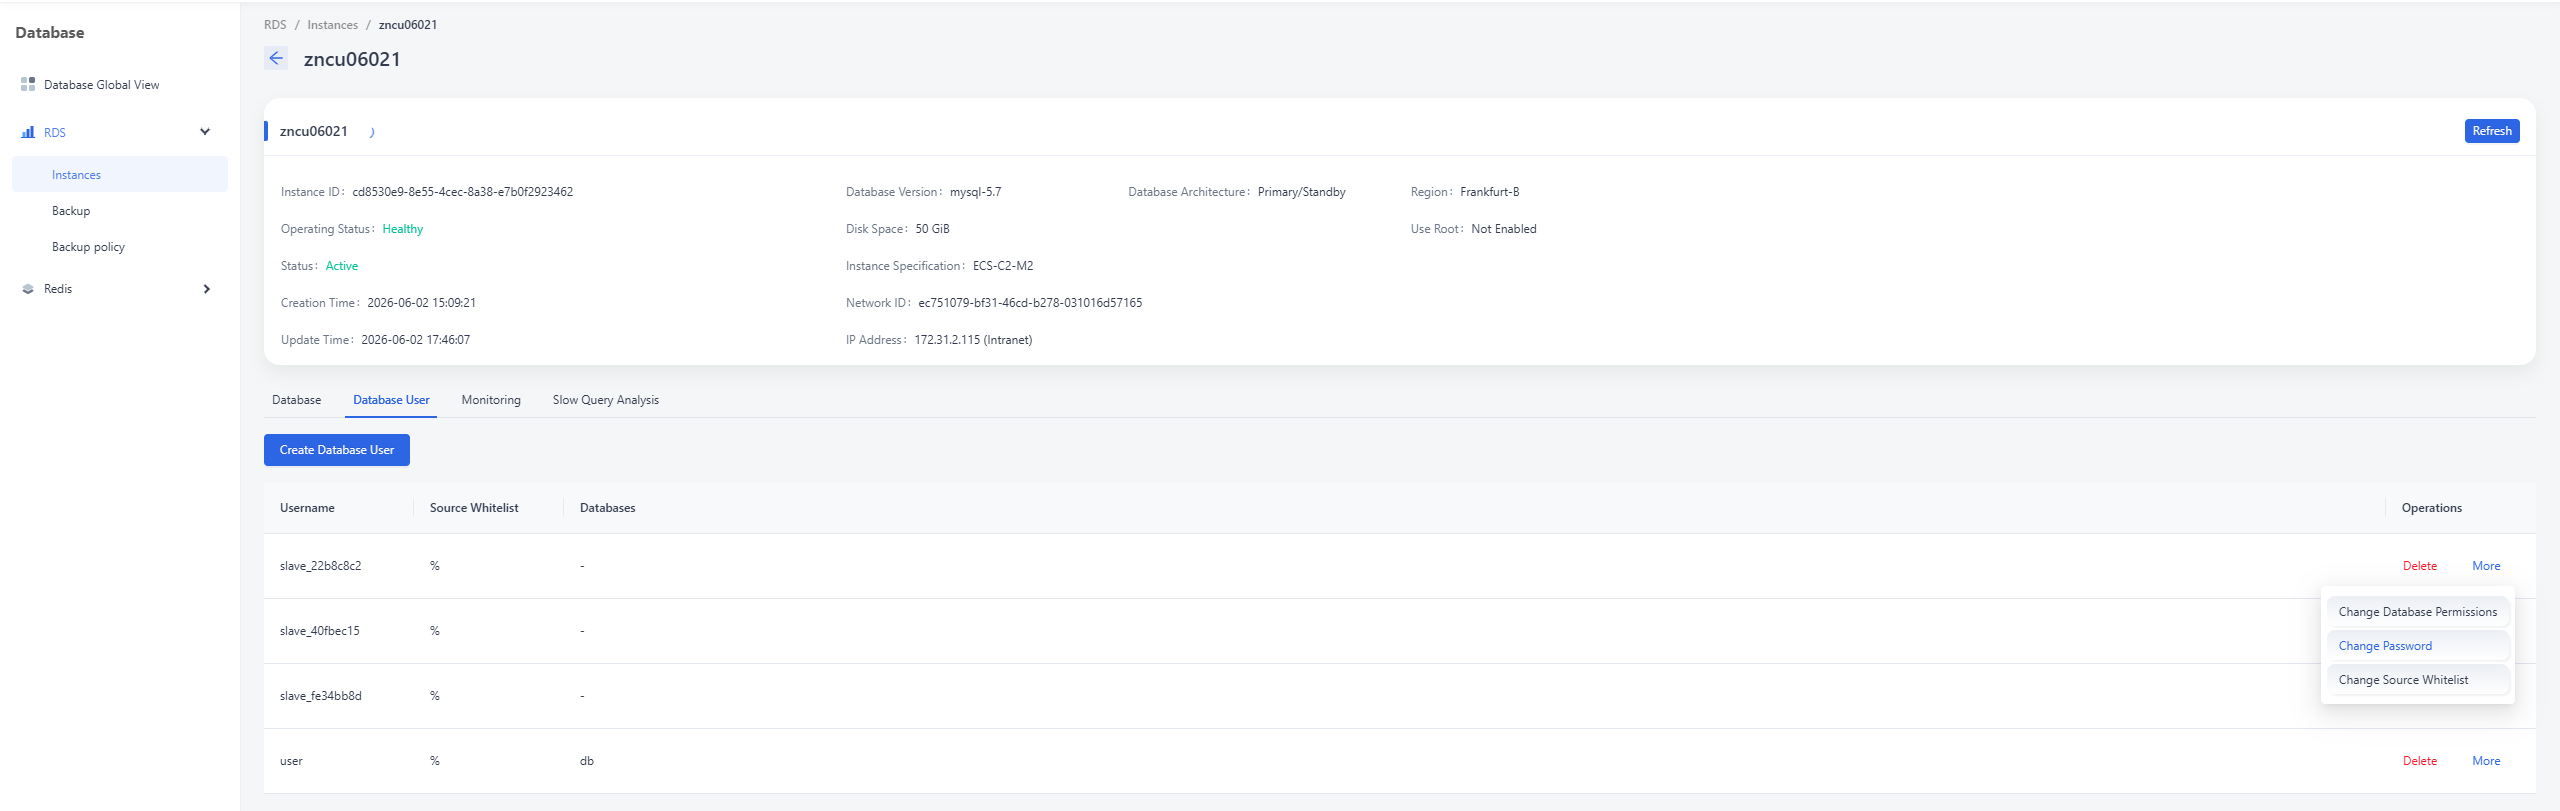
In the dialog box that appears, enter the new password and click "Confirm" to finalize the password update.

Upon a successful password update, the system will display the notification: "Operation successful."
Verifying User Access Permissions
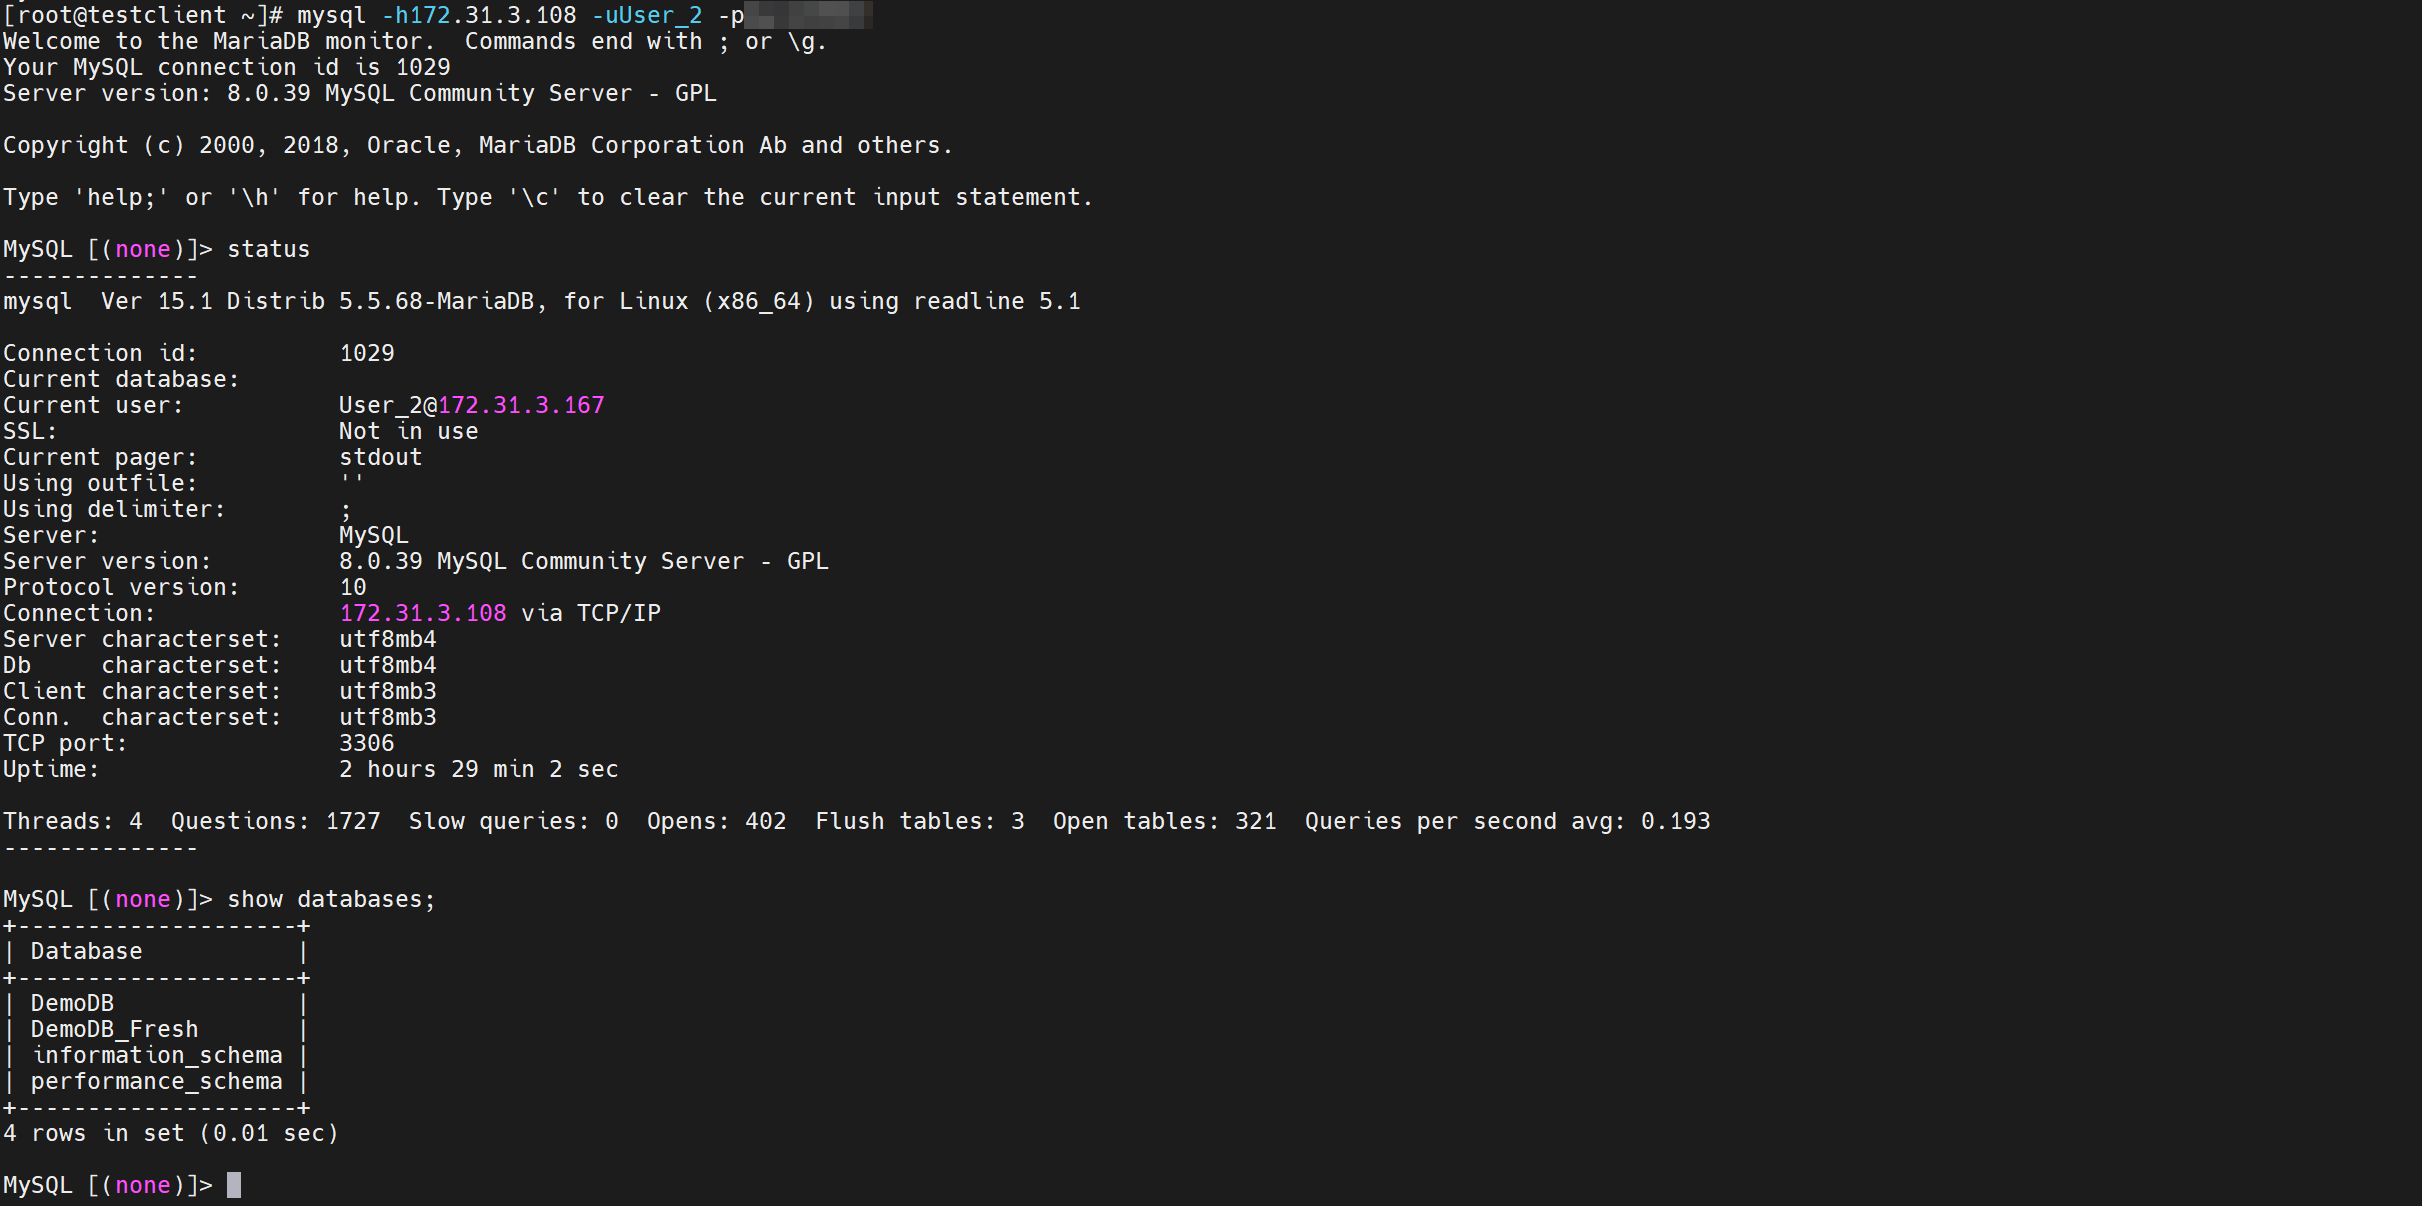
To verify the permissions and IP whitelist settings for the database user created in the previous steps, log in to an ECS (Elastic Compute Service) instance residing in the same network segment as the database instance and execute the command below.
mysql -hIP_ADDRESS -uUSER -pPASSWORD
status
show databases;
Access to the database will be denied for any unauthorized IP addresses or user accounts.

Authorized users and source IP addresses can successfully access the designated databases.
Deleting Database User
In the Database User list, locate the target user and click the "Delete" button on the right to initiate the removal process.
In the Delete User confirmation dialog, verify the user information and click "Confirm" to remove the user.
Once the user is successfully removed, the account will disappear from the Database User list.
Enabling the Root User
In MySQL, the ROOT user is the "super administrator" with the highest level of privileges. To ensure system security, the ROOT user is disabled by default. You should only enable this account when performing essential maintenance or troubleshooting tasks.
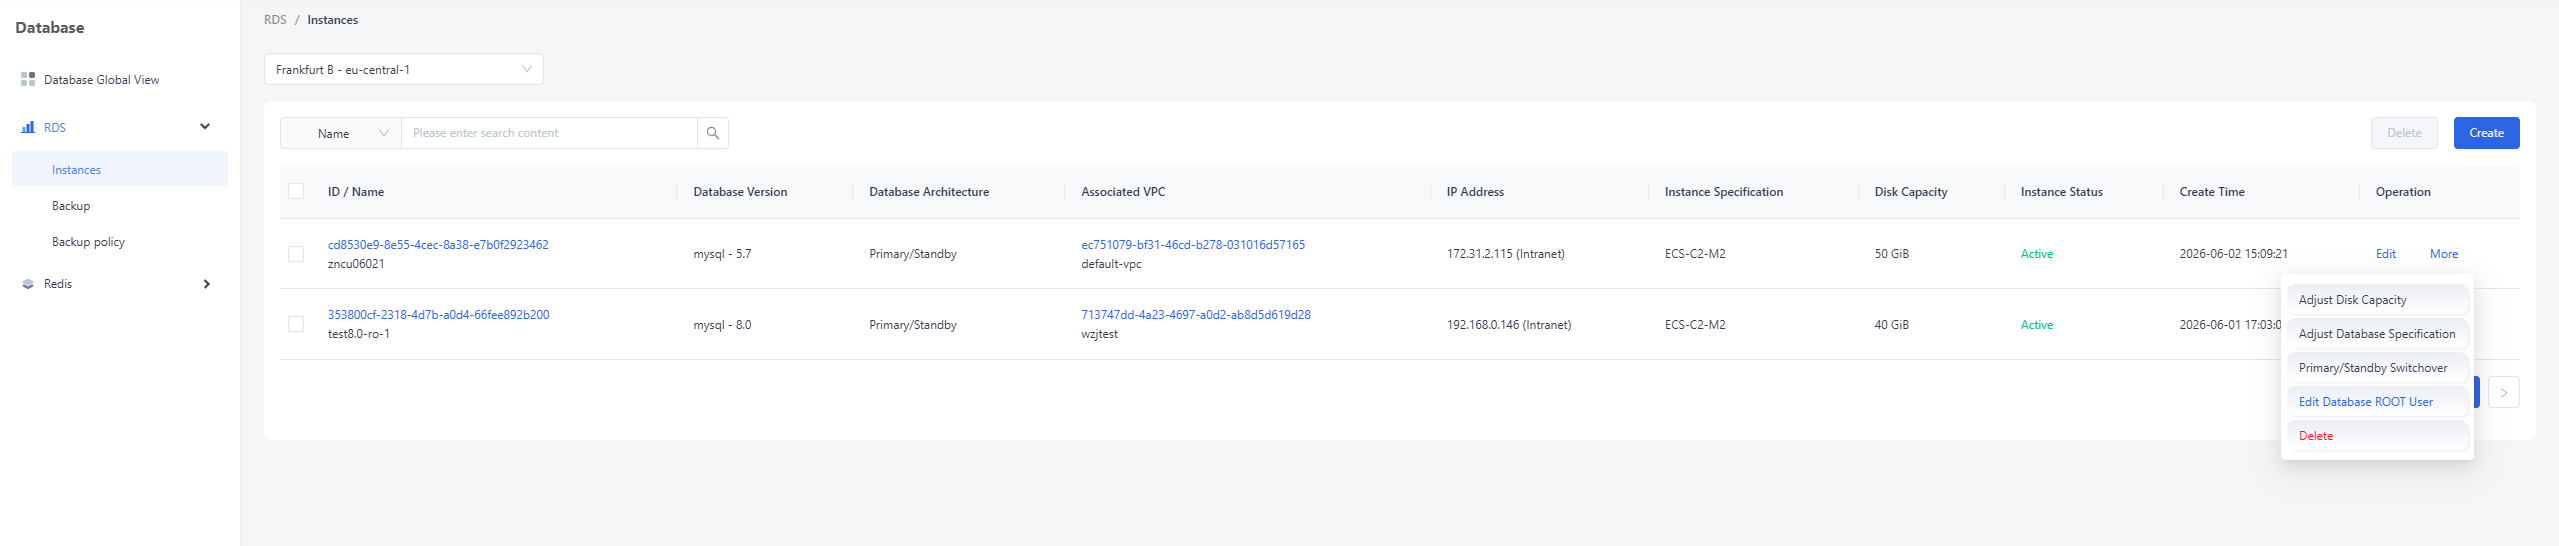
To enable the ROOT user: In the Database Instance list, click "More" next to the target instance and select "Edit Database ROOT User" to access the activation interface. This entry point can also be used to reset the ROOT password if it has been lost or compromised.
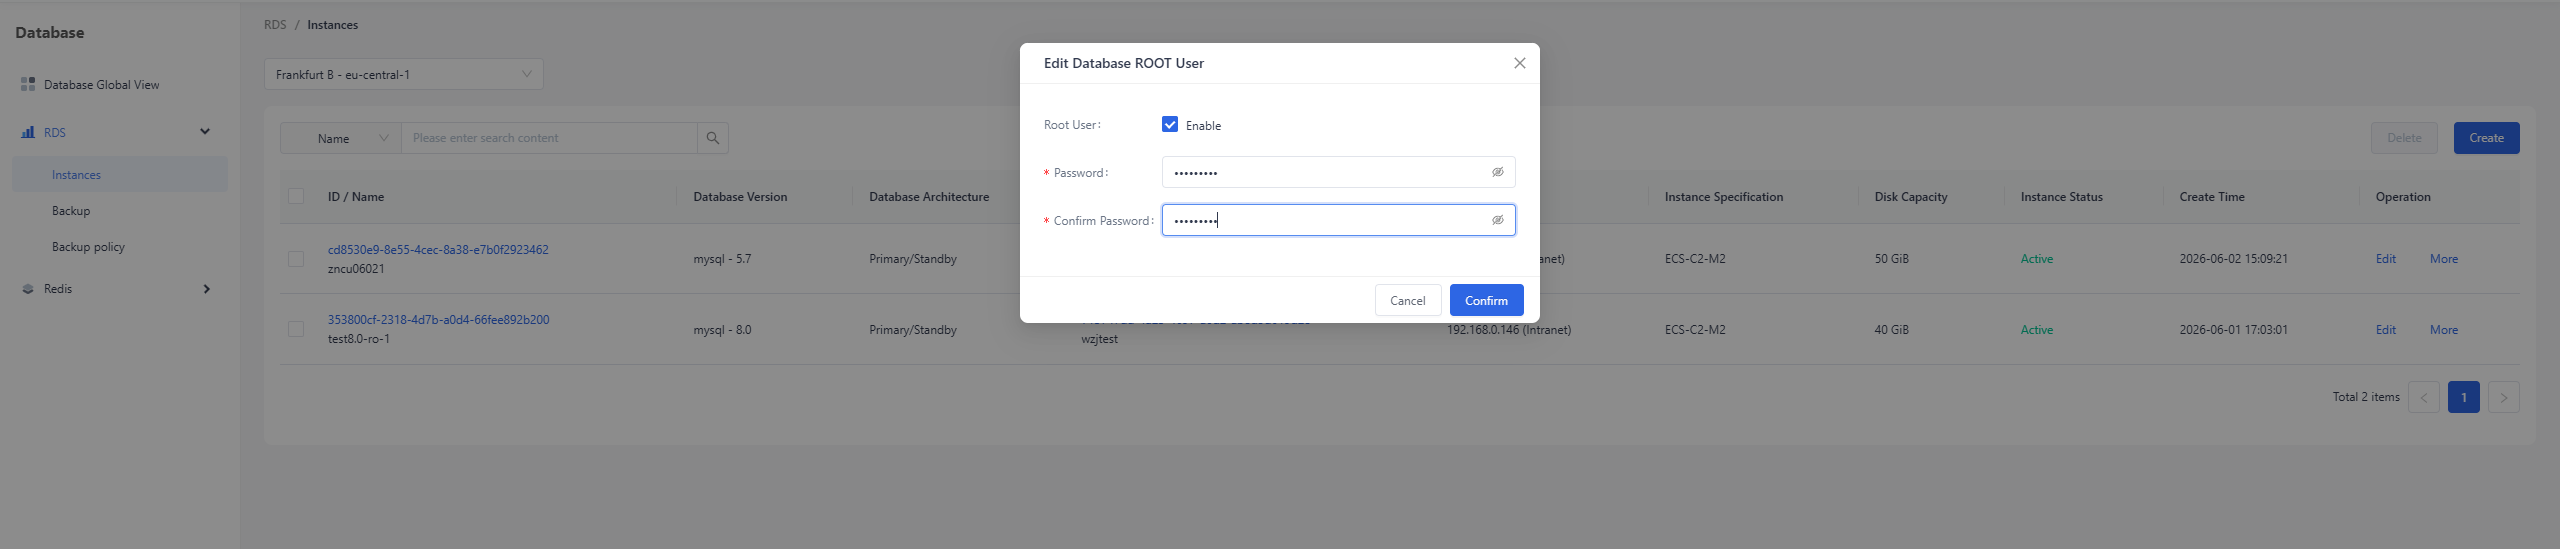
In the dialog box, check the "Enable" box and set the password for the ROOT user. Click "Confirm" to complete the activation.
Verifying Database Information as the ROOT User
Once the ROOT user is enabled, you can perform the following operations to verify the database instance details created by the database service.
Log in to the database as the ROOT user
mysql -hIP_ADDRESS -uUSER -pPASSWORD
Checking the MySQL Version
select version();
Viewing the Database List
show databases;
Checking Database Configurations
use DATABASE;
show variables like 'character_set_database';
show variables like 'collation_database';

Viewing the User List
select User from mysql.user;
Viewing User Privileges and Source Whitelists
select User,Host,Db from mysql.db;
Modifying Database Specifications
When the initial specifications selected during instance creation can no longer meet the demands of business growth, or if there is an excess of resources and you wish to downscale to optimize costs, you can adjust the database instance specifications as follows:
To adjust the specifications: In the Database Instance list, locate the target instance, click "More" on the right, and select "Adjust Database Specification" to enter the modification page.

In the dialog box that appears, select the appropriate CPU and Memory configurations based on your business requirements, then click "Confirm" to apply the changes.
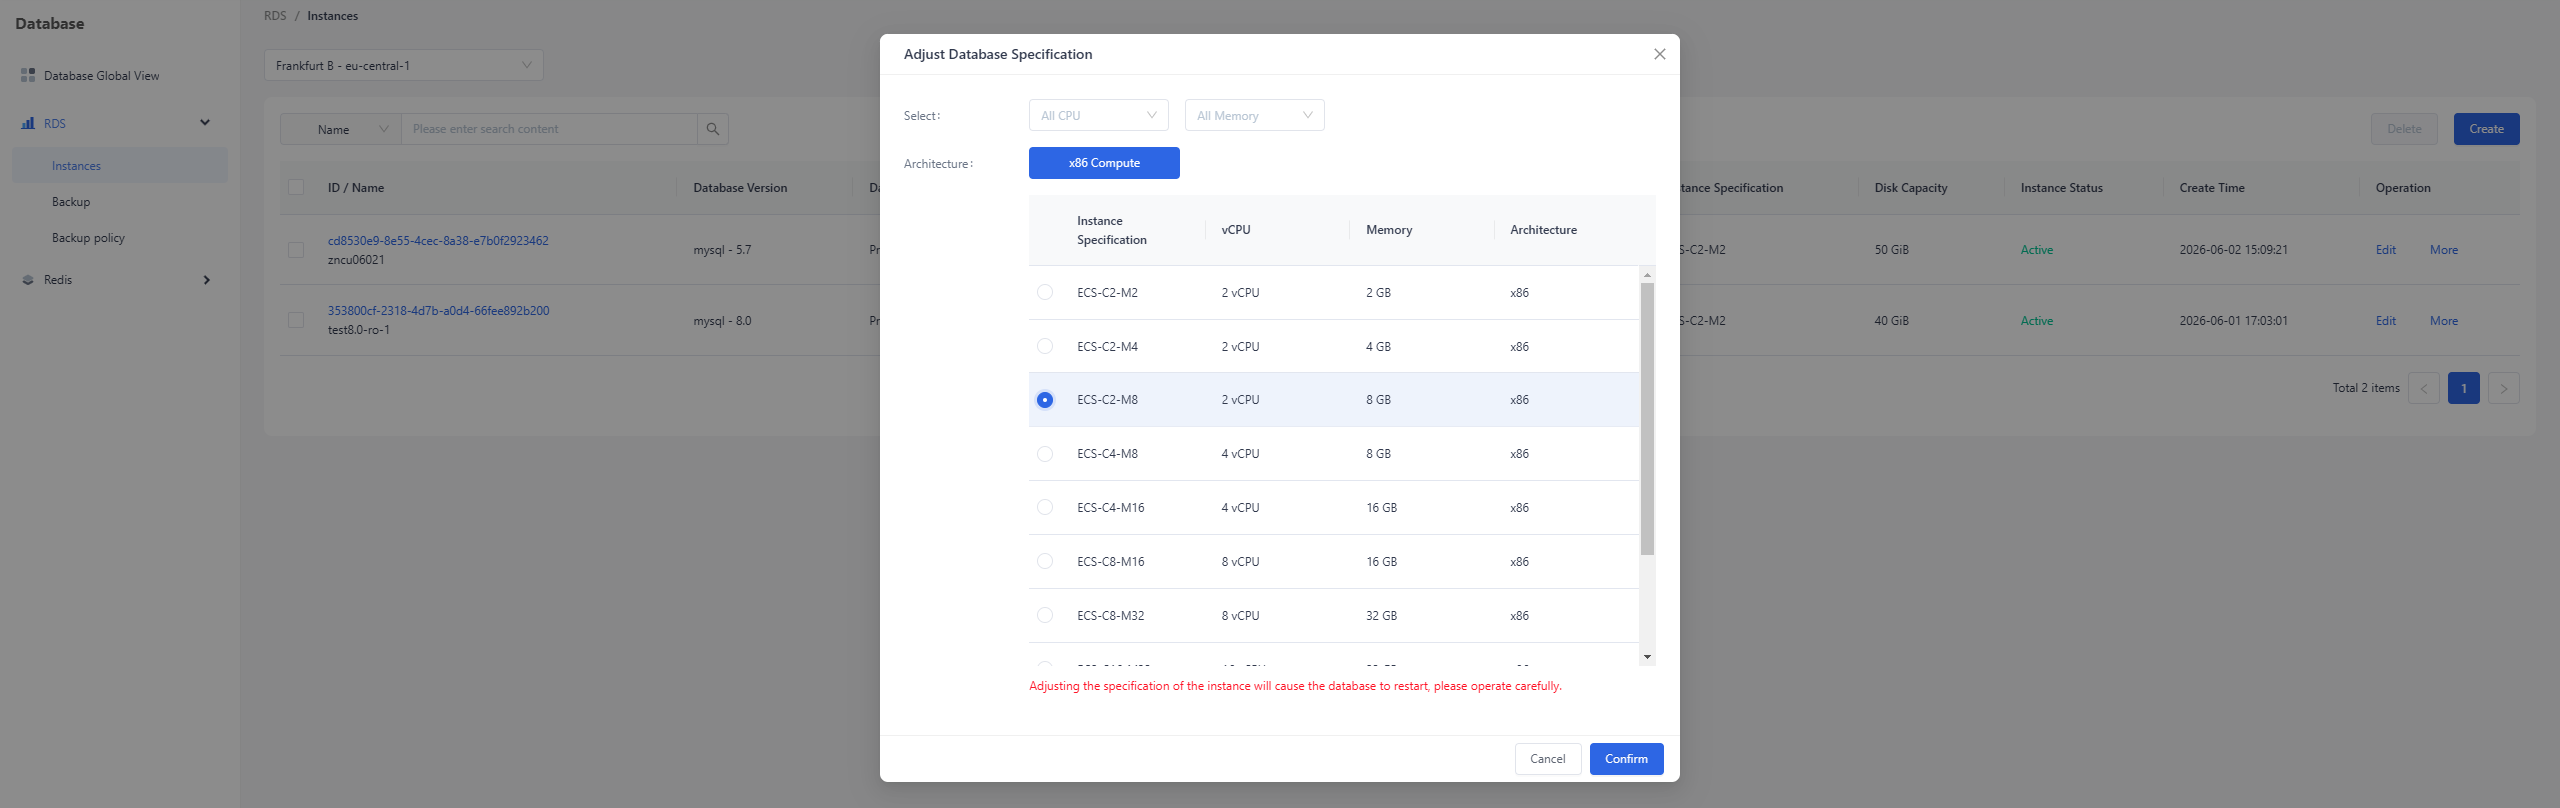
Upon successful modification, the "Instance Specification" column in the Database Instance list will display the updated specifications.
Database Storage Expansion
When the storage capacity configured during the creation of a database instance is no longer sufficient to accommodate the data growth driven by business expansion, you can increase the storage capacity using the following method.
To expand storage: In the Database Instance list, locate the target instance, click "More" on the right, and select "Adjust Disk Capacity" to access the storage adjustment page.
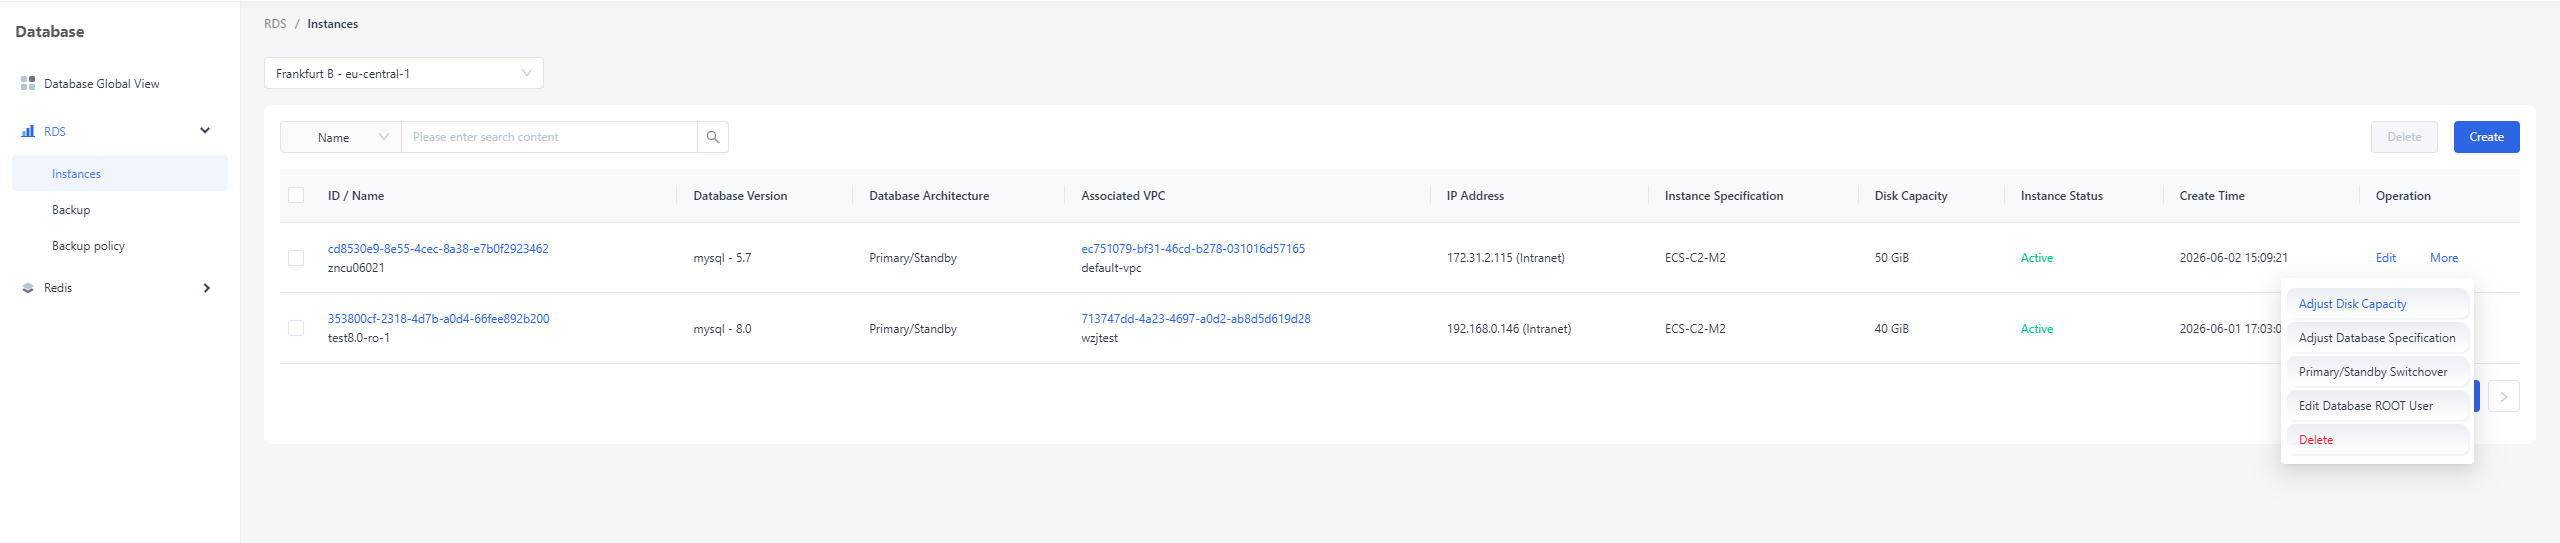
In the dialog box that appears, increase the storage capacity of the database instance based on your actual business requirements, then click "Confirm" to apply the changes.

Upon successful modification, the "Disk Capacity" column in the Database Instance list will display the updated storage capacity.
FAQs
Database Character Sets and Collations
1. CHARACTER SET
Usage: Defines the encoding method for data storage.
Description: A character set is a collection of characters and their corresponding binary encodings. It determines the range of characters (such as Chinese, English, Japanese, emojis, etc.) that the database can identify and store.
2. COLLATION
Usage: Defines the logic for string comparison and sorting.
Description: A single character set can support multiple collations. Collation determines how the system evaluates the equality or magnitude of characters when performing ORDER BY operations, WHERE clause filtering, or general string comparisons.
For detailed information on MySQL 8.0 character sets and collations, please refer to: https://dev.mysql.com/doc/refman/8.0/en/charset-mysql.html
For detailed information on MySQL 5.7 character sets and collations, please refer to: https://dev.mysql.com/doc/refman/5.7/en/charset-mysql.html
Understanding Database Statuses
The database service maintains two distinct types of status indicators: status and operating_status. These provide visibility into both the underlying infrastructure and the database engine itself.
status(Instance/Task Status): Reflects the condition of the backend virtualization resources and the progress of lifecycle tasks. This status indicates whether the Virtual Machine (VM) or container hosting the database is provisioned correctly or if a task (like resizing) is underway. Example: After successfully creating an instance, the status will be displayed asACTIVE;operating_status(Service Health Status): Indicates the actual runtime state of the database engine (e.g., MySQL) inside the instance. A Guest Agent residing within the virtualization resource actively monitors the database service and reports its health to the management platform. Example: When MySQL service is running normally,operating_statusshould beHEALTHY; if MySQL service is not running for some reason,operating_statuswill beSHUTDOWN.Status Values and Meanings:
Status values Meanings NEW The service has received the request to create the database instance. BUILD The database instance is currently being installed or built. ACTIVE The database instance has started and is running normally. REBOOT The database instance is currently restarting. RESIZE The database instance is adjusting its configuration specifications (e.g., CPU, memory, or disk size). RESTART_REQUIRED The database service requires a restart (typically required for configuration changes to take effect). SHUTDOWN The database instance is being shut down during the deletion process.
Need help? Contact our support team at support@edgenext.com.
Back to documentation home